darktable article lede image

tag: Blog

a new website

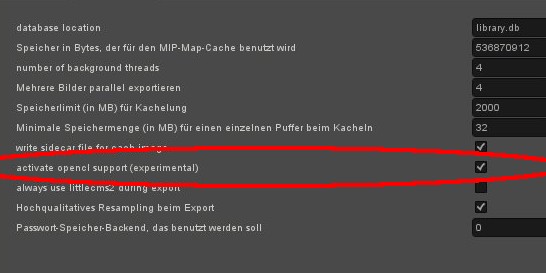
A new year is coming on us quickly, so how about a nice new website to go with it? Baby New Year from 110 years ago … houz and I have been working hard over the past few months to migrate the old website from Wordpress to a new static site, using Python/Pelican. This should make things more secure and safer for both you and us (see the problems that rawsamples.

local laplacian pyramids

improving contrast with the local laplacian filter sometimes difficult lighting situations arise which, when taking photographs, result in unappealing pictures. for instance very uniform lighting on a cloudy day may give dull results, while very contrasty illumination (such as back lit) may require to compress the contrast to embrace both highlights and shadows in the limited dynamic range of the output device. refer to the following two shots as examples:

rawsamples.ch replacement

Rawsamples.ch is a website with the goal to: …provide RAW-Files of nearly all available Digitalcameras mainly to software-developers. [sic] It was created by Jakob Rohrbach and had been running since March 2007, having amassed over 360 raw files in that time from various manufacturers and cameras. Unfortunately, back in 2016 the site was hit with an SQL-injection that ended up corrupting the database for the Joomla install that hosted the site.

Visualizing the raw (sensor) highlight clipping

Have you ever over-exposed your images? Have you ever noticed that your images look flat and dull after you apply negative exposure compensation? Even though the over/underexposed warning says there is no overexposure? Have you ever wondered what is going on? Read on. the problem First, why would you want to know which pixels are overexposed, clipped? Consider this image: … Why is the sky so white? Why is the image so flat and dull?

compressing dynamic range with exposure fusion

modern sensor capture an astonishing dynamic range, namely some sony sensors or canon with magic lantern’s dual iso feature. this is in a range where the image has to be processed carefully to display it in pleasing ways on a monitor, let alone the limited dynamic range of print media. example images use graduated density filter to brighten foreground using the graudated density iop works well in this case since the horizon here is more or less straight, so we can easily mask it out with a simple gradient in the graduated density module.

colour manipulation with the colour checker lut module

[update 2016/07/31: there was a section about intermediate export to csv and manually changing that file. this is no longer needed, exporting the style directly from darktable-chart is fine now.] motivation for raw photography there exist great presets for nice colour rendition: in-camera colour processing such as canon picture styles fuji film-emulation-like presets (provia velvia astia classic-chrome) pat david’s film emulation luts unfortunately these are eat-it-or-die canned styles or icc lut profiles.

Liquify, liquify?

Most modules in darktable are working on changing pixels color, lightness, etc. Few modules are moving pixels and when they do they are doing it in a very constraint way like to rotate, fix the lens’ distortions or remove spots. The liquify module offer more ways to move pixels around by applying some free style distortions to parts of the image. There is three tools to help doing that: point line curve Each tool is based on nodes.

Running on non-x86 platforms

For many years darktable would only run on x86 CPUs that also support at least SSE2. While that is nowadays almost everything looking like a PC it’s still limiting. Consequently Roman sat down and started work on dropping that hard requirement. While his work isn’t complete yet it’s definitely becoming useful. So with a little tweaking you can for example use the development versions on an ARM, like the Raspberry Pi.

A new module for automatic perspective correction

Since many years darktable offers a versatile tool for manual perspective correction in the crop & rotate module [1]. Although the principle is simple and straightforward, there are cases where it can prove difficult to get a convincing correction, especially if no distinct vertical or horizontal features can be spotted in the image. To overcome these limitations a new “perspective correction” module has just been added that is able to automatically correct for converging lines.

Why don't you provide a Windows build?

Due to the heated debate lately, a short foreword: We do not want to harass, insult or criticize anyone due to his or her choice of operating system. Still, from time to time we encounter comments from people accusing us of ignorance or even disrespect towards Windows users. If any of our statements can be interpreted such, we want to apologize for that – and once more give the full explanation of our lacking Windows support.

Introducing the darktable app store

Today we are happy to announce a big new feature that we will not only ship with the big 2.0 release later this year but also with our next point release, 1.6.4, which is due in about a week: even more darkroom modules! One of the big strengths of darktable has always been its varied selection of modules to tweak your image. However, that has also been one of the main points of criticism: too much, too many and too complicated to grasp.

Color Reconstruction

If you overexpose a photo with your digital camera you are in trouble. That’s what most photography related textbooks tell you – and it’s true. So you better pay close attention to your camera’s metering while shooting. However, what to do when the “bad thing” happened and you got this one non-repeatable shot, which is so absolutely brilliant, but unfortunately has some ugly signs of overexposure? In this blog article I’d like to summarize how darktable can help you to repair overexposed images as much as possible.

On Lens Detection and Correction

darktable (and some other projects, like for example ufraw) don’t do any real lens detection or correction by itself. We depend on two libraries which in most cases are provided by the Linux distribution you’re using. Lens Detection Many image files contain metadata about how the image was created. In case of digital camera images, a standard called Exif is used, this standard allows a camera to record many details about how an image was taken.

Luminosity Masks in darktable

Pat David has a great blog on photoediting in GIMP. I recently read his post on luminosity masks and was fairly impressed. Can darktable do something similar? Yes – they’re a special case of parametric masks. I thought I’d post a quick tutorial on luminosity masks using parametric masks. First, I strongly suggest you read Pat David’s post and thoroughly understand what’s going on. A quick and simplistic explanation follows: Normally, if we make a selection and, say, adjust the brightness dramatically in that selection, we get a sharp (and ugly) transition near the edge of the selection:

Using X-Trans cameras with darktable

There is now a development branch of darktable with experimental support for raw files from many recent Fujifilm cameras. These cameras include those with the X-Trans sensor (X-Pro1, X-E1, X20, X100S, X-M1, XQ1, X-E2, and X-T1), X-Series cameras with conventional sensors (X100, X10, X-S1, XF-1, X-A1), and some from Fujifilm’s other lines (S6000fd, E550, IS-1, S3Pro, S5Pro, S5600, E900, S2Pro, S5000, S5200, S5500, S6500fd, S9500, S9600, S9600fd). Previously, darktable would fail to read RAF-type raw files produced by these cameras.

Libre Graphics Meeting 2014 in Leipzig, Germany

Yes, it’s this time of the year again. The annual Libre Graphics Meeting is getting closer, and we, that is the whole developer community of your favorite free graphics applications, would like to ask you for your help. Some of you might remember our call for sponsoring from last year. Back then we asked for donations for specific people – a task that didn’t work out that well in the end.

Of Histograms and Waveforms

Figure 1: the gradient test image – download and play with it in darktable People using image editors or similar (raster) graphics editors are probably familiar with histograms. You also have them in almost all digital cameras. In darktable you can find it very prominently in the top right corner of darkroom mode, but also as a backdrop of modules like levels, tonecurve and similar. From a mathematical point of view they are a diagram displaying the amount of pixels in the image that have a specific colour, lightness, value or similar measure.

determining focus in lighttable

wouldn’t it be great if you could judge sharpness of your images in lighttable mode? this mode is limited to small and medium sized thumbnails of your images, so we can deliver the required speed to browse a lot of them. to tell whether or not you got the focus right during the shoot, we would like to look at the full resolution. the most you get out of lighttable mode will look like this:

about basecurves

the purpose of the basecurve is to make the otherwise scene-referred linear (linear raw rgb) color look good on your output devices. this is done independently of any color managed transforms which are also done in the pipeline, so we can establish a certain look independent of the devices. this will affect how highlights and shadows are balanced against each other, the overall contrast of the image, as well as color saturation.

Display color management in darktable

The general picture on the modern Linux desktop Modern Linux distros featuring either GNOME, Unity or KDE offer fairly easy configuration of color management, this system level configuration mostly pertains to the handling of an ICC display profile. If you have set a display profile via your system configuration tool (The Color applet in System Settings for GNOME or Unity), there are a few things to keep in mind. An ICC display profile consists of two main parts.

masks

In darktable, selective editing was a long awaited feature. Our development version now allow limiting module effects to a region of the image. Remember the old times, the red light of the darkroom, the smell of the developing bath … Remember when you were using your hands or a small piece of cardboard to achieve some masking … Now you can do that in darktable. example let take this photo as an example.

Color Mapping

I’d like to give a few words on a new module named “color mapping” that is currently under development in our master branch. This module is a rework and enhancement of the older “color transfer” module. That older module had several issues which made a migration impossible. So we leave the old one behind as deprecated (old history stack still work as before) and for all new history stacks “color mapping” should be used instead.

multi-instances

One of the upcoming new feature in darktable is the ability to use the same development module several times. By applying the same module multiple times and combining them with blendif it is possible to do some effects that could not be achieved previously without using external tools like the gimp. Modules that can be instantiated multiple times have a new icon in their header, next to the “reset” button. Clicking that icon will open a pop-up menu that allows you to create a new instance of the module, change the order in which the different instances are applied, or delete an instance of the module.

Importing Lightroom Development

One of the most time consuming work for any photographer is probably the development process. Lot of time behind a computer screen to adjust the curves, the contrast, the colors, the sharpness… All these are application specific, that is, the development process done with Lightroom is not compatible with AfterShot Pro or darktable (to name just few raw processing softwares around). This makes it really difficult to move from one software to another.

profiling sensor and photon noise

… and how to get rid of it. [update 02/05/2018 The information how to create camera noise profiles is outdated please read this tutorial instead!] [update 20/12/2012: ‘how to profile your camera’ includes instructions with the new gen-profile script] [update 15/12/2012: no more recompile needed, updated the instructions in the benchmark section and how to run make.sh.] to summarize the current situation in dt: we have a lot of cool tools wrapped around great algorithms with almost all the knobs you need to get perfect results.

What's involved with adding support for new cameras

Update: Some of the information on this page is oudated. See the github wiki page on camera support for up-to-date instructions. Say you’re running darktable, you’ve just bought a brand spanking new camera and it’s not supported yet by darktable. Here is a list of things that need to be done (typically we’d recommend to check this before actually buying anything, often you’ll be able to find sample raw files online):

Process HDR images using darktable.

Introduction This blog post will go through a simple workflow when working with high dynamic ranged images using darktable and the modules for processing, you need use darktable 1.1RC for this guide. The example image used in the screenshots can be downloaded at following link: AtriumMorning How to make an HDR image I’m not going into details of the process of making an HDR image, there are many guides out there describing manual methods or automatic ones which some cameras have, but basically, take a bracket shot of your scene and import them into darktable and do no processing at all, export to 16bit tiff and import the tiff files into luminance hdr where you use its align and merge HDR functionality, when HDR is merged and cooked just save the image as EXR image format which you load into darktable for further processing.

edge aware image development

in an ideal world, an image is piecewise smooth. it has soft gradients, some detail and edges. in particular there’s no noise and the edges are sharp. given these assumptions, you can do a lot of cool things to your pictures, using techniques like frequency space editing, wavelets, or local histograms. darktable’s equalizer module demonstrates some of this, using the wavelet approach. you can use it to sharpen and denoise, enhance or attenuate certain frequencies in your image, while keeping the edges intact.

Bringing current darktable to OS X

darktable has been software of my choice for raw photo development for quite some time now, I’ve occasionally submitted bug reports and patches and kept an eye on current development by using git master version. My main operating system is Linux, which is the priority target of darktable support, but recently I bought MacBook Air to take with me on trips and such. Also my current project at work consists of porting a library to OS X, so this presented to me as a great opportunity to contribute to one of my favorite open-source projects and make darktable work reliably on Macs.

Some enhancements to conditional blending

Conditional blending, also known as “blend if”, is a feature which is currently under development in our master branch. A general description of the idea together with some examples can be found here. In short, conditional blending allows you to limit the effect of a module to certain pixels of an image, determined by their color coordinates. For modules in Lab space, you can restrict the effect of a module depending on the pixel’s L, a, and b value.

magenta highlights

false color highlights seem to be an issue frequently, so here’s some quick faq about it. alexandre, please excuse all the outward references ;) why are my highlights magenta? that’s how the sensor works. it collects a couple of photons, at some point it fills up and rejects to deliver any more useful information past this point. unfortunately that doesn’t happen at the same time for all color channels. how does the sensor work?

Exporting images on the command line

Recent builds from git will bring you a new executable, “darktable-cli”. With this tool you can export images using the processing power of darktable on the command line. The simplest way to call the utility is darktable-cli <input> <output> This will take the input image, look for the XMP file associated with it, process it at maximal resolution and write the output to output, trying to guess the output format from the output filename.

Community contributions to the project

We heard quite some voices from users requesting better possibilities to contribute to the project. Here they are. In our dev meeting (or if you had a closer look: even before) we decided to ditch the old bug tracker in favor for a new one: Redmine, hosted by PolarFox, just on the same server as our website lives. This comes with some long-wanted features – and more liberty in configuration.

Upcoming features: New interpolation modes and better resize

darktable is all about providing you the best tools in order to get the most out of your photographies. This blog entry will explain how an existing feature can help you get more detailed exports and it will try to give you a glimpse of what is cooking in an unscheduled but upcoming version of darktable for even better detail preservation. Make sure to enable High Quality Resampling for exporting your photographies In darktable, the pixel pipeline is responsible for processing your photography from demosaic up to the point it is passed over to the output subsystem (saving in tiff, jpeg…).

Live view

For quite some time darktable supports tethering your camera. What was missing all the time was live view. This is about to change though. If you use master (and have a camera supporting it) you can now either use the eye button in the “camera settings” module or hit ‘v’ on your keyboard to start live view from within tethering mode. Since the preview is scaled to fit your screen it might be a good idea to hide some of the side panels.

darktable and Solaris: It Just Works™ ... and there are some nifty benefits too

I’m the self-appointed maintainer of darktable on Solaris, which is a fairly easy gig to keep on top of. Here’s why that is so: darktable’s codebase is very portable. It’s not riddled with operating system-specific assumptions; it uses standard C (with some C++), and apart from the OpenCL support every prerequisite library is buildable on Solaris with gcc or g++. I’d prefer to use Oracle Solaris Studio because that’s my work compiler, but there’s no great incentive for me to beat up on all the prerequisites to make them behave.

darktable and Memory

or “How to drive away the evil skull” At all times main memory was one of the most limited resources in computing. Although from 20 years to now the memory setup of a typical desktop PC has increased by a factor of several thousands (from less than a megabyte to a few gigabytes), we still need to consider how to efficiently handle that resource. The reason of course lies in the increasing demands of modern applications.

color correction

this is one of the oldest modules in darktable. it appeared to me that it probably lacks an example to discover how useful it can be … so here goes the example. this started off to be a wrapper around the gegl:whitebalance operation, which works in Lab color space and is able to give dark and bright colors a different color tint, interpolating between the two for mid tones. so suppose you have the following image:

Upcoming features: Conditional Blending

or “If one slider is not enough” Diligent readers of our small blog series are already aware of the blending feature that darktable offers as part of many modules. Instead of just handing over their result to the subsequent module in pixelpipe, “blending modules” take a moment to reconsider. Based on the blend setting they will take their original output together with their input and do a re-processing. As an example refer to here, where we took blend mode “overlay” with module “lowpass” to do shadow recovery.

darktable and OpenCL (updated)

Many readers will have already heard about GPU processing and the fact that darktable can make use of OpenCL to improve performance. As we still lack a detailed documentation of that topic, please find here a few explanations and howtos. The Background Processing high resolution images belongs to the more demanding tasks in modern computing. Both, in terms of memory requirements and in terms of CPU power, getting the best out of a typical 15, 20 or 25 Megapixel image can quickly bring your computer to its limits.

Shadow recovery revisited

One of the remaining shortcomings of digital cameras is their rather low dynamic range in comparison to analog – especially black-and-white – film. Scenes with strong differences between highlights and shadows are very difficult to capture. Even if they are exposed properly with no blown-out highlights they will too often only give acceptable results after extensive post-processing. Fortunately, darktable is progressing with a high pace. Some days ago I wrote an article on how to recover shadows with a technique using lowpass filter plus blend mode (" Using lowpass filter to recover shadows ").

Using lowpass filter to recover shadows

Outdoor photographers are often confronted with unfavorable light conditions. This often entails too high contrast. Two of the most frequent consequences are blown highlights and deep shadows in your digital images. Overexposed highlights are challenging to repair in digital post post-processing, still darktable offers a decent set of valuable tools as long as you take your pictures in raw (see Jo’s blog post “ why you want raw ”). Fortunately, it’s much easier to take care of the deep shadows.

Mastering color with Lab tone curves

or “How to bring the jungle back” Since its early beginnings darktable has a tone curve module that is able to alter the gray level distribution of an image. Recently we did an enhancement: tone curve is now able to control the full Lab color space with separate curves for the L, a and b channel. People who are used to curve tools in RGB, at first might get puzzled over the results of these three curves; they show marked differences to the typical RGB curve.

why you want raw

or: how to rescue your shot after the fact. also: how to use color zones for black and white. sometimes i’m surprised by what kind of data is hidden in my raw images, and i want to pass this on to those of our users who happily take pictures in jpg. actually it’s just a short story about a typical communication problem between me and my camera and the way darktable moderates that, after the fact.

darktable and research

you might have noticed our equalizer tool, and been confused by it and the many controls. that’s probably partly because you didn’t see a similar thing before, we had to develop it first. very short history behind the ui is a powerful frequency domain processing technique, based on wavelets. the most commonly used wavelets are based on the lifting scheme [swe97], work in a data-independent way, and are decimated (i.e. the coarse coefficients are much more sparse than the fine ones).

different kind of saturation

different kind of saturation there are many different ways of tuning saturation, darktable does offer a few alternative ways to alter saturation and the reason for this post is to clarify what they do and how they work. the image on left is the original untouched image used for the different examples below, use it as a reference for comparing the results of the different kind of saturation described below, the resulting effects is exaggerated to make it easier to spot the differences.

a new caching backend

since i probably tend to make this more technical than any reader would like to, here’s the take home message: much faster import of folders much faster thumbnail creation for first-time images much improved scalability wrt concurrency much improved scalability wrt total number of images in your database (should be good up to around 500 million images) much improved robustness (no more deleting ~/.cache/darktable/mipmaps all the time, yay) some context: darktable’s light table mode shows you your image collection in arbitrary order and filtered by arbitrary queries to the underlying database.