
Outdoor photographers are often confronted with unfavorable light conditions. This often entails too high contrast. Two of the most frequent consequences are blown highlights and deep shadows in your digital images. Overexposed highlights are challenging to repair in digital post post-processing, still darktable offers a decent set of valuable tools as long as you take your pictures in raw (see Jo’s blog post “ why you want raw ”). Fortunately, it’s much easier to take care of the deep shadows.
When talking about deep shadows I not only refer to almost pitch black parts of the image. Even if an important part of the picture is considerably too dark, the photo will miss to catch the interest of the viewer. So it’s worth a try to recover shadows in many cases.
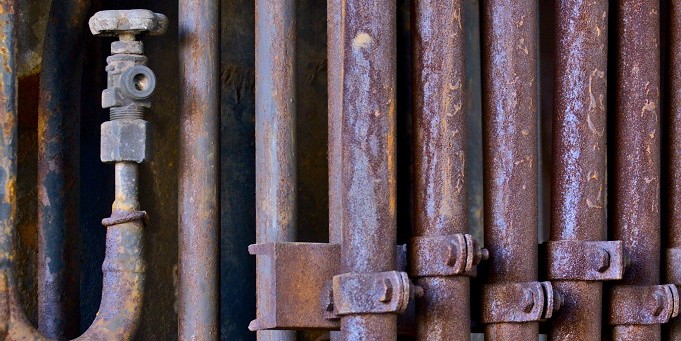
Let’s have a look at an example. Here is a detail photo taken at a retired blast furnace in Duisburg, Germany. Although the light was soft that day and the overall contrast was not very harsh, I am missing something. Somehow the more retracted parts of the structure obviously got too less light and are hiding a bit in the (not overly) dark shadows. So shadow recovery could make sense here.

A simplistic way to recover shadows would use the “tone curve” module and apply an inverse S-curve to the L-channel. This does the job for the shadows but sacrifices contrast in the higher tones, often leaving the image flat and unappealing.
A better suited technique makes use of blend modes. It is especially a blend mode called “overlay” that comes in place.
A few words about how darktable’s blend modes work in general. Image processing in darktable consists of a consecution of filters, called modules. They are processed in a pre-defined sequence. Each filter/module will take the output of the previous filter as its input and generate a newly processed image as its output. Now in addition many of our modules allow activating blend mode operations (click checkbox at the end of the module parameters). darktable will then take the input of the module and its output and re-process those two depending on the selected blend mode and opacity, before giving the final result to the next module. Think of it as a doublet of image layers, the input image is the underlying layer and the processed image is the upper layer. If opacity is zero, it’s like the module has no effect at all; output of the module is identical to the underlying original layer. If opacity is set to 100%, you get the maximum effect of mixing the two layers with the selected blend mode.
Blend mode “overlay” is able to darken or lighten the underlying layer based on the upper layer. In places where the upper layer is of a middle gray tone, it has no effect. Where the upper layer shows a darker gray, the original image will be darkened, where it is of a lighter gray, the original image will be lightened.
A naïve approach to recover shadows would be: take a de-saturated and inverted upper layer over the original image and apply it with module “overlay”. However and surprisingly, this fails completely (you might try it for yourself). What we need additionally is a strong blurring of the upper layer. That blurring will only affect the transition areas between image parts where we do lightening and darkening. It will not have any deteriorating effect on the sharpness of the image!
How do you get a layer with this strong blur? That’s what module “lowpass” in the effects group is for. It allows giving a Gaussian blur to an image with a speed-efficient algorithm. You control the extent of blur with parameter “radius”, the higher “radius” the stronger the blur. In addition two further parameters are offered: “contrast” allows a gradual move from a positive (+1) to a negative (-1), i.e. inverted image (the latter is what we need here). Parameter “saturation” controls color saturation: +1 means unaltered, 0 means completely de-saturated, -1 means inverted colors. You can even go beyond +/- 1 to over-saturate the image. For the purpose of shadow recovery you would start with:
Radius = 50
Contrast = -1
Saturation = 0
Applying the above parameters to darktable will give the following intermediate result:

Not very useful in itself, but let’s now activate blend mode “overlay” and play with the opacity slider. I felt than an opacity value of about 90% is best suited in my case.

Here is the result after shadow recovery:

The image shows much more detail in areas that were somehow weak and unappealing in the original image. Sometimes you might observe halo-effects if edges have a high tonal contrast. In that case try to reduce the blur radius a bit.
To give the photo its final snap, I added some additional contrast via an S-like L-curve and some color contrast in the blues and yellows via a steep S-like b-curve (see blog post “ Mastering color with Lab tone curves ”).

Increasing tonal contrast with the L-curve sacrifices some of the previously recovered shadows, but in the end it gives a more convincing overall result.
Here is the final output:

If you like, you may play around with module “lowpass”. You could try different combinations of lowpass parameters (radius, contrast, saturation) with different blend modes and opacity values. Many combinations will give interesting and reasonable – albeit difficult to predict – effects to an image.


Happy to see darktable growing at a good pace...
One suggestion: The seventh paragraph should say "Blend mode “overlay” is able to..." not "opacity".
Keep this going.