
In other languages: Français, Deutsch. Italiano.
For the first time in its history, darktable breaks its one year release cycle by releasing version 3.2 in August of 2020. The unfortunate state of global health has led to a marked increase in contributions and improvements. On top of that, version 3.4 is still scheduled for Christmas 2020. 2020 will therefore be the first year in which the darktable team will have the pleasure to offer you two major versions. If you need a refresher course on version 3.0 features see the 3.0 article.
Due to last minute bug fixes, darktable 3.2 will begin directly with a 3.2.1 release.
A refined interface, down to the last details
The darktable team has fine-tuned the interface minutely, for a more professional look. Several developers have worked hard to bring you a neat interface, starting with a complete rewrite of lighttable, which is also complemented by nice performance improvements. CSS themes now have more precise classes and more inline comments, making it easier for you to control the look and feel of darktable. The CSS work also increased consistency between themes and for items in the interface, for example: check boxes were not exactly the same before version 3.2.
Interface improvements are huge, some of which are detailed below, such as the overhaul of the preferences, dynamic buttons or tooltips, and the biggest piece, the in-depth redesign of lighttable.
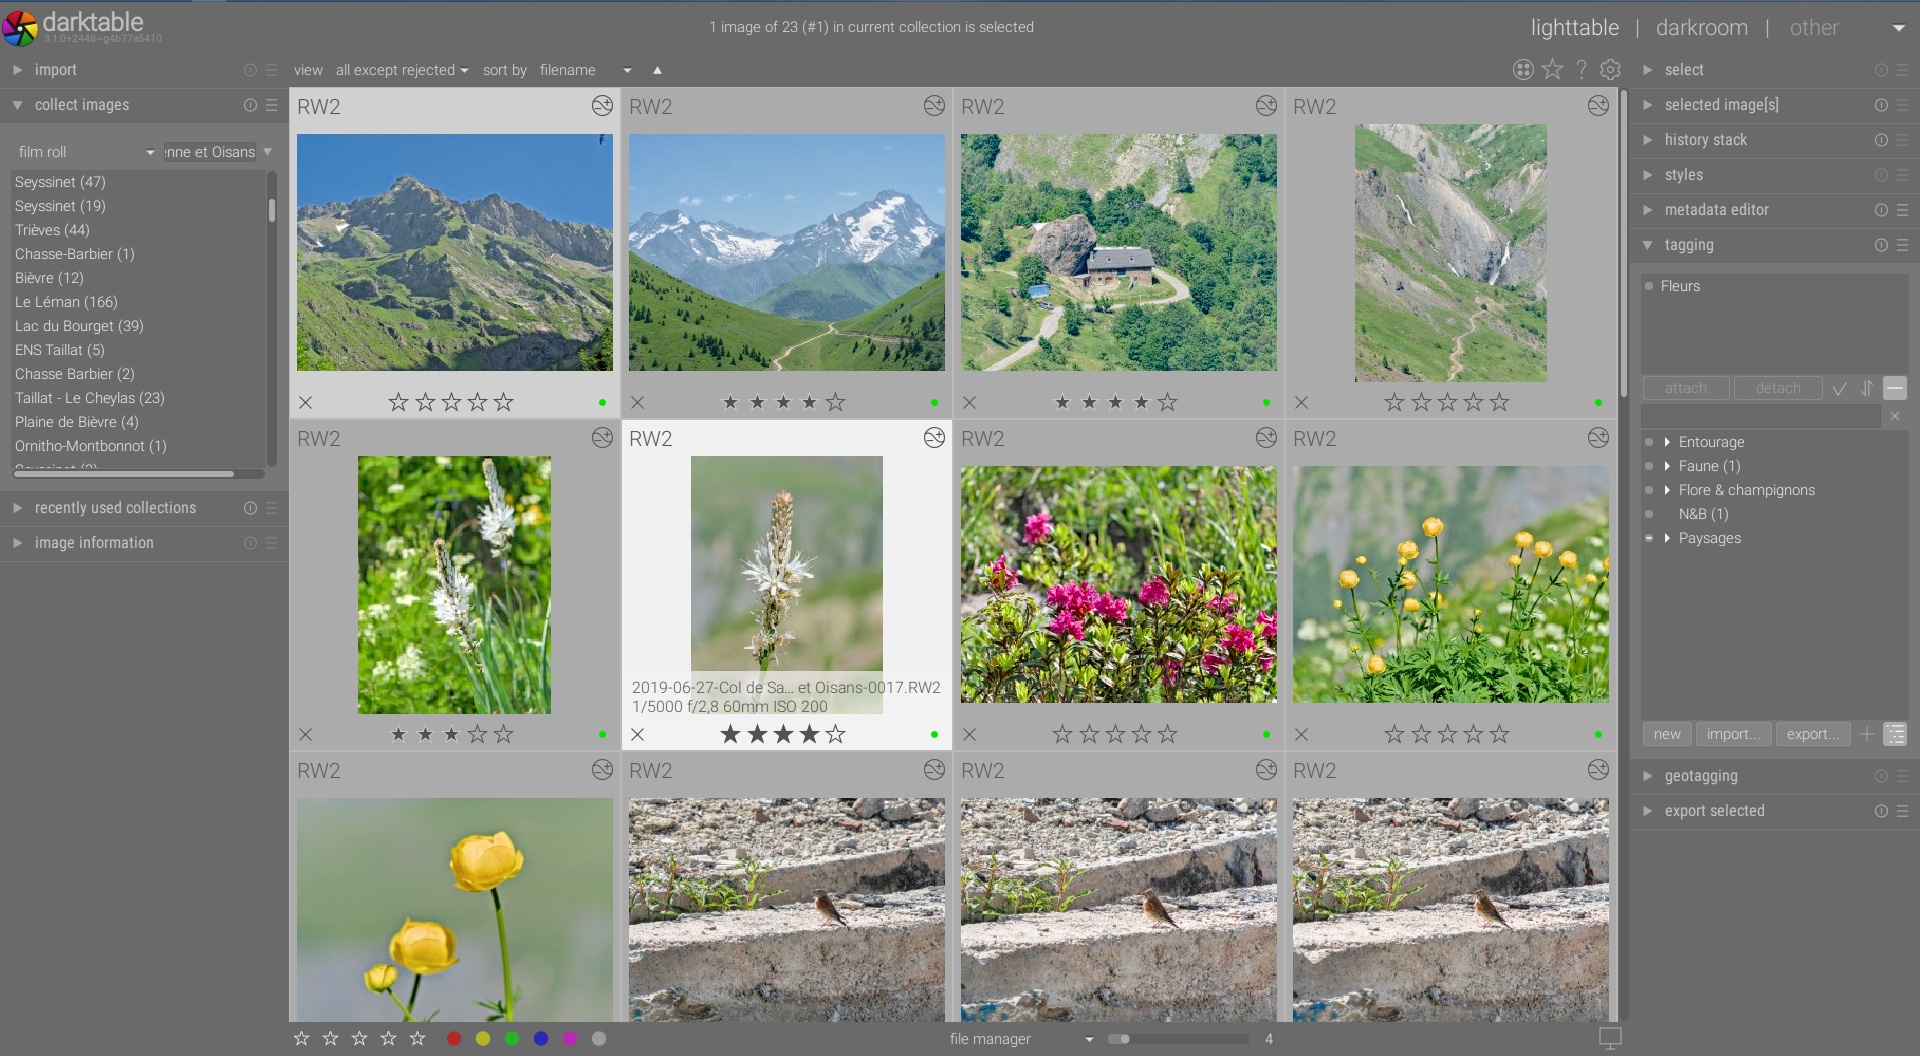
Lighttable : a major overhaul
The lighttable has evolved the most since the last release. Thanks to the hard work of AlicVB (Aldric Renaudin), lighttable is far more efficient. The display speed is notable, particularly when using the zoomable lighttable mode and on slightly older configurations. The filmstrip also benefits from a redesign and performance enhancements.
In this article, for the sake of simplicity, the overhaul of lighttable includes all the modes related to lighttable, i.e. zoomable lighttable mode, file browser, culling mode and preview. All these parts are now ready for use with up to 8k screen resolutions.
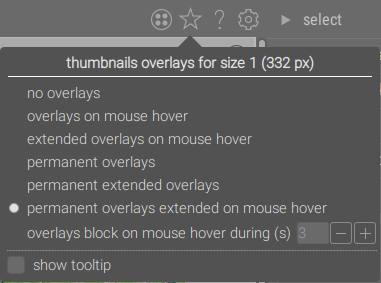
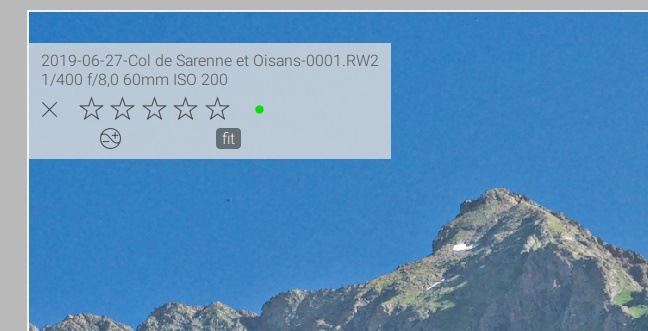
Aldric also adds new overlays modes on thumbnails, applicable independently in each of the existing modes (zoomable lighttable, file browser, culling, preview and filmstrip). Clicking on the star icon at the top right, you will discover a new popover menu that contains these new thumbnail display options (stars, group icon, altered icon, color labels, and information). If that level of verbosity is not for you, there is a minimalist mode (“no overlays”). An option allows you to display or not display thumbnail tooltip on hover. The content of those tooltips can be customized in preferences.
Warning : leaving the field that manages this content empty in the preferences will not display anything, whichever option is selected in menu below.
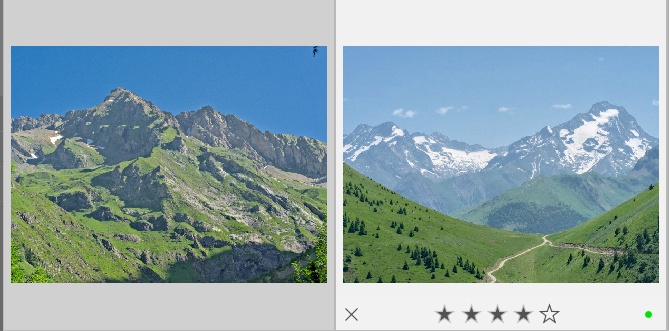
Here is an overview of some modes, starting with a fine-tuned overview of the interface, in overlay mode number n° 6 (selected line above). This mode permanently displays some information and the extended ones (here the image file name and main info) when hovering the mouse. Note that the extended information displayed can also be set in the preferences (lighttable tab).
The first two modes are quite similar. By default, they display no information, except the image. Only the second mode will display some information on mouse hover. See below:
The most detailed mode by defaut for thumbnails is the fifth (permanent extended overlays mode) and renders as follows:
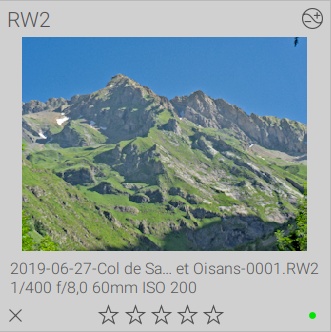
Finally, the seventh mode is designed to be coupled with the culling and preview modes (and so it’s the default overlay for those modes). This mode allows you to customize the display time. Now, this new mode also allows you to display the zoom level of the image, when the cursor hovers the image (3s by default, could be set to -1 for a permanent display), in both culling and preview modes.
Explore the other modes for yourself!
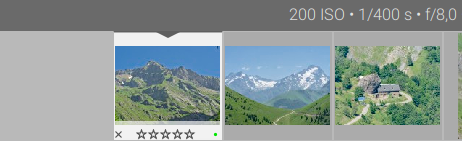
The filmstrip (display it with Ctrl + F) can also display customized metadata in the same manner. To customize the filmstrip metadata, use the star icon. The display of selected images in the filmstrip (or of the selected images in culling view) is better. The display and selection was rather confusing. Now, the selection UX is better:
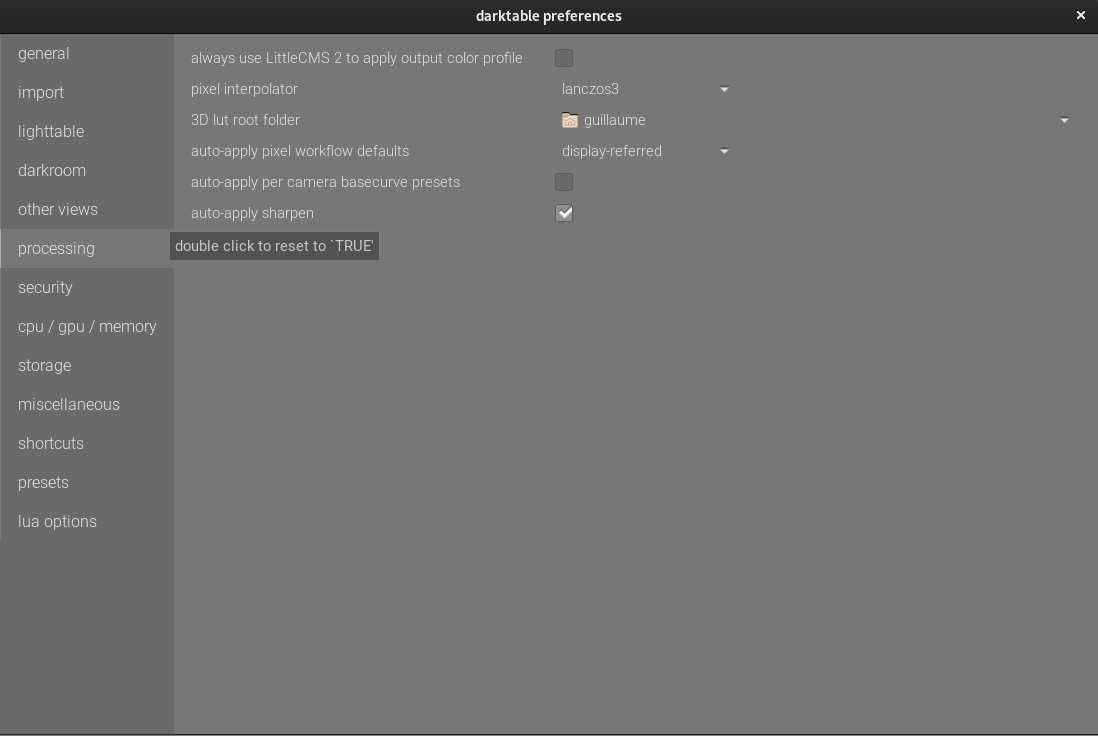
Redesigning preferences: improved organization
With the introduction of new features since 3.0, the preferences have been reorganized, increasing the number of tabs to provide greater readability. One of the objectives was also to avoid long scrolling to access an option. Thus, each tab doesn’t take up more than one page (except presets tab). Each tab also has a name that clearly describes the options that can be set there.
Since screenshots shows this better, here are two examples of preferences tabs:
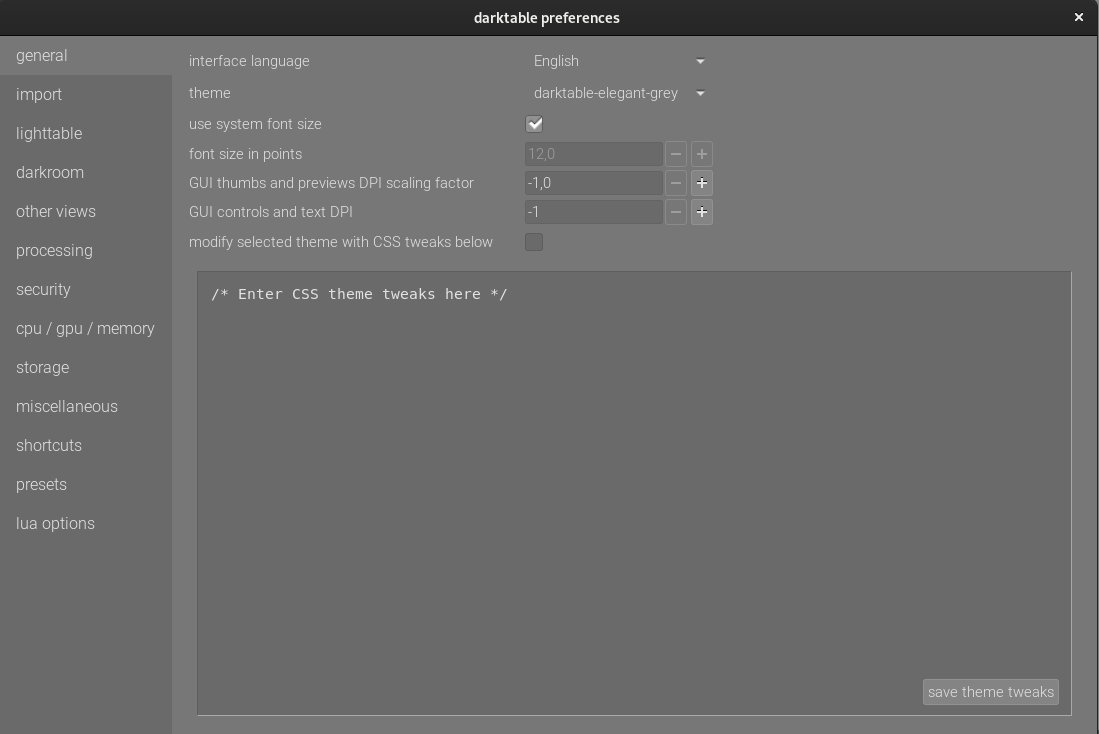
As you can see, some new display options have also appeared. It is now possible either to use a system font (or font size if you use an elegant theme) or to customize the font size and scaling for high resolution screens directly from darktable. An option that has been requested for quite a while is finally here!
Other options also allow you to refine the size of all interface elements. Be careful to maintain reasonable values for the DPI options, the default options remain recommended for the majority of users.
Finally, elstoc (Chris Elston) added the option to customize the entire interface by adding your own CSS, as you can see on the screen capture above.
Another example of this overhaul:
Dynamic buttons: personalize your actions
And darktable became “alive” !
New dynamic buttons have been integrated, for a better user experience. This feature enables or disables buttons, depending on whether they’re usable or not in the current context. For example, select an image, open the development module, then click on copy. As long as image stays selected, paste is not usable (no point in pasting the development of an image on itself). Select another image, then paste button becomes clickable.
More details
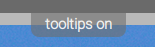
Improved tooltips
Tooltips sometimes have the disadvantage of being displayed where you don’t want them to be. Unfortunately, this problem can’t be fixed by the darktable team since it’s an inherent flaw in GTK+ (the GUI library used by darktable). To get around this as much as possible, the darktable team has integrated two things (after long debates):
- the possibility to show/hide tooltips at any moment with a simple shortcut:
Shift+T - a (slightly) improved display of tooltips.
A new type of tooltip, universal toast message, is used mainly on the darkroom. This appears at the top of the image and makes some essential information visible, like the mask opacity value or exposure change. Showing or hiding tooltips is also confirmed by a toast message.
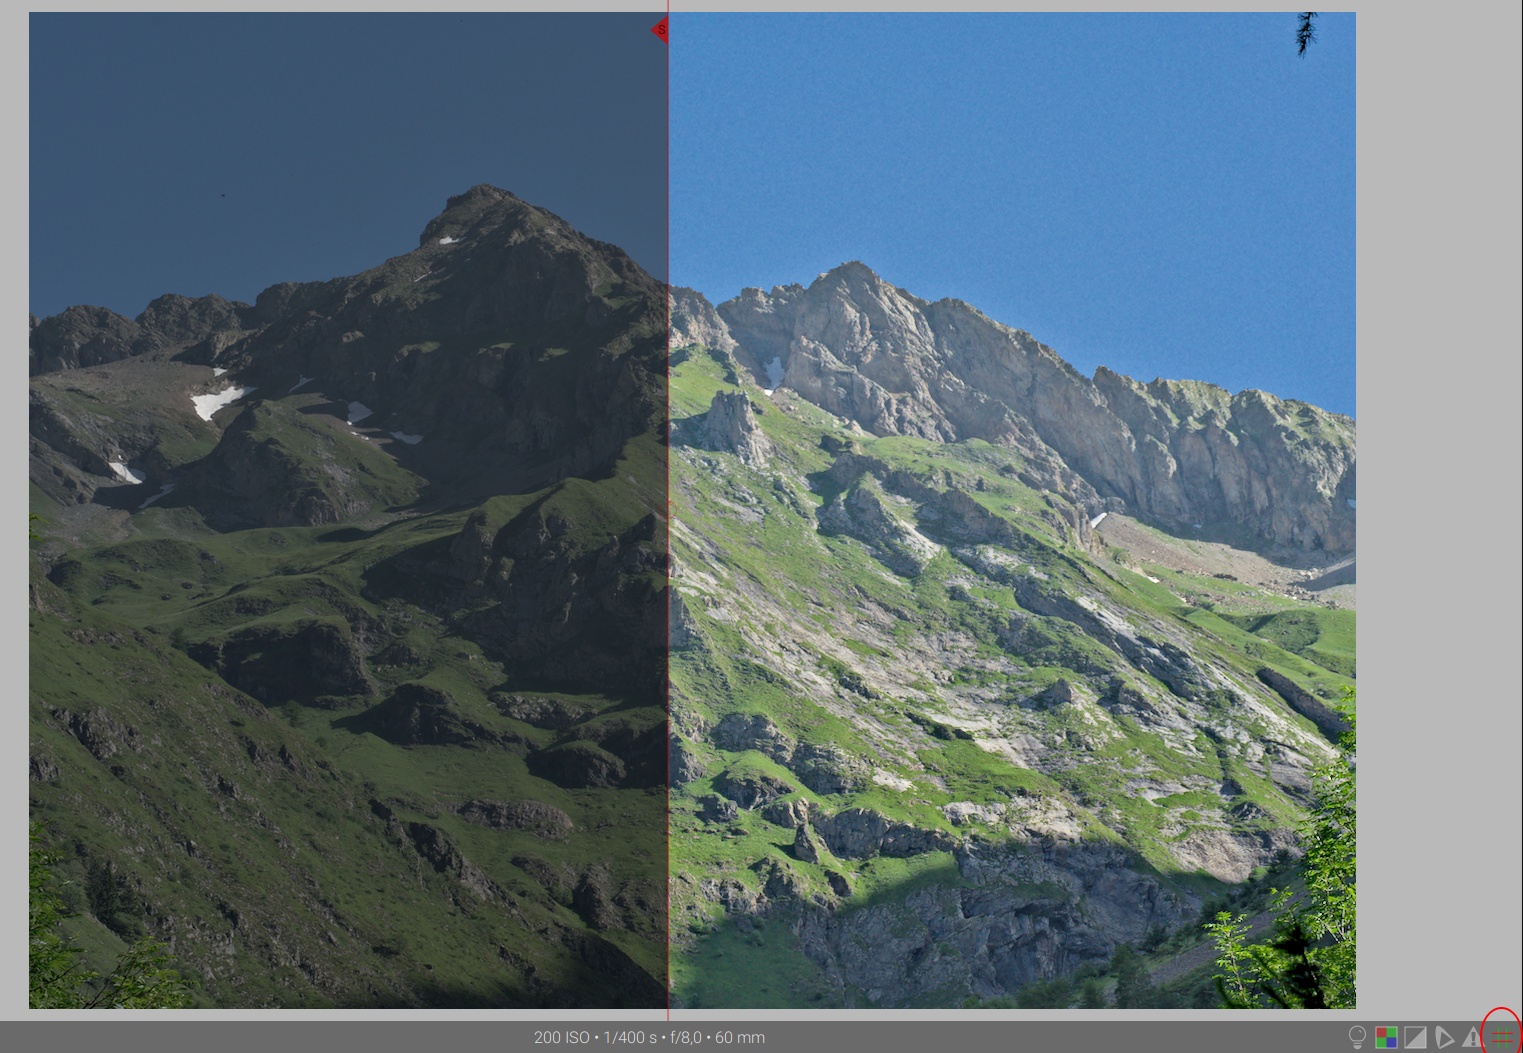
A new snapshot comparison line and coloring of the picture overlay
darktable 3.2 brings also some visual improvements about image overlays in darkroom.
The comparison snapshot line is more visible, sporting a newly-integrated visual marker of the selected snapshot side (displayed by an arrow with S symbol).
You can set the color of the snapshot line, and all overlays image (like drawn masks forms) using a red and green checkered icon, on the right of the bottom toolbar. Six colors are available (grey, red, green, yellow, cyan and magenta). It’s also possible to change directly this color by using Ctrl+ O (the letter). The color changes instantly and is confirmed by a toast message displayed at the top of the image.
Here is an example of this new snapshot line comparison (in red). The icon that allows you to select the overlay color is circled in red.
Minor changes to user interaction
You can now single click an image in the filmstrip to load it for editing. In other views, to add more images to a selection, use Ctrl and Shift click, depending on whether you want to add one image, or several. To make a new selection, use Alt + click.
You can now change the display of the top (header and info bar) and bottom panels with a single key combination. By default, 3.0.x shortcuts are disabled (Shift + Ctrl + T and Shift + Ctrl + B) but can be redefined in the preferences.
And more
Several icons have been redesigned, such as group, star, help, preferences and the mask icons. New icons are also HiDPI-ready under Windows. That redesign allow a better display consistency depending on screen type (LoDPI (low resolution) or HiDPI (high resolution)), whatever icon size is used.
All pickers have been reworked for a global behaviour and a more homogeneous display throughout the interface. This work also adds functionality for resizing the areas defined by a picker.
The file selector interface has also been redesigned.
The export and print progress bars have been redesigned to better fit the rest of the interface.
In darkroom, the active module has a new visual effect on the status icon and module title: “you can see that in the filmic v4 screenshot, further down in the article.”
The list of location search results in map view is more readable and has an improved visual style.
All the sliders have been refined: the bars are thinner and the control sliders more visible.
And more clean up of the fine details throughout the interface.
Digital Asset Management
Metadata editor and tagging improvements
The tagging and metadata editors have a more refined interface.
Metadata editor
The metadata editor added two more fields: a “notes” field and a “version name” field. The version name field is used to customize the name of different versions of the same image. These new fields have been integrated into to the import options. The same options are now presented in the same way across the three different ways to import images and each field can be individually selected.
All editor fields are now multi-line. Press Ctrl + enter to add a line in a field (pressing enter only makes you go to the next field by saving the previously completed one). Fields can also be expanded with Ctrl + scroll.
By opening the new editor, you will also see a new settings icon. For each editor field, you can choose to hide it from the editor or to make it private (not exportable).
Tagging
darktable 3.2 further improves tag management. On darktable 3.0.2, it was not always possible to add a tag on an already existing parent. It is now possible to so with the improvement of virtual node (not used tag) management. These last ones are now shown in italic.
Tag creation now works without a selected image. It is now possible to create a tag on a virtual node, then insert a pipe character | in the creation tag. The tree view shows the newly created tags.
The bug where updating a tag necessitated a restart of the application to apply the tag has been fixed.
New collection filters
Seven new filters are added to the many already existing ones. darktable is already very rich in filters on photo metadata (EXIFS data and IPTC/XMP data). On the other hand, very few filters existed on the various events or treatments specific to darktable. You already know the filters film roll, tag and local copy to sort your photo collection. Version 3.2 adds the new filters: history, module, module order, import timestamp, change timestamp, export timestamp and print timestamp. Here is a brief description of the role of these new filters.
- history - select altered or not altered photos (this include photos with auto-applied presets).
- module - select photos where the development stack contains the specified module. All modules used at least once are presented.
- module order - select photos altered with a precise module order. All existing orders are shown.
- import timestamp - select imported photos with a specific timestamp (timestamp = date and time). All timestamps are shown.
- change timestamp - select photos altered at a specific timestamp. All timestamps are shown.
- export timestamp - select photos exported at a specific timestamp. All timestamps are shown.
- print timestamp - select photos printed at a specific timestamp. All timestamps are shown.
New image information
The image information module also displays new information. The four timestamps mentioned above: import timestamp, change timestamp, export timestamp and print timestamp, as well as new EXIF information: exposure bias.
The module window is smaller, but the module is now scrollable and resizable with Ctrl + scroll
A new module : negadoctor
The current film negative invert module has a major flaw: it only works on non-demosaiced image data; it does not work with negatives scanned with a digital camera. The result is two unsolvable problems:
- If the digital file comes from a real scanner, and it is encoded with a transfer function (the “gamma”), it is not removed before the inversion. Depending on the type of scanning you are working on (“RAW” 16-bit linear scan from a specialized film scanner, or 8-bit gamma encoded JPEG scan from a consumer scanner), you will not have the same behaviour. Note that if the scan is made from a digital camera, the signal is linear, so the problem does not arise here.
- We invert the color before correcting the color space of the scanner or digital device, so that the color profiles then become wrong (they would have to be inverted as well), and the (unavoidable) color deviation of the sensor used for scanning cannot be properly subtracted.
This results in tedious color fixing sessions, using different modules to manually make up what should have been done automatically by the input color profile if it had been applied at the right time, i.e. before the negative’s color inversion.
negadoctor solves this, and much more, based on the Kodak Cineon sensitometry system, developed in the 1990s to digitize film reels in the cinema.
Since the advent of digital photography, many film photographers would like to find their old photos in their digital workflow. Several methods exist:
- Have them scanned by a professional but, to have a good resolution, it is relatively expensive.
- Digitize them yourself with a film scanner: low-end scanners do not digitize at more than 10 Mpx and usually only offer the JPEG format with a good loss of post-processing possibilities; high-end scanners offer slightly higher resolutions and the Tiff format in 16 bits better for post-processing. On the other hand, they are slow to obtain high resolutions and require the use of one’s computer: these scanners propose to invert the negatives directly from their software.
And why not use your DSLR with a macro shooting system to reproduce your films negatives and use darktable to do this job?
For the purpose of this article, a Lumix Gx8 (20 MP in RAW) with a Leica Elmarit f:2.8 45mm macro was used to digitize negatives: B&W and color negatives and B&W and color slides. Note that:
- The slides do not pose any problems when processed with darktable (no inversion is required).
- B&W negatives are relatively simple to invert and most software offers this inversion. In darktable, the classic invert module is sufficient, but negadoctor also manages them.
- Color negatives are more capricious because of the base color of the film (orange) and the white balance. The software that manages them, requires a sample of the unexposed film to recover the RGB values of the orange filter, to subtract them from the exposed negative.
negadoctor processs B&W and color negatives. To get the best possible results, it is important to keep a portion of the unexposed film around the image (to take the Dmin, see below) and to follow a rigorous routine that corrects the color in two steps:
- first the scan is corrected, i.e. the colorimetric deviations brought by the camera or scanner that scanned the film,
- the film itself is then corrected, i.e. the colorimetric deviations brought about by the film and by its possible ageing.
The first step is done early in the pipeline, neutralizing the sensor white balance, adjusting the exposure so that the histogram of the image occupies the entire 0-100% range without negative values or clipping, and applying the input color profile (ICC) of the sensor used.
The second step is done in negadoctor:
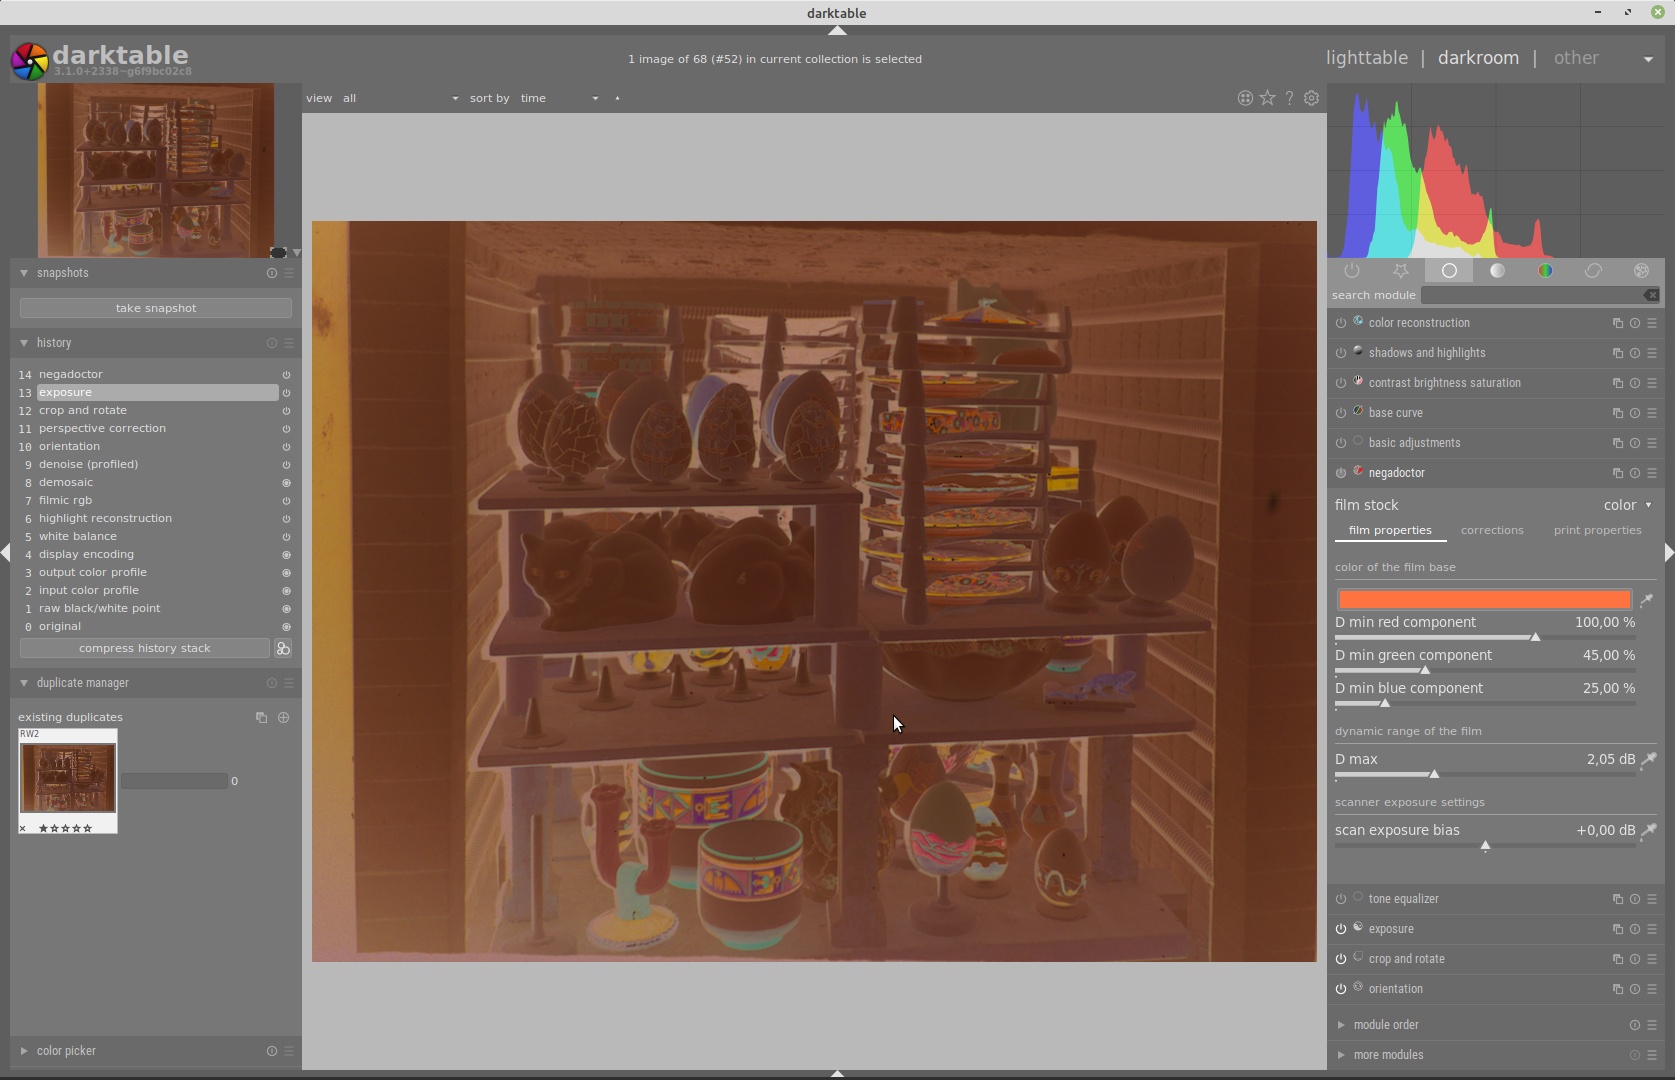
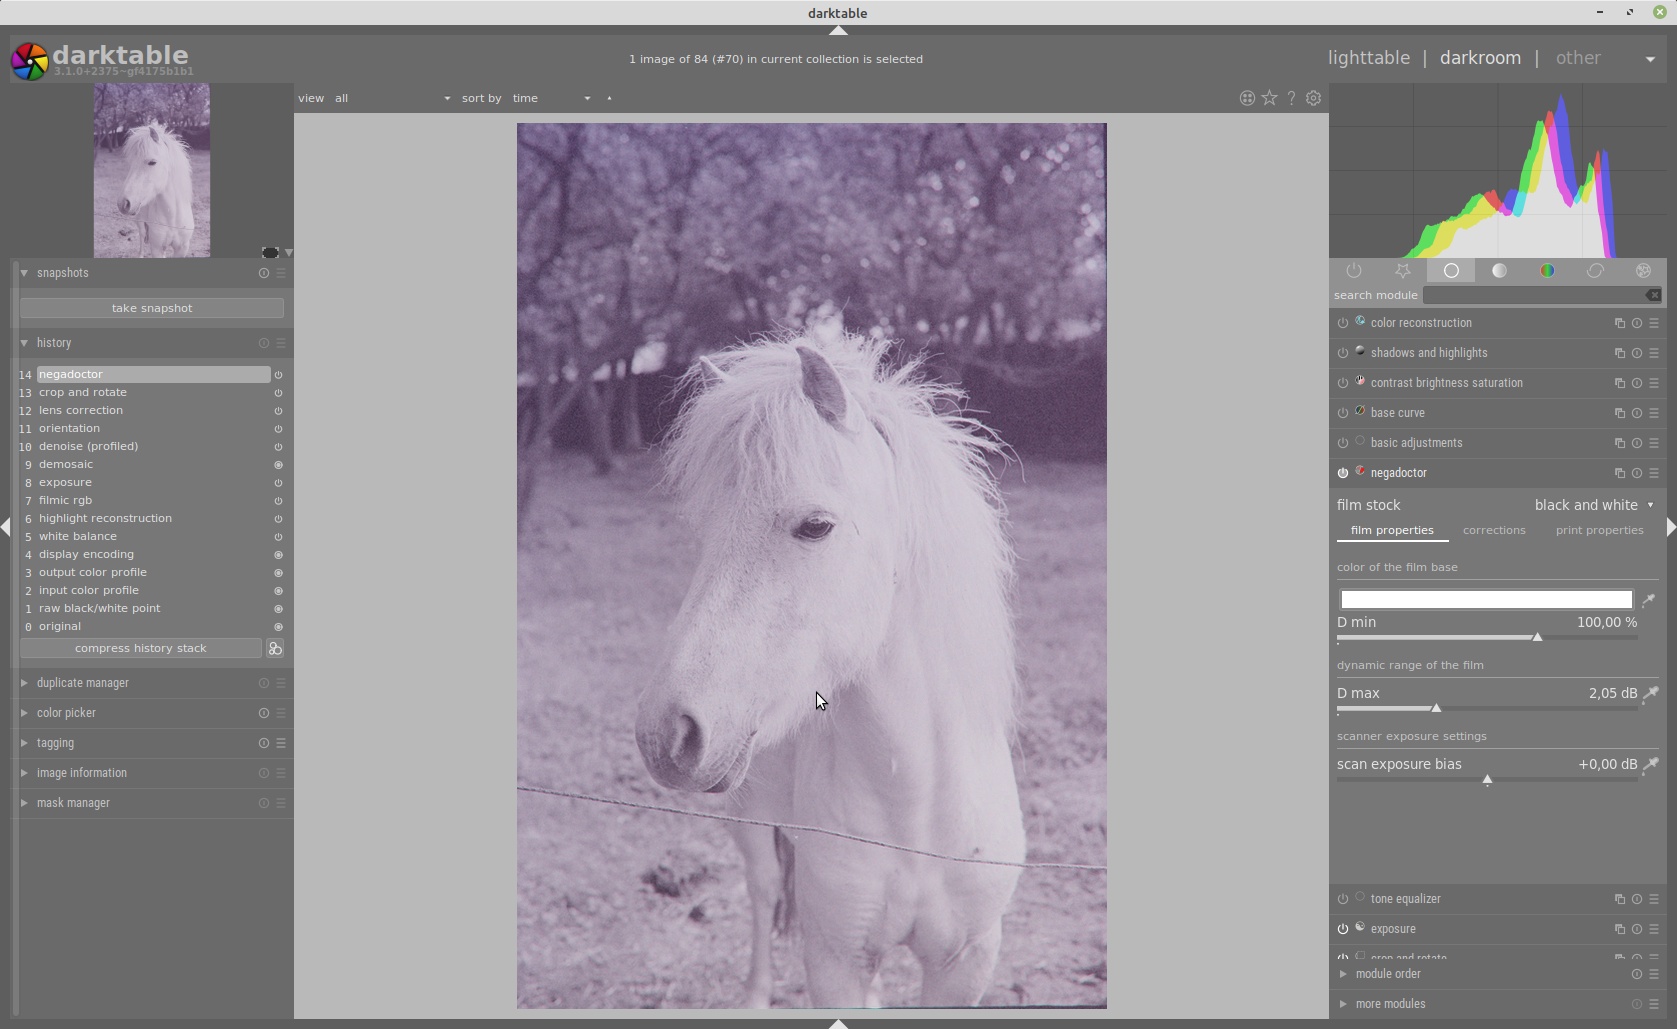
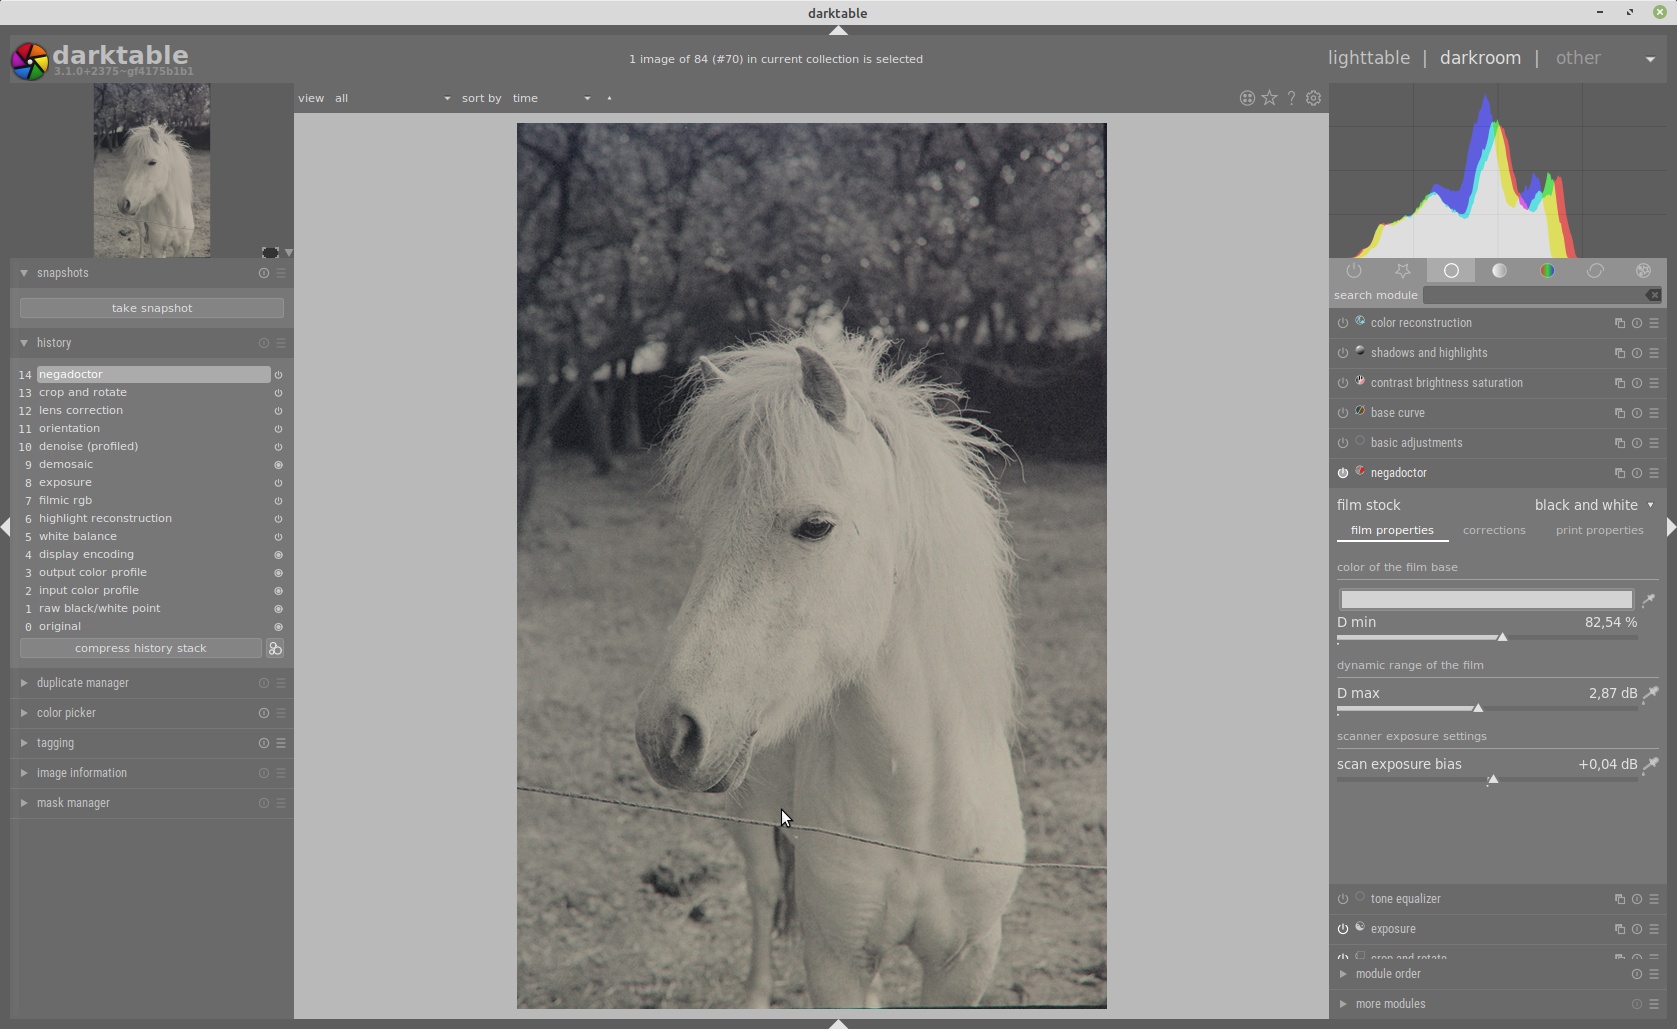
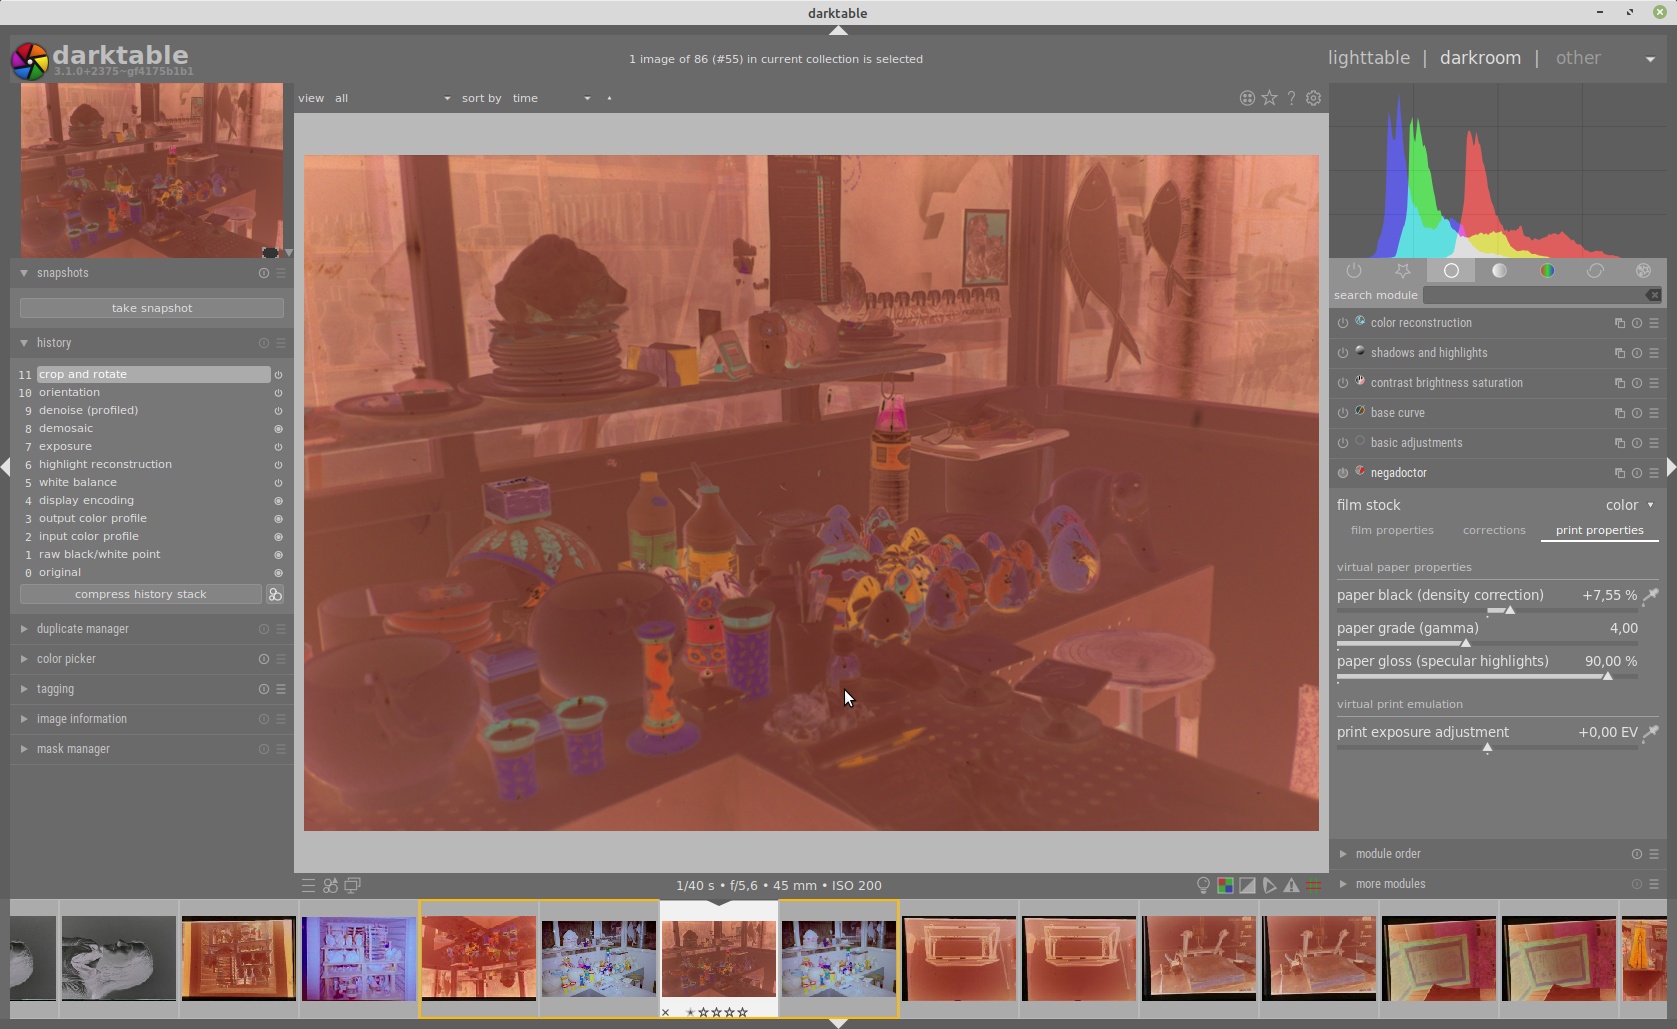
A selector allows to switch to the B&W negative:
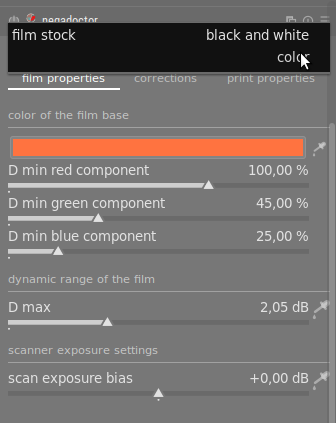
By opening a B&W silver negative:
You only have to click on “black and white” instead of “color” to invert the negative, then to adjust the parameters in the order in which they are in the interface:
- For the Dmin, select with the picker an unexposed part of the film. This recovers the minimum density of the film, corresponding to the areas where it is most transparent.
- For Dmax, select with the picker a high light area free of dust or scratches. This recovers the maximum density of the film, corresponding to the areas where it is the most opaque.
- For the scanner exposure bias, select an area that is supposed to be black, or even the whole image. This adjusts the scanner’s exposure so that the black image areas are matched to values close to black (0, 0, 0).
The green tint before inversion, and indigo after inversion, comes from the camera’s white balance, since the scan is made in RGB. It will have to be neutralized with the classic white balance (before negadoctor). To simulate a print of the negatives on warm tones paper, you can use the " corrections " tab of negadoctor, which allows to tint the virtual print using the same algorithms as the color balance.
A few settings in the “corrections” tab allow you to correct the white balance of the emulsion or tint the negative for creative purposes. Some important notes:
- If the color film has been exposed exactly at its nominal color temperature (D50 for “daylight” film), the white balance correction in negadoctor should be unnecessary (both values should be pure white), provided the scan sensor has been properly corrected beforehand (white balance and input profile).
- If the color film has been exposed to a different color temperature than the one for which it was balanced, only the correction of Highlight White Balance is necessary. This correction was used in the Kodak Cineon system and simulates an emulsion correction at the film itself.
- The shadow color derivative is an addition to the classic Cineon, which is used to recover important color shifts, especially on damaged negatives that have been poorly preserved. To use it, make sure that the exposure bias of the scan, in the “film” tab, is not zero or the setting will have no effect. Then adjust the color drift of the shadows first, by picking into blacks, then the white balance of the highlights, by picking into whites (following the order of the interface). The shadow color shift simulates an additive light color printer calibration.
- Color corrections are also available if you are working with black and white negatives, to allow you to make tone shifts in a non-inverted logarithmic space. The same algorithms are available in color balance, but work in pseudo-linear space and after inversion.
- negadoctor uses pipeline RGB workspace, either Rec 2020 linear by default. If this works reasonably well, the actual color space of the film is not Rec 2020 and it may be useful to use the actual RGB space of the film to work the color. A Rawtherapee developer who worked on a similar inversion module created an RGB color profile from the spectral sensitivity of Fuji and Kodak emulsions. All you have to is download it, add it in
~/.config/darktable/color/out, then chooseFilmNegRGB_650_550_460-elle-V4-g10.iccas workspace profile in input color profile. It is not clear at this stage whether this profile generally works better than Rec2020 to compensate for color, but it is an option. - Color corrections defined in a workspace will become wrong and will have to be redone if the working color space is changed.

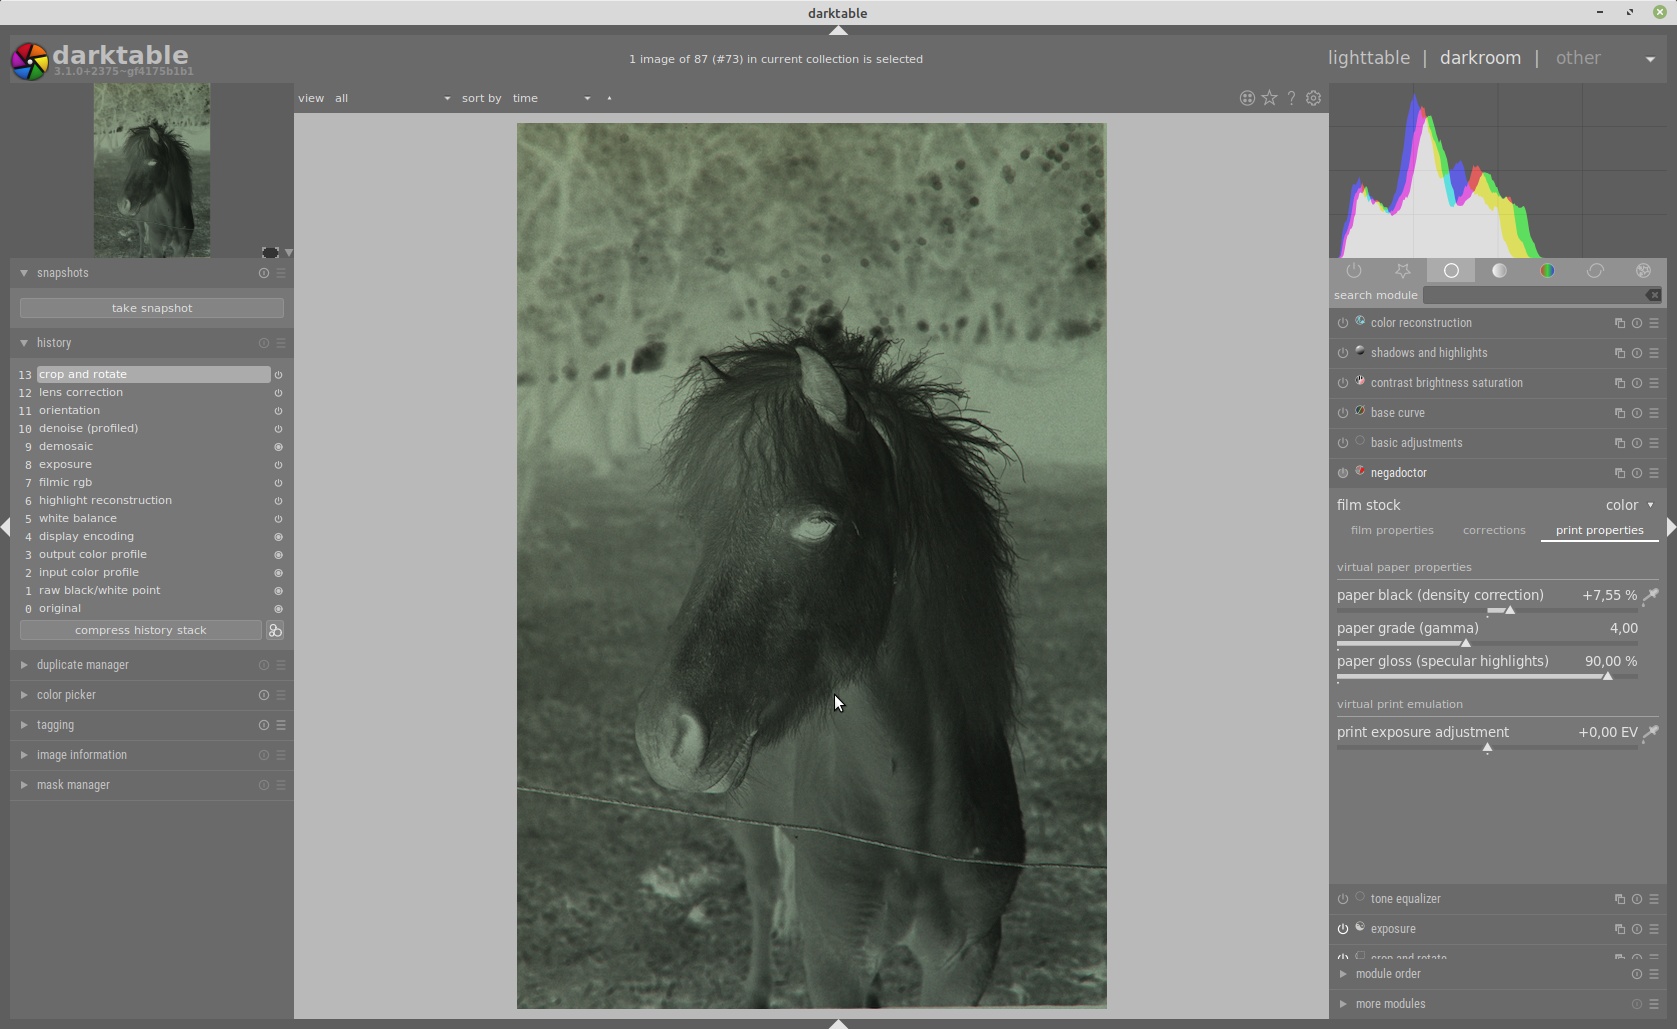
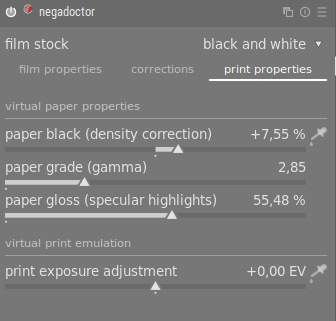
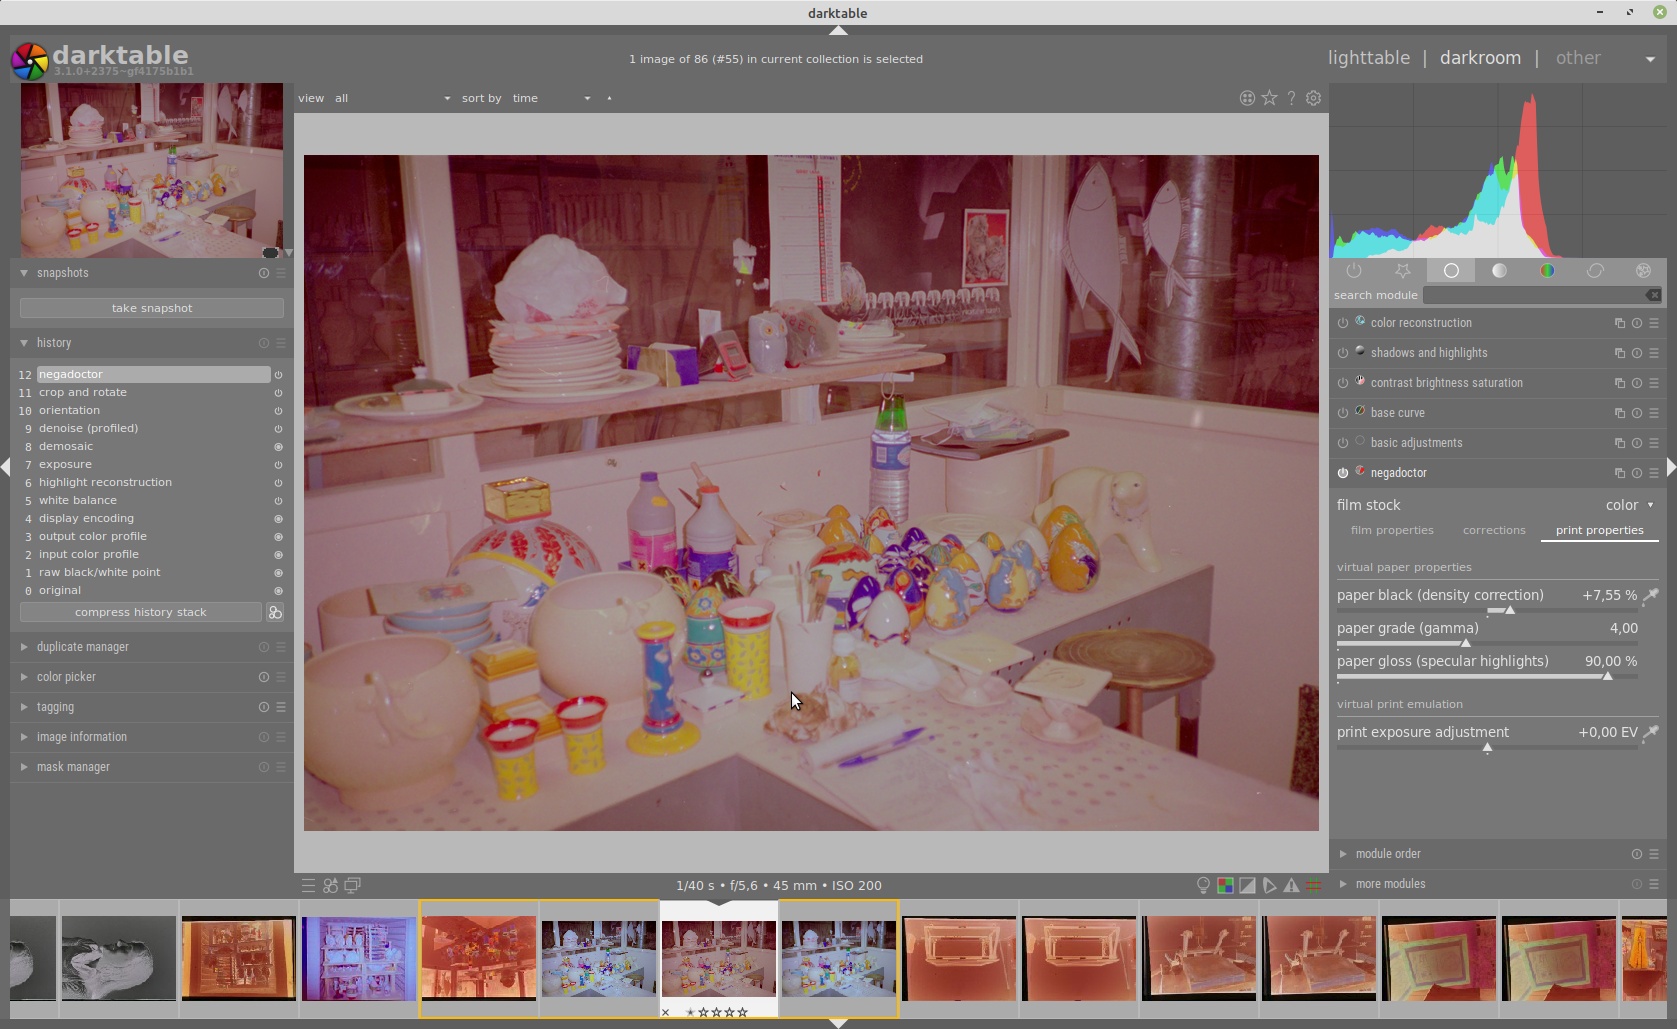
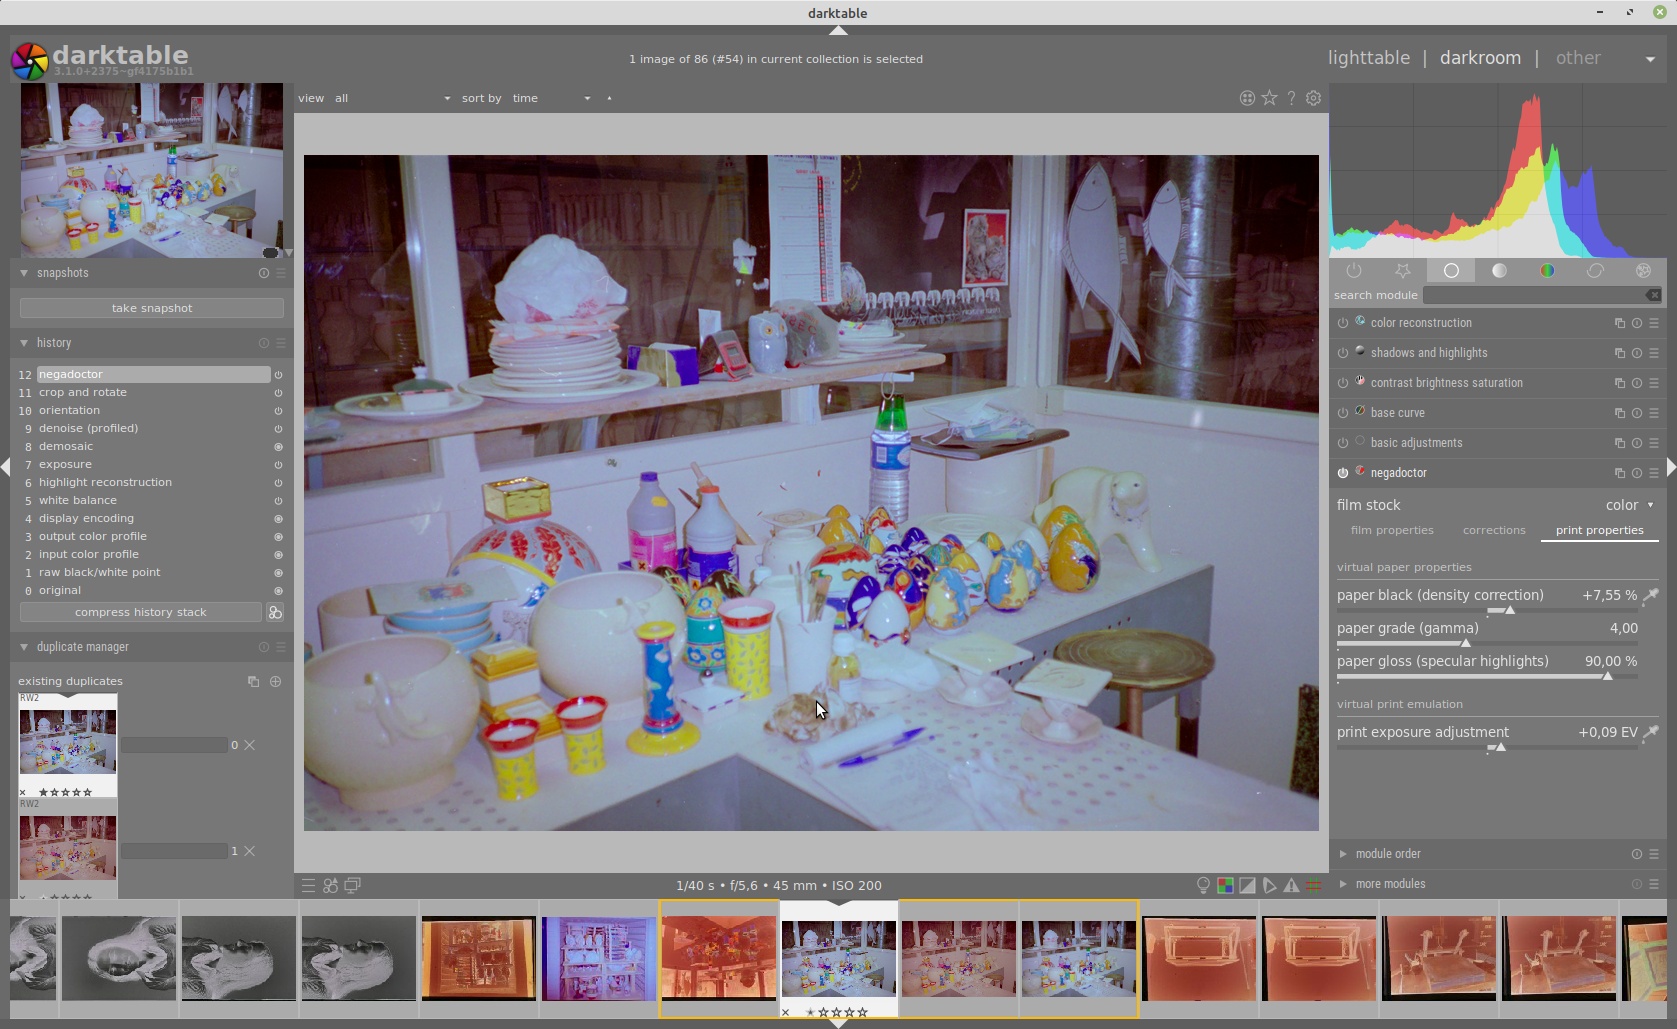
The “print properties” tab allows you to adjust the virtual printing parameters according to the paper used or the reproduction system. Indeed, the negative is a transparent support whose opacity (density) cannot be zero, both physically (just look at the film) but also mathematically (we work in logarithmic space, and the logarithm of 0 does not exist). It is at the time of the virtual printing that the black of the film (the Dmin) is remapped with the RGB value (0, 0, 0) in order to adjust the image to the basic assumptions of the digital pipeline.
The black level sets the black density correction and anchors the histogram to the left. The grade corresponds to the contrast curve of the paper, also called hardness or gamma (which has nothing to do with monitor gamma or ICC profile gamma). The brightness corresponds to a compression of the highlights: 100% means no compression; the lower the value, the more the highlights are compressed and their local contrast is swallowed up. Used in combination with exposure adjustment, this increases the overall brightness of the image without clipping the values.
For the processing of a colored negative:
you then just need to activate negadoctor (orange filter will be neutralized with default value):
And then, after doing some corrections:
negadoctor is one of those modules that can be confusing, as several parameters will apparently have the same effect on the final image. For example, the Dmin, scan exposure bias, and black density correction will all impact the final black density, but the Dmin works linearly before inversion, exposure bias in logarithmic before inversion, and exposure correction in pseudo-gamma after inversion. Each of these black corrections has a non-intuitive mathematical justification (related to the functions used, accepting or not zero values) that a simple visual evaluation of the final result will not reveal.
It is therefore important to be methodical in use to avoid losing control over the many combinations of parameters that can produce a similar visual result, respecting the order of use of the settings defined by the interface (use the tabs from left to right, and from top to bottom). Keep in mind that we are only digitally simulating here a printing process in a darkroom, by first correcting the scanner, then the negative, then the paper print, following the image production line. Each value, each operation, each step is linked to a physical reality put into practice without necessarily realizing it in the photo lab.
Finally, to use negadoctor, think about deactivating base curve and filmic, since they will duplicate the film itself. Once all your color corrections are done, you could then crop the image to remove the unexposed frame.
New default workflows
The functionality conflict between filmic and base curve, to provide the necessary tonal transformation from linear RGB to screen RGB, was previously managed via an option in the preferences that enables the base curve by default, or not. However, nothing was available to enable filmic automatically. This is now set with the default workflows, available in the preferences window on the processing tab.
The “display-referred” workflow, used by default, automatically activates the base curve and orders the modules in the pipeline as they were for darktable 2.6 and older. As such, it will apply the non-linear transformation at the beginning of the pipeline, and all editing will then be done on non-linear RGB, as almost all photo editing software does. The only merit of this workflow is that it is what many photographers are used to, but it will cause many problems with color consistency and the credibility of some local filters (blurring or sharpening), especially in scenes with wide dynamics.
The “scene-referred” workflow is designed around filmic, to offer the same level of functionality as the “display-referred” workflow. It consist of adding, by default, +0.5 EV of exposure (in exposure module), to adjust the global brightness and mid-grey to a similar value to that used by most JPEGs produced by SLR cameras.
New: the exposure module will also compensate the exposure bias set on the camera (the EV compensation of the lightmeter), commonly used to prevent highlight clipping, for photographers who expose to the right of the histogram. This feature relies on reading the EXIF field ExposureBiasValue which must be correctly filled in the RAW file by the camera for it to work. Note: for Fuji RAWs, it will be necessary to add aditional +0.75 EV, for an overall correction of +1.25 EV, to compensate for their native underexposure.
Next, filmic is applied by default and its basic settings take into account the global exposure correction (including +0.5EV mid-grey correction and exposure bias). This allows to have a working base reasonably close to the camera JPEG, directly by opening the RAW in darktable. But like any default preset, it is designed to work properly 80% of the time, and additional manual adjustments will be required in the remaining 20%; in particular, some cameras apply a +0.5 EV correction and others a +1 EV, so it is illusory to try to satisfy everyone.
Let us recall here that the interest of filmic is to apply a tone mapping curve at the end of the pipeline, allowing a physically realistic retouching on RGB values encoded linearly before, but also to manage color consistency through the tone mapping, in order to preserve hues as much as possible and to avoid gamut overruns.
Finally, it is possible to not use any workflow and so deactivate all automatic modules and manage your pipeline manually.
The option “use base curve” in preferences has been deleted, and so you will need to redefine manually the workflow you wish to use after installing darktable 3.2.
Filmic is still evolving
Filmic was designed for darktable 2.6 with the goal of improving the robustness of the color in scenes with a wide dynamic range. It aims to perform a fully user-definable tonal and gamut mapping, with a few adjustments (instead of a 6-12 point curve obtained by reverse engineering of the manufacturer JPEGs), based on the film sensitivity. Similar functionality exists in all image processing software, photo (contrast curve), video (preview LUT or OpenColorIO display transformations), and 3D rendering (filmic in Blender and OpenColorIO), because resizing the dynamic range between capture and display media is a common constraint in all graphic arts.
After looking again at Kodak’s documentation on silver sensitometry for the negadoctor module, Aurélien had new ideas for improvements to filmic rgb:
- A new color science to manage the “desaturation” of extreme luminances in a more progressive way, notably by avoiding blue breaks in contrasting skies. The idea is to make the light spectrum more “sharp” (close to monochromatic laser light) to “saturate” or more “flat” (close to white light) to “desaturate”. We are thus moving to a more physical and metaphorical approach to saturation, which no longer has a direct link with color perception, but which has the advantage of being controlled in a more progressive way.
- A different desaturation strategy, which forces black and white to zero saturation regardless of the settings, but allows the midtones to be resaturated to counterbalance the effect of the tone mapping. Remember that the purpose of this desaturation is to perform a basic gamut mapping to ensure that the maximum and minimum luminance (conventionally called white and black) are achromatic (i.e. white, not colored). It is, in fact, impossible to represent a saturated color with a luminance of 0% or 100% in any available color space. Such a color would be clipped in a more or less random way, and would produce in particular urine-yellow sunsets (which means that red is clipped). Filmic thus produces a progressive desaturation curve that ensures a smooth transition to achromatic colors at the extremities.
- A reconstruction of the highlights based on white exposure. Indeed, in color silver, in addition to desaturating the highlights for an integrated gamut mapping, the chemistry tends to blur the transition between the burnt areas and the valid areas, by spatial diffusion of the chemical species of the developing solution. In filmic v3, we still lacked smoothness in the valid/cut transitions, since it only took into account the luminance of the pixels, but not their neighborhood. Filmic v4 introduces a reconstruction of the highlights in the wavelet domain, thus multi-scale, which aims not only at smoothing the valid/clipped transitions, but also at trying to recover sharp details in the unclipped RGB channels (if possible), and at propagating the color of the neighboring areas by successive scattering (the process is iterative and the user can set the number of iterations). The user can choose the parameters to favour a more textured reconstruction (recovery of unclipped channels) or a smoother reconstruction (high frequency interpolation), more colorful or more achromatic, and finally sharper (in digital mode) or more blurred (like silver blooming).
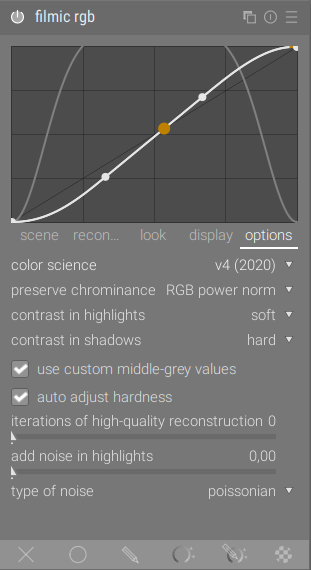
- Filmic allows to add noise, using different statistical profiles (Gaussian, poissonian or uniform), in clipped highlights (see the “options” tab). This allows noise to be homogenized and texture to be simulated in the highlights, in order to avoid abnormally smooth reconstructed highlights compared to the rest of the image, all this in order to better merge the visual transitions between clipped and reconstructed highlights and valid tones. This is even closer to the rendering of silver film, which also has grain in the highlights.
- The grey setting of the scene disappears by default, but can be optionally reactivated. This meets a need for simplification for users following misunderstandings of the difference between global exposure and scene grey, both in terms of the visual result (there is none) and in terms of the overall workflow (caution, danger). The “canonical” way to use filmic is therefore to use the exposure module to pre-adjust the overall exposure (brightness) of the image, and then to use filmic only to constrain the dynamic range of the image within the available range of the display medium. In this configuration, dynamic range compression is done around the middle grey (conventionally set to 18%), which is the only value not affected by the transformation, thus preserving the overall brightness. Then, feel free to go beyond these recommendations, but it will cost you one more step to finally convince yourself that this is not a good idea. In this configuration, filmic no longer affects the overall brightness, but only the compression of extreme brightnesses.
- The default settings for filmic are adjusted by the software according to the exposure bias stored in the photo metadata. Thus, for digital photographers who are accustomed to exposing to the right of the histogram, forcing a manual exposure compensation on the camera body to protect the highlights from clipping (which is the only good way to expose in digital photography, with all due respect to purists who don’t understand the technological differences between photoelectric semiconductor and photo-sensitized silver halide ions) will have their pipeline, relative to the scene, set automatically for them (as a first approximation, because filmmakers still can’t guess what the exact mid-grey value is for a given scene).
Filmic v3 is still available via the color science combobox in the last tab of filmic rgb. As well as it is possible to update an image from filmic v3 to v4 with the same tab. Here a preview of this new filmic rgb and the selection of the version wanted via science color menu:
Note: the reconstruction of highlights is done by means of wavelet decomposition by iteration, which induces a certain performance penalty. It is possible to disable the reconstruction completely by setting a very high highlight threshold, as the program bypasses the reconstruction if no pixels are detected beyond this threshold. Nevertheless, given the difficulty of convincingly reconstructing highlights, this is an acceptable compromise. The current default setting mostly disables highlight reconstruction to improve performance.
It is also possible to deactivate, in some cases, the default highlight reconstruction module if filmic reconstructs the highlights itself, to preserve more details. Then think of controlling the desaturation of the highlights in order to absorb the magenta highlights that you could create by deactivating this module.
Other improvements
Version 3.2, like the 3.0, is rich in new features and improvements. This article isn’t intended to be exhaustive but to present the main changes and allow you to understand them. You will find below, in a jumble, a few other improvements.
Better management of the image processing pipeline
As a reminder, darktable 3.0 not only introduced a new processing pipeline order, but also the possibility to change the order of the pipeline by reordering the modules yourself (a very advanced function). In fact, some users were lost and had no way to find the default order of earlier versions. So, a new permanent module has been added in darkroom (in bottom of right panel) named module order. This module allows you to check the pipeline order actually applied to the current image: 3.0 (the new default order), original (the default order on versions older than 3.0) and custom (personal order that you define, even unintentionally). This same module also allows you to apply 3.0 preset, the original one, or save your own custom preset. You can find the new filter collections presented earlier in this article.
Performance improvements and important bug fixes
A complete overhaul of the processing pipeline has been done by Pascal Obry, for a more robust management of the new pipeline integrated in 3.0. This overhaul makes the pipeline both more stable and efficient and fixes several bugs.
Image modification detection has been improved. This mainly avoids the need to recalculate the display of an image that has not been altered, for example by having been opened in a darkroom without any modification. The modification of XMPs and thumbnails is more reliable and only impacted in the event of a real modification.
Many other performance improvements have been integrated, especially in the processing modules. The work is ongoing and more improvements will be made in version 3.4. The next stable release is coming together with significant performance improvements.
darktable 3.2 also introduces an automatic database maintenance option (configurable in the preferences), allowing for a healthier database to be maintained over time.
Finally, with the various code improvements, many similar parts have been unified, allowing a faster and easier integration of new modules and a much better consistency on similar parts (for example, what has been done on color pickers). Test tools have also been added, making it easier for developers to test new additions and ensure backward compatibility and stability, especially when rewriting a module for better performance.
And of course, many bugs have been fixed, making this 3.2 the most stable version 3 to date. If you are already using a 3.0.x version, I can recommend upgrading to version 3.2, if only for its superior stability.
Some new options in preferences window
Apart from the new workflows and the few preferences already presented, you will find some new options that may be very useful. Here are the main ones:
-
In the lighttable tab, you can sort film roll by number or by folder. Following the redesign of lighttable, you can also define different size categories (via size category separators) which will allow you to define a different overlay mode according to the size of the thumbnails. The size is specified in pixels and the thumbnail size is displayed in the overlay mode popover menu shown above.
-
In the darkroom tab, it is now possible to reduce the resolution of the navigation preview, reducing CPU usage and possibly improving performance. Warning : as described in the tooltip of this option, this can slightly reduce the guided mask accuracy.
-
In the miscellaneous tab there are new options to control how keyboard shortcuts are applied where multiple module instances are used.
-
The shortcuts tab now includes a search field that allows you to quickly find the shortcut you want to customize.
And finally, a new lua options tab which, to date, has only one option to show/hide the lua script installer (more on that below).
Note that the modified preferences are saved dynamically. Closing the preferences window therefore saves all modified preferences.
Lua script manager installer
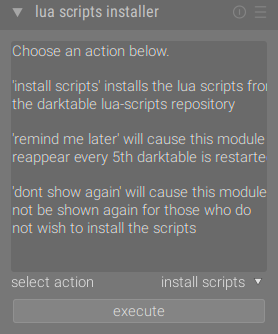
Bill Ferguson, who deals with the management of Lua scripts, had made a Lua script to manage Lua scripts. Until now, the script manager had to be installed manually.
The author has included, directly in darktable, a Lua installer. This can be enabled or disabled on first boot or in the preferences. The installer downloads the latest available scripts from the darktable Lua scripts repository.
Of course, this is only for those who don’t already have the script manager installed. This is what this new installer looks like:
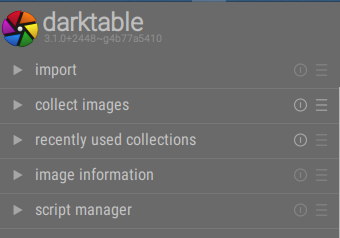
Once installed, script manager appears on the left panel in lighttable:
An adjustable histogram and a new mode: RGB parade
Two new features have been introduced to the darktable 3.2 histogram. First is the possibility to adjust histogram height size. This adjustment is done the same way as some lighttable modules: move the cursor over the histogram and press Ctrl + scroll to adjust the height.
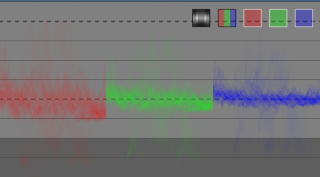
A new mode, RGB parade, appears and displays waveforms that represent the levels of each layer (red, green and blue). This mode allows you to visualize the distribution of color components.
This mode can also be displayed by selecting the histogram display in wave mode (with the top left icon on the histogram) and then changing the wave mode with the next icon on the right.
Add to that an important code rewriting of the histogram for better performance.
Drawn mask: curved gradient
When adding a drawn mask, it is now possible to bend the gradient shape (gradient). To do this, point the mouse cursor at the gradient bar and scroll up or down with the mouse wheel (or touchpad). Ctrl + scroll allows you to set the opacity and Shift + scroll manages the edge hardness.
An improved history
The history behaviour has been improved according to different users feedback. When compressing the history or loading a new image, the history will now behave this way:
- any active module that cannot be deactivated will always appears next in the history stack;
- any module that is enabled by default but can be disabled appears next in the history stack;
- finally, all modules activated by presets or as a result of a preference setting (workflow or sharpness selected in the preferences) are added.
And more:
- Add support of AVIF file format (>= 0.7). This requires the libavif library to be installed.
- Add optional grey-scale export of TIFF for monochrome images.
- It is now possible to export masks in TIFF format.
- It is now possible to use more than 500 images in tethered control, which is needed for time-lapse.
- Applying a style now supports append mode (added to the existing image history) or in overwrite mode (so replace the existing image history). This makes the style module consistent with history stack module.
- It is possible to handle (deleting, applying, or exporting) multiple styles in the style module.
- Implement undo/redo for orientation changes from the lighttable.
- By using
Ctrl+clickon mask shape buttons, you can continuously create similar shapes. - Rejecting an image keeps in memory the previously-defined number of stars. If the rejection is canceled, the image will be returned to the defined number of stars.
This list is not exhaustive. Some other minor improvements could be discovered by reading the complete darktable release notes: https://github.com/darktable-org/darktable/releases/tag/release-3.2.1
darktable 3.4 is on its way
A second major release, 3.4, will be out for Christmas. This release already has performance improvements on more modules. It should also see the arrival of a new channel mixer: more powerful, efficient and integrates a modern white balance using the Bradford transform, the CIECAT16 space, and equipped with white balance detection by supervised machine learning.
A visual redesign of the retouch module is also in progress as well as the white balance module. Discussions and proposals are also in progress to improve the management of modules in the darkroom (reorganization of tabs, improvement of presets, etc.).
And most certainly, there are other surprises in sight.
About this article
This article is licensed under the terms of the Attribution 2.0 Generic (CC BY 2.0), or, at your option, the Creative Commons BY-NC-SA 3.0 License.
Article co-authored by: Nilvus, aurelienpierre, jpg54, hgmarty, jpv and Pascal Obry. And thanks to the proofreaders who helped.

