
In other languages: Français, Italiano, Deutsch.
Following the tradition, darktable 3.0 has been released for Christmas. After many evolutions in 2018, 2019 has seen many very unexpected changes in darktable, both in its user interface and in its internal mechanisms. This makes darktable 3.0 a more than major version, justifying the direct transition from version 2.6.x to version 3.0.
The announcement and release notes for this new release can be found here: /2019/12/darktable-300-released/.
Among the new major features (the list is huge):
- A brand new GUI, more modern, fully redesigned and customizable via GTK+ CSS rules. There is no more size, color, fixed position in the Gtk C darktable code. This version already comes with several themes.
- A new culling mode on the lighttable. It displays a fixed number of consecutive images starting from the first selected (or a set of selected images), and allows you to pan & zoom them. The number of displayed images can be set by the user, and they can be navigated with the mouse wheel and keyboard. Finally, it provides a comparison mode of images often requested.
- A new timeline view, making it possible to select a date range to display related images
- A quite extensive rewrite of the lighttable view (including the filmstrip in darkroom view) has been made to greatly improve the overall performance. The lighttable is now usable on 4K and 5K monitors. darktable 3.0 also brings many code optimizations for CPU and SSE paths.
- A new filmic RGB module which, like the previous module filmic, is designed to replace base curve, shadows and highlights and other global tone-mapping modules. This new version should be easier to use and it will reduce color casts. The old filmic module is now deprecated and only available on images where it was previously used.
- A new module tone equalizer has been created to merge the features of zone system, shadows and highlights, and (local) tone mapping modules in a scene-referred RGB space. It brings an easy and safe way to remap tones locally, performing a quick zone-based dodging and burning using the zone system of Ansel Adams.
- New modules RGB curve and RGB levels. They have modes for linked and independent RGB channels.
- The module denoise (profiled) has been greatly improved. It now offers high-performance default settings in most cases. It is thus no longer necessary to use the two chroma and luma instances. In most cases only one instance is sufficient. For images processed with darktable 2.6 or earlier, it is possible to upgrade the module to the new processing algorithms via a checkbox in the module.
- A new module 3D lut, for handling 3D RGB Lut transformations (PNG Hald-CLUT and Cube files are supported).
- A complete rework of the tagging module. It is now faster and more complete, with a new hierarchical view, possibility to set tags as private, to assign them to categories, or to even search synonyms.
- Export module have now an option to select which metadata to export.
- A new module basic adjustments. It allows you to adjust the black level, exposure, highlight compression, contrast, middle grey, brightness and saturation. It also has an auto feature based on Rawtherapee’s auto levels that can work on the entire image or a user selected area.
- A new raster mask, that allows to copy a mask to other modules in the pixel-pipe.
- And many other minor (but useful) features. We will talk about some of them, in the last part of this article.
As with every darktable major release, the database format changes, so you can’t go back to the previous version once you go to 3.0: it’s always advisable to make a backup of your database (~/.config/darktable/ directory) before the update. However, darktable 3.0 introduces an automatic backup of your database in version 2.6 or earlier due to so many changes darktable brings, and particularly a whole rework of pixel-pipe order.
Major features
A whole new complete CSS themable GUI
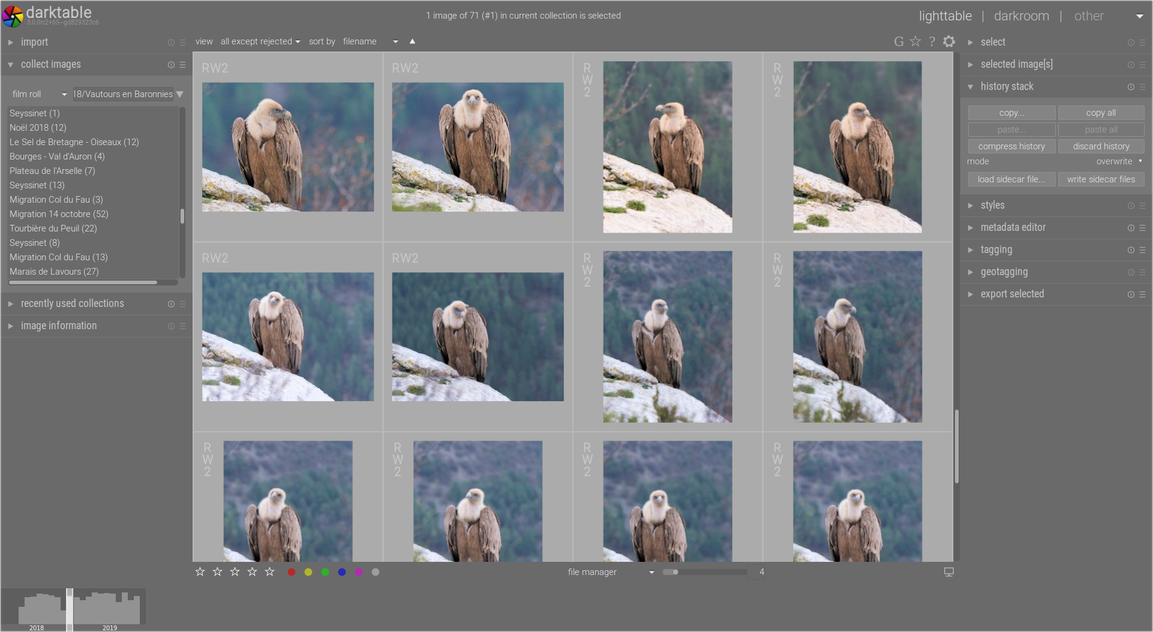
darktable 3.0 introduce now a more modern and completely themable GUI by CSS. It is now also compatible with 4k and 5k monitors. With that whole rework, four themes have been introduced:
- darktable: the adapted original theme (by default), it uses the default font of the operating system.
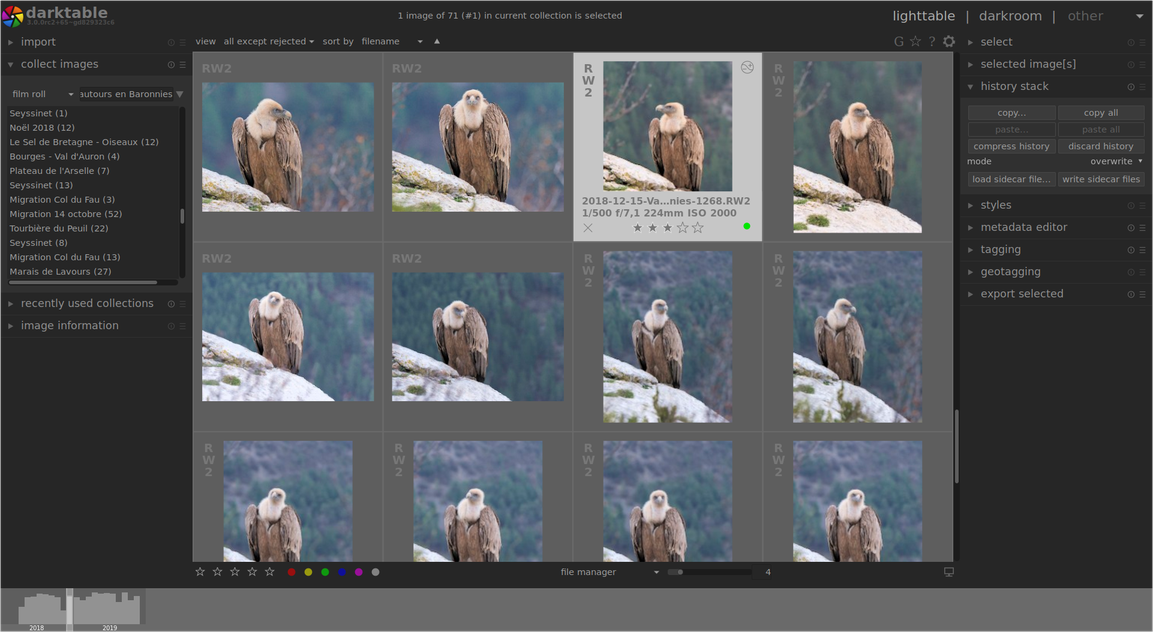
darktable 3.0 specifically introduces the following three new themes (in addition to the default theme adapted to the new interface). These three themes, called elegant, require the installation of Roboto fonts to achieve the desired complete visual experience.
- darktable-elegant-darker: similar to default theme but with the Roboto more condensed font.

- darktable-elegant-dark: lighter version.
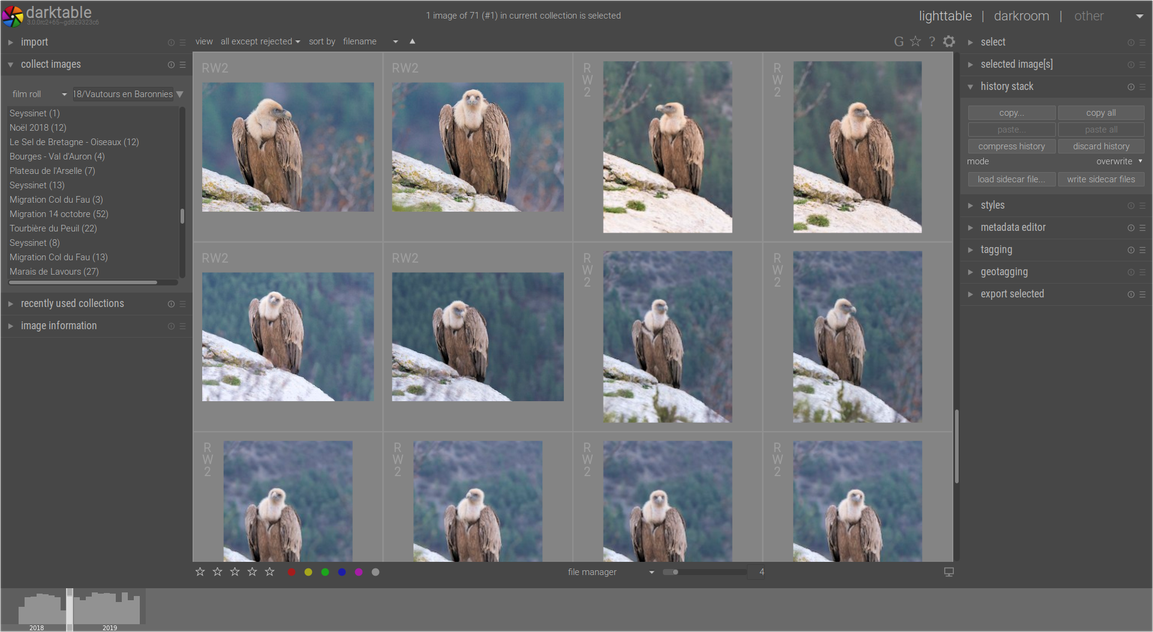
- darktable-elegant-grey: even lighter version. Near to middle-grey.
Apart from any aesthetic considerations, the recommended interface color for color evaluation is middle grey (interface L = 45, background L = 75), close to ISO 12646:2008. Indeed, visual perception is affected by ambient brightness, and a low brightness of the interface causes all kinds of illusions:
- exaggeration of the exposure perceived in the image (highlighted by the experience of the Adelson’s checker shadow illusion): the image seems clearer than it is,
- decrease in the perceived saturation in the image (Hunt effect): the colors seem less rich,
- decrease in perceived contrast in the image (Bartleson-Breneman effect): tones appear flatter.
Using a dark interface to retouch photos can therefore lead to excessive retouching (abuse of contrast and saturation) and to a photo that is too dark once printed. The introduction of the grey theme avoids these illusions and consequences on image processing.
The four main themes no longer display icons of the darkroom modules to lighten the interface and limit colorful visual distractions. As some users have requested them, specific variants add the display of the icons of these modules. If you want these icons, use the icons themes instead.
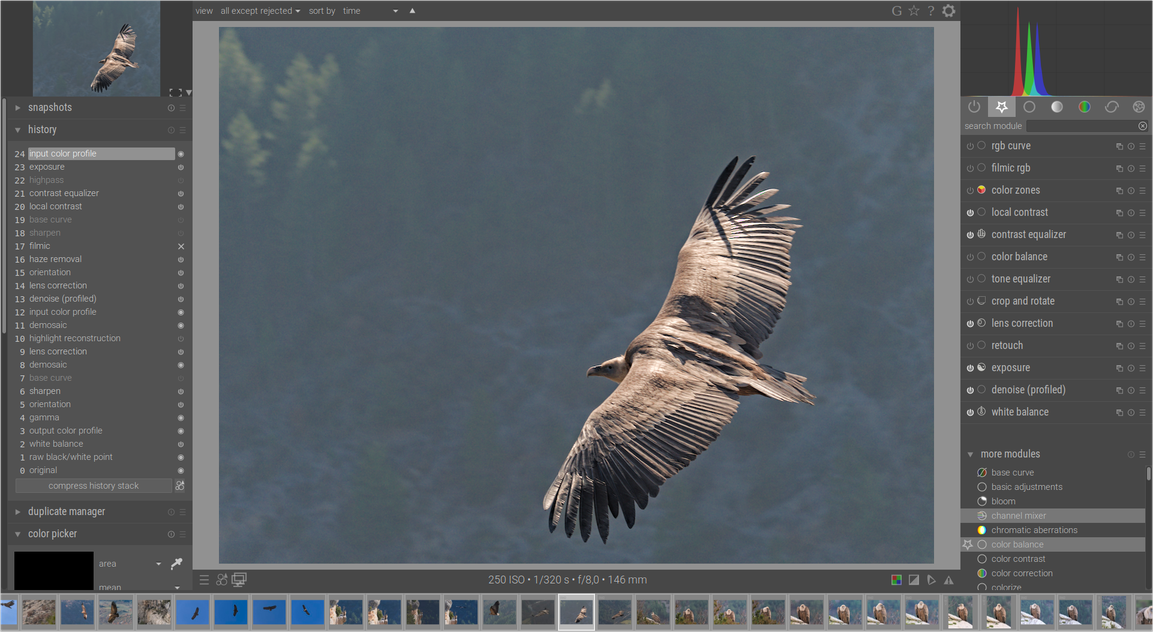
Here it’s the new darkroom view with dark theme (without icons):

And same view, with modules icons:
Other improvements about that new GUI
darkroom view
New shortcuts have been added for a better user experience and more image space. Here are the most important ones in the darkroom (the first 4 shortcuts are also usable in other darktable views):
Shift+Ctrl+t: show/hide top panel (between the image and the top banner)Shift+Ctrl+l: same for left panelShift+Ctrl+r: same for right oneShift+Ctrl+b: same for bottom one (between the image and the image banner)Shift+Ctrl+h: same for histogramShift+Ctrl+n: same for thumbnail image on the left
These shortcuts are a good complement to this two shortcuts already present in darktable:
Ctrl+f: show/hide images banner at the bottom, without going to the optionsCtrl+h: same for top banner (from logo to links to lighttable, darkroom, others)
These shortcuts can be easily memorized by understanding this: the letters correspond to the 1st letter of the English term (top, left, right, bottom, histogram, navigation, filmstrip, header).
And finally, valid in all darktable views: my favorite to use only once, after getting used on using the shortcuts above: b. With this simple letter, just say goodbye to borders with arrows. And darktable is getting lighter!
Take a look at the screenshot below to see for yourself. The applied shortcuts have been: b, Shift+Ctrl+l, Shift+Ctrl+t, Shift+Ctrl+b (for these last three ones, a quick tip: keep pressing Shift+Ctrl and then successively press l, t and b to hide the left, top and bottom panels) and Ctrl+f (for the image banner removed at the bottom). To replace the removed parts, simply repeat the same shortcuts.
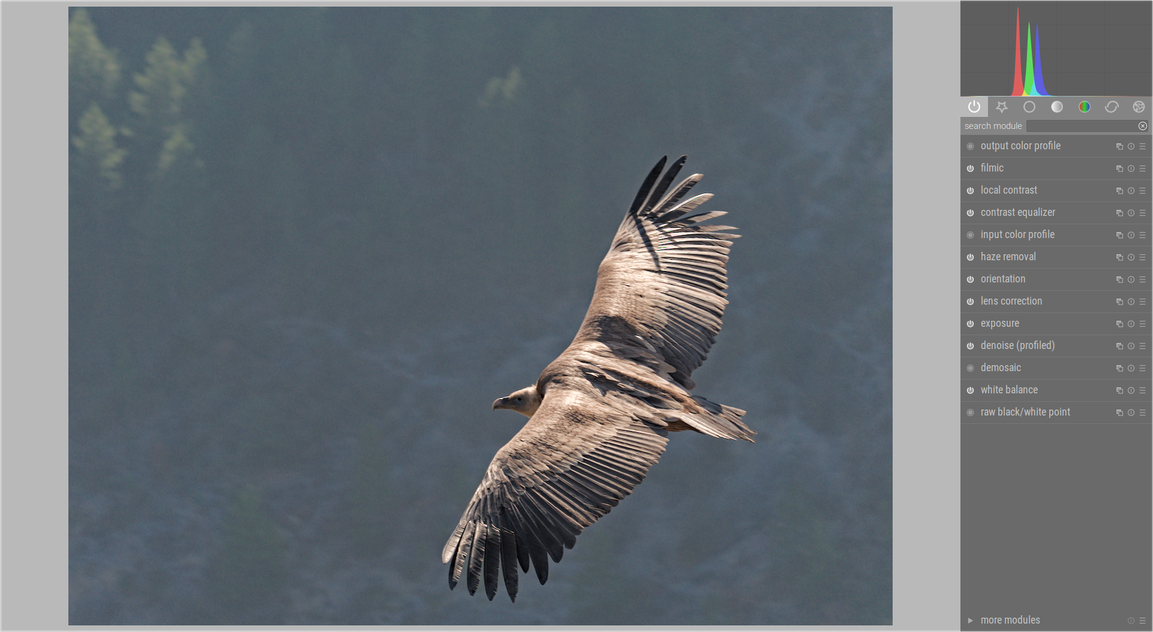
With all these shortcuts, you can display your darkroom view (and each darktable view) with the parts you want (with or without miniature, right or left panel, histogram or not…). Test, see what suits you best for your practice, depending on your need or when you want to alternate between the parts. It’s simple and effective!
Search module field
In this darkroom view, you could see on above screen capture, a new search module field, just between modules tabs and modules list. This new field simply allow to… search a module among all those darktable have (search to be done in lowercase, the field is case sensitive).
New visualization of mask options
In the modules allowing the use of fusion masks, access to mask options is no longer via a drop-down menu, and has become more visual. Just see yourself:

From left to right: “disable active mask”, “uniform mask”, “drawn mask”, “parametric mask”, “drawn & parametric mask” et “raster mask” (new one we will talk about later in this article).
History
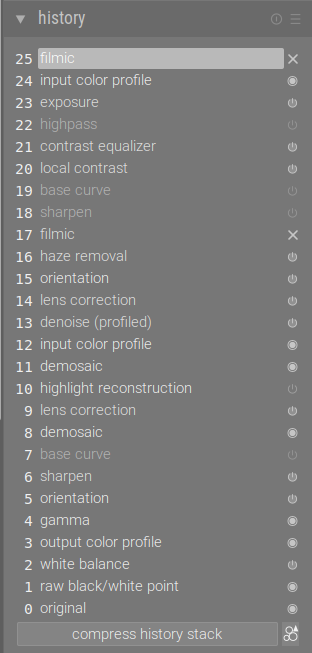
A redesign of the history has been done. darktable, like any RAW developer software, must run some default modules to allow the RAW to be displayed. Previously these modules were hidden. For greater transparency, all the processing steps performed are now displayed, even if they do not correspond to an existing module, such as the gamma line. These modules cannot be disabled because of their usefulness.
As you can see below, new visual icons have appeared on the right. They indicate the status of the module (for the first three states, you will also find this same visual in the module panel on the right):
- Default modules that cannot be disabled: full round surrounded by a circle (ex: gamma)
- Modules in active state (that could be disable): on/off button enabled (ex: white balance)
- Modules in the state disabled (that could be enabled): on/off button disabled and the text of the module in light grey (ex: base curve)
- Deprecated modules (recommended not to use them anymore): cross (ex: filmic). If enabled, white and light grey text and light grey if disabled.
EXIF images infos
For a better rendering of the histogram, as well as for a better visualization of the main EXIF data of the image, the latter have been removed from the histogram. They are now visible in a new area, by default at the bottom of the image:

It is possible to customize the data displayed in this area, in the darktable preferences (see the “format of the image information line” line) as well as the position of this information line:
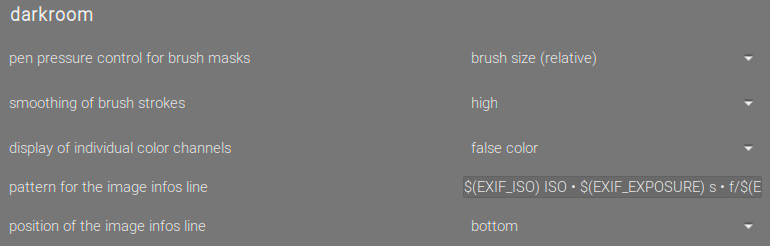
Possible parameters for the format can be found in darktable manual. Changing these options requires a restart of the application to be applied.
Second image preview window
It is now possible to display a second image preview window via the dual screen icon at the left bottom of darkroom image. This view allows you to select a different display profile from the main view for comparison. To do this, simply select it via a new menu accessible in the usual softproofing and gamut verification options, at the bottom right of the image in the main view.
You can zoom in this new view, via the mouse wheel.
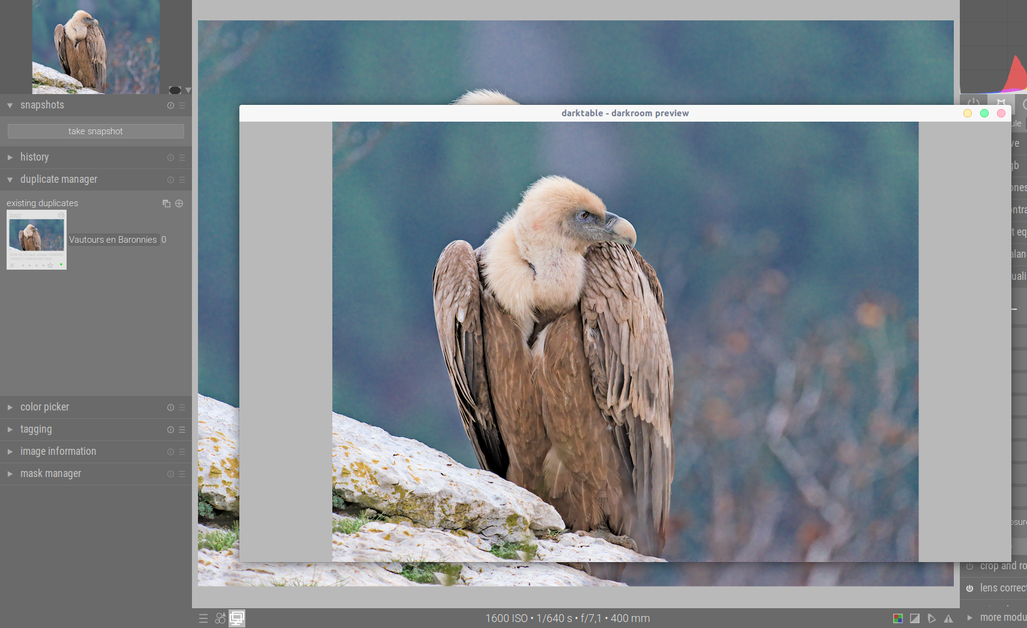
This new window has its own color profile, which allows you to place it on another screen and use its dedicated profile. As for the main window, the profile is automatically retrieved by darktable via colord or xatom, but it is possible to add it manually in ~/.config/darktable/color/out and then select it from the display profile menu. Note that colord does not seem to work under Windows with a second screen, so Windows users will have to perform the operation manually.
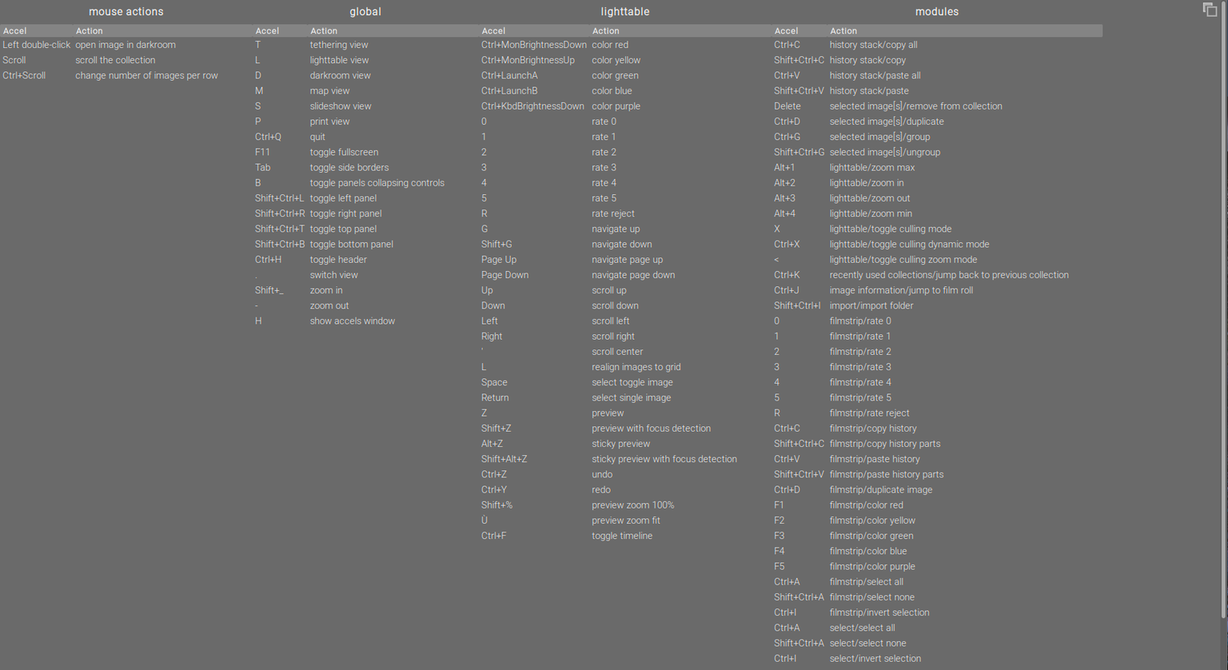
Accels window: viewing shortcuts in the active view
At any time, whatever the active view of darktable, you can display the shortcuts that can be used in this view. This list of shortcuts is dynamic and includes both default shortcuts and your custom ones. To display it, nothing could be easier: press the letter h (then Alt if you want to leave this panel active). It is possible to separate it from the darktable window via the button that appears at the top right.
Preferences
darktable 3.0 also offers a clearer arrangement of preferences. The options are now grouped into sections to make it easier to find and customize preferences.
New lighttable features: culling and timeline views
The lighttable is now more reactive. Many code optimizations have been performed to greatly improve usage and performance.
The lighttable also sees the arrival of undo/redo functions via Ctrl+Z shortcut applicable to keywords, star rating, color labels, metadata modification, copy/paste or removal history or even style application.
=> Since this shortcut was initially assigned to the preview with focus detection, this last function can now be displayed via the shortcut Ctrl+W. For consistency, the preview previously displayed with Z is now displayed via the shortcut W or Alt+W (persistent preview).
It is now possible to zoom and pan on an image in preview mode. After launching the preview, use the shortcut Ctrl+mouse wheel to zoom in/out. However, in some smaller configurations, the new zoom capabilities may result in a waiting time to allow the zoomed image to be displayed. To speed up this display, it may be useful to run the following command in terminal mode (darktable must be closed, and remain closed, while executing this command):
darktable-generate-cache -m 6
It is possible to modify the number according to the desired zoom level (7 corresponding to 100% level and lower). 5 can be a good compromise disk space saving. Indeed, this command generates a cache folder containing jpg files corresponding to the active histories at the execution time of this command.
culling view
The lighttable gives until now two modes: zoomable light table and file manager. A third mode appears, and not the least: a culling mode. This mode displays a consecutive (or not) and fixed number of images from the selected one. It allows to zoom and pan on them. Images number can be fixed by the user, and it’s possible to move on with mouse wheel and keyboard.
Yes, you understand, one of the most frequently requested features of the lighttable is finally there: possibility to compare images. See now how it works !
Two options exist:
- fixed zoom: images number is set by a cursor on the right of culling selector menu (launching shortcut of this mode:
x) - dynamic zoom: images number is set by images selected on lighttable (launching shortcut of this mode:
Ctrl+X)
Of course, here, dynamic zoom will have same effect as fixed one if selected number is the one set on fixed zoom mode. In both cases, you can move on images of the actual collection simply with:
Wheel mouse(or keyboardleft and righ arrows): to display previous or next images.
The number of images to be displayed and the mode option are set in the selection mode with settings on the right of the culling menu at the bottom of the lighttable:

If, as here, the number of images to be displayed, defined in this mode, is 2 (fixed zoom), selecting an image will display that image and the next one. This gives us (reminder: mode launched via x shortcut):
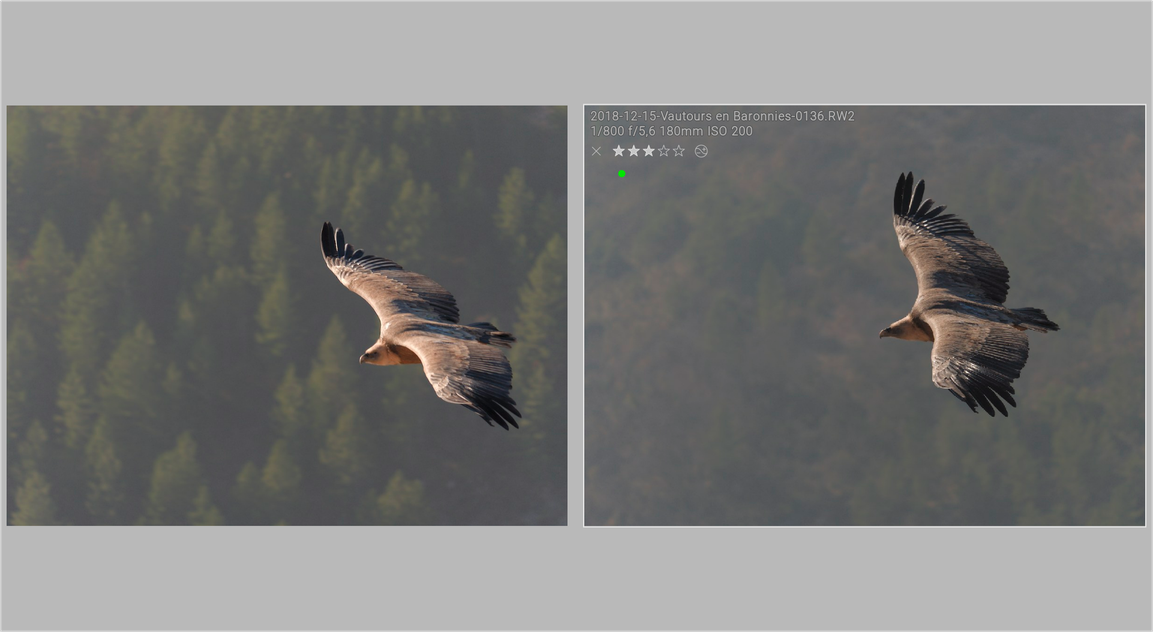
Note here that I have hidden all the panels with the shortcuts seen above, to better benefit from the display of images and comparison possibilities. To display the settings of the selection mode (previous image), just type shortcut Shift+Ctrl+b.
And the same, on six selected images, in dynamic range mode (mode launched with Ctrl+x):
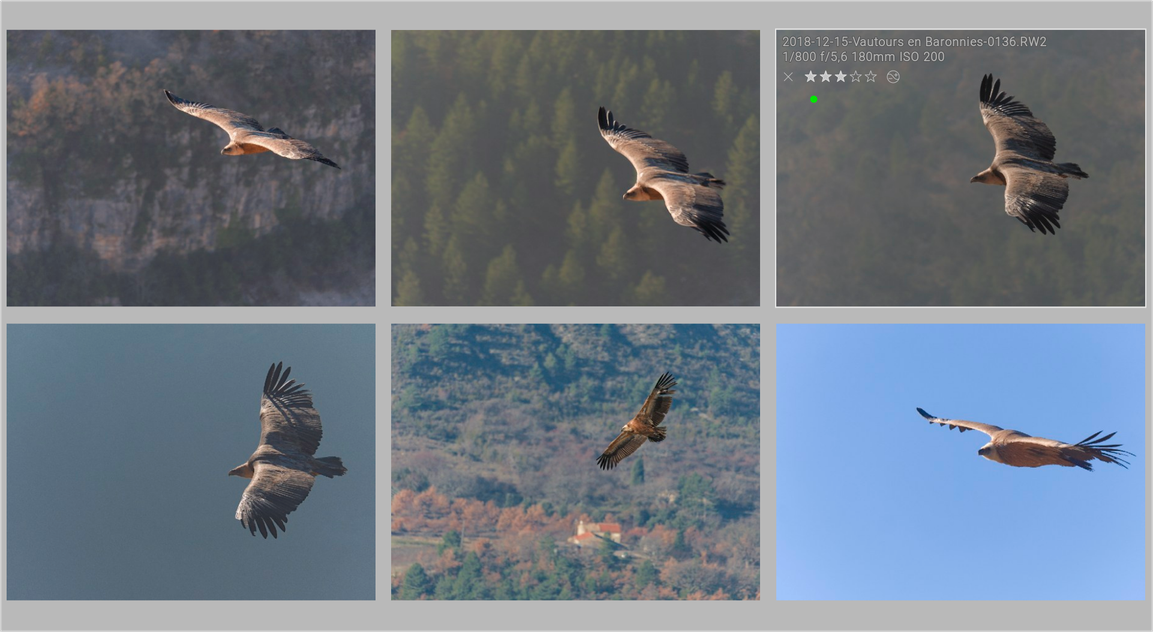
In this culling mode, whether in fixed zoom or dynamic zoom, here are the options available to you:
Ctrl+wheel mouse: zoom in displayed images.Shift+Ctrl+wheel mouse: zoom only on the image where the cursor is hover.Click & drag: on a zoomed imaged, allow to pan on the image (will apply on all displayed images at the same time).Shift+Click & drag: same as above but only on the image where the cursor is hover.
Warning: Although it is possible to display more than 4 images, zoom and pan within images are only available for up to 4 images, for visual comfort and performance reasons.
As you can see, the culling mode also displays the main image information, rating stars and color labels. It is of course possible, as in other modes, to define them in this mode.
An important trick to know: you can simply show or hide these information depending on the position of your cursor. Point the cursor upwards in an image to make them appear, slide it downwards to make them disappear.
timeline view
timeline view is a new view displayed on the bottom of lighttable with Ctrl+f shortcut (same shortcut as filmstrip in darkroom view, this new view is displayed on same place but in lighttable view). This view could also be activated or disabled on preferences window.
This view displays a chronological timeline of your images and allows to select a wanted range with a simple click & drag with your mouse. You just have to move your cursor on a part of this view to see the period (displayed in year/month).
You could see a preview of this timeline view on the four themes images in the beginning of this article.
A workflow that extends over the RGB space:
New modules appear, exclusively in RGB space. With darktable 3.0, you can edit your images entirely in RGB, with the modules that will be presented to you in this section: the vast majority of images can be processed exclusively with these modules, combined with the white balance, exposure and denoise (profiled) modules. A powerful and fast workflow, with fewer modules. In a word: efficient.
=> For an optimal use of this new workflow, it is strongly recommended to activate, in the input color profile module, the linear Rec2020 RGB working profile (you could also use linear prophoto RGB).
=> It is also strongly recommended in this context to disable base curve and sharpen modules via the three new options of darktable preferences, tab core options then heading quality
To understand this linear RGB workflow and why it is adopted in darktable, we recommend you to watch the following video: Image processing and pixel pipeline in darktable 3.0. In general, taking the time to watch Aurélien Pierre’s latest videos on this version 3.0 will help you to become more efficient in processing your images and make the most of this new workflow and, ultimately, gradually save a lot of time.
However, a summary of this workflow and its benefits is provided below.
The linear RGB workflow gradually introduced since darktable 2.6 with filmic and color balance allows to free oneself from the graphic heritage of the years 1980-1990 centered on low dynamic range photography for paper printing. This traditional workflow, known as display-referred, assumes that RGB values encode colors (in the perceptual sense) and manipulate them in a psychologically realistic way. Unfortunately, psychophysical models that link (physical) light to (psychological) color sensation are only valid for images with low contrast (or low dynamic range), in the order of 100:1 (6.67 EV), which poses increasing problems as modern cameras see their dynamic range increase (currently between 12 and 14 EV, or 4096:1 to 16384:1). To be anticipated if you want to push your low lights: parasitic shade turns and over- or under-saturation problems, color that explodes when you correct the luminance, luminance that explodes when you correct the color… Hell.
The linear RGB workflow, known as scene-referred, assumes that the RGB values encode light emissions, i.e. a light spectrum reduced to three intensities through the camera’s sensor, which is nothing more than a colorimeter. It manipulates RGB values in a physically realistic way, digitally reproducing the effect of optical filters. This not only makes it possible to accommodate any dynamic range, without having to change algorithms (and therefore no more specific HDR processing), but also to obtain more natural and predictable results.
This new workflow - although already adopted by the film industry since the 1990s, out of practical necessity - still acts as a curious beast in photography, and will change the habits of users who will have to reason more and more in terms of light (physical) and less and less in terms of color (psychological and perceptual).
But there’s nothing to worry about: a child painting on a sheet of paper manipulates color in a physically realistic way, without even realizing it. He knows that adding blue and yellow will give green (note that painting is a subtractive synthesis). However, if we try to subtract blue and yellow from white in drawing software that works in a space related to display (like Gimp), we get black. If you try to add blue and yellow, you get white. It will be necessary to go through Krita, and her linear painting style, for adding yellow and blue to give a “kind of green” (which is more like cyan). This is enough to prove the intuitiveness of the physically realistic linear RGB workflow, even if the colored perception of the equation is removed.
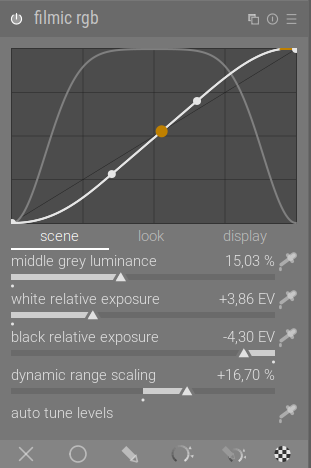
New filmic RGB module
filmic RGB is the new version of filmic (2.6 one), rewritten for the new internal API allowing the user to define an RGB color space for the pipeline (to be set in the input color profile module, as explained earlier). Like the previous version, its objective is to transform RGB values from the space of the photographed scene (potentially high dynamic range) to the space of the screen (low dynamic range), by defining an intention for preserving contrast in midtones (within latitude). It can therefore work both in compression or expansion of the dynamic range, or even keeping the dynamic range identical, instead of an “S” tone curve.
By the way, some bugs have been fixed, such as the over-saturation (especially in the reds) caused by the chrominance preservation mode, and several changes have been made to improve ergonomics:
- The controls are divided into scene/look/display tabs, which are clearer and lower on the screen.
- The filmic curve is a new spline created to reproduce the behaviour of the densitometric curves of the film. It offers deeper and less faded blacks than the previous version, better local contrast in midtones, and never oscillates, no matter what the parameters.
- The output space transfer function automatically adjusts to keep the grey point on the identity line, and allows better control of the curve.
- Latitude is defined as a percentage of the dynamic range, and no longer needs to be adjusted if the relative exposures of white and black have been changed.
- The desaturation curve is displayed on the graph.
- The global saturation setting, implemented to correct the effects of the chrominance preservation bug, is removed. The use of saturation in the color balance is recommended.
Two new chrominance preservation modes have been added in addition to the old one (max RGB): luminance Y and power norm. They will allow to adapt to different scenarios, for example when the max RGB mode darkens the blue skies too much.
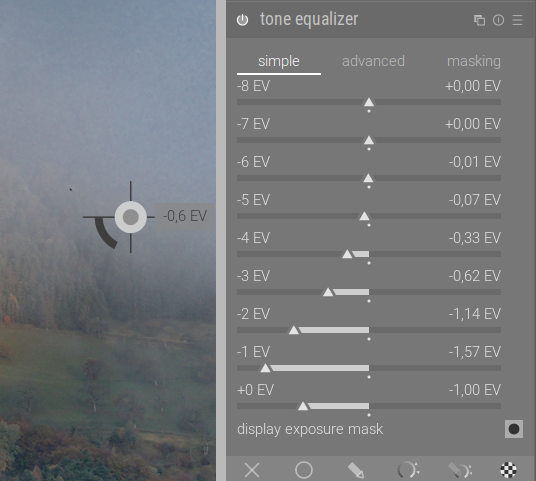
New tone equalizer module
The tone equalizer takes the functionalities of tone mapping and curves, but adapts them to a logarithmic representation of brightness (in EV) in accordance with Ansel Adams zone system. Its function is simply to define a parametric exposure compensation, which varies according to the original brightness of the pixels. It is possible to fully reproduce the operation of the tone equalizer by using several instances of the exposure module merged in parametric mode and set to isolate different exposure levels. The tone equalizer only speeds up the process, and automates parts of it.
It offers an interface that allows you to quickly define a selective exposure compensation for each exposure band between 0 EV (white) and -8 EV (black), similar to the audio equalizers of hifi amplifiers. Exposure compensation performs content extraction by guided filter, allowing the same correction to be applied to continuous areas of the image, and thus to preserve local contrast (the logic is similar to the module shadows and highlights but the guided filter is designed to never produce halos on the contrasting edges). The tone equalizer therefore makes it possible to re-light the scene afterwards but in a physically realistic way, without affecting chrominance or creating halos, and therefore much more credible than traditional HDR mapping or shadow correction tools.
It also innovates on user interaction, by offering an interactive cursor that allows, when hovering over the image, to display the exposure of the area under the cursor and to directly adjust the corresponding exposure compensation via the mouse wheel.
The detail preservation mode (based on the guided filter) can be disabled, in which case the module behaves as a simple tone curve with a logarithmic interface and an algorithm that preserves the chrominance. The interpolation of the settings using a series of Gaussians, it will then be smoother than the interpolation by monotonic spline and less oscillating than the interpolation by cubic splines of base curve and tone curve modules.
New rgb curve and rgb levels modules
These two modules use the features of the old levels and tone curve (used in RGB mode), but work in the RGB space of the pipeline and use linear RGB fusion modes (note that the old modules merge in Lab). They also allow to manage RGB channels separately, and to use the same chrominance preservation logic as filmic in attached channels mode.
It is useful to note that the RGB levels module uses exactly the same algorithm as the color balance module in slope, offset, power mode: the black setting corresponds to the offset setting, the grey to the power, and the white to the slope. It is essentially the interface that changes, and the fact that RGB levels assume input values between 0% and 100% and pre-calculate a 16-bit LUT for the transformation to be applied (technique used 10 years ago to accelerate processing, less useful today), while color balance accepts values between 0 and infinity and directly calculates the exact pixel value.
Major improvements on noise reduction
Several improvements have been made regarding denoise profiled to improve denoising quality and to make user’s life easier.
Context: how does denoise profiled work
Noise is a quantum phenomenon that generates incoherent RGB values for certain pixels randomly and that is perceived as luminous or colored “grain” that scatter the image where one would expect smooth surfaces. As is often the case in science, when faced with a random phenomenon, we deal with it through the law of large numbers by seeking a statistical distribution that models the random phenomenon, of which two essential parameters are the mean and the variance.
Variance is a measure of the dispersion of values around the mean, so in our case it gives information on the typical deviation between the mean and a “normal” pixel. The profile allows the variance to be expressed as a function of the mean.
A profile is a set of a few parameters (2 per channel and per ISO value in our case) that describe the way the noise variance change depending on luminosity. It is built using measurements done on test images (that are blurry to be sure that anything that isn’t blurred is noise).
Denoising algorithms are usually made with the assumption that variance does not depend on luminosity. Applying them on data where this hypothesis is not verified gives uneven smoothing of the noise. The profile allows to define a transformation on the image, called a variance stabilization transform (VST), that produces an image where the variance of the noise becomes constant: after the transform the noise in dark and light areas then has the same characteristics, and the denoising algorithm can do its job much more easily.
New features in denoise profiled to improve noise reduction quality
We have seen that darktable uses two parameters for each channel and ISO value to perform its variance stabilization transform.
An important change introduced was to change the variance stabilization transform to make it more generic. The new variance stabilization transform admits a 3rd parameter allowing to control the amount of denoising on shadows highlights, which helps finding a good balance. Ideally, this parameter should be determined during profiling, but for the moment it is automatically inferred with a heuristic from the 2 known parameters of the profile. It can also be modified manually in the interface. Note that this parameter corresponds to the gamma parameter present in the Rawtherapee noise reduction. This change in variance stabilization transform also provided an opportunity to introduce a bias reduction parameter, which corrects the image when shadows turn purple (which happens regularly at high ISOs).
Several new parameters have also been added to the non-local means algorithm.
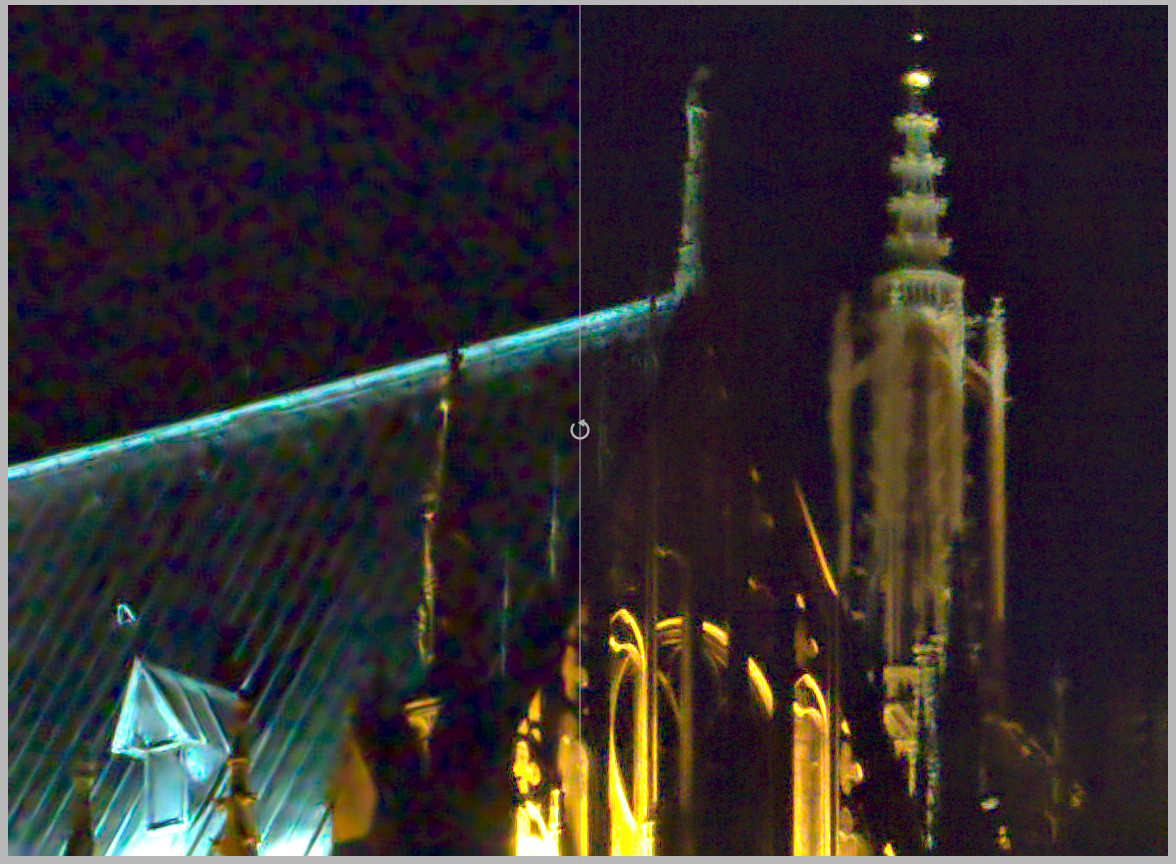
The first parameter added is the scattering parameter, which allows to effectively reduce coarse-grained noise. A small example on a picture of jpg54, with what we used to get (on the left), and what we can get now (on the right). We see that the noise reduction on the left creates a very ugly coarse-grained noise.
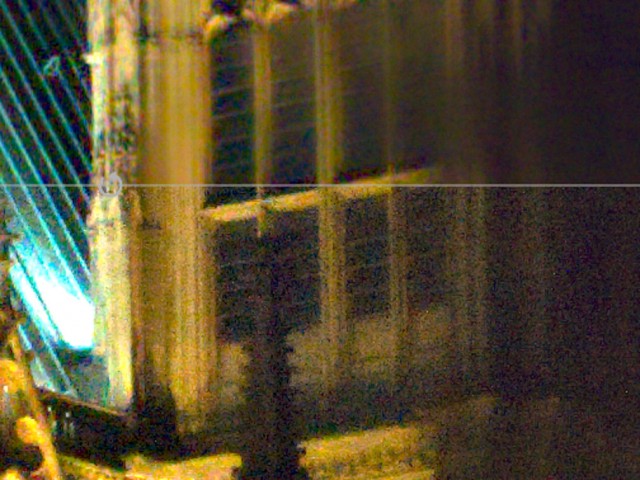
Another parameter called “central pixel weight” was added. It mainly controls the details: it allows to recover details (and fine grain noise). When set to high values, the module mainly reduces chrominance noise. This method is the adviced method if you want to reduce mostly chroma noise. An example, deliberately a little overdone, with no detail recovery at the top, and a strong detail recovery at the bottom:
New features in denoise profiled to improve the user experience
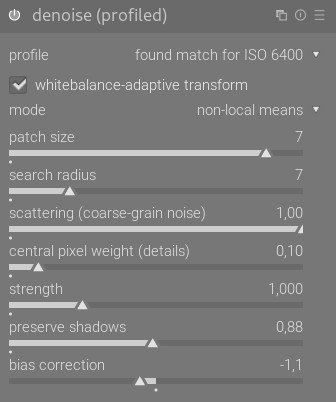
The addition of these new parameters gives a rather complex interface, with many parameters:
An “auto” mode has thus been added, which sets the vast majority of parameters on its own based on the profile. This mode has a slider to adjust the proposed automatic setting. Increase the value of this slider if the denoising is unsatisfactory, reduce it if the local contrast is smoothed too much. This setting should be used especially if you have under-exposed your image significantly.
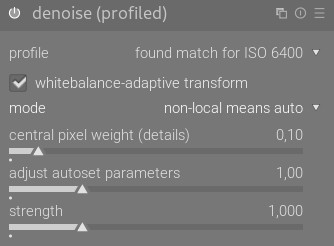
If you change the values in this mode and return to a manual mode, the sliders will be updated, as if you had changed them directly.
In addition, the module’s default settings are also automatically adjusted according to the profile, allowing a one-click noise reduction activating the module.
Other important features
new 3D Lut module
The 3D lut module has been introduced. It allows to apply 3D matrix to a photo. These matrix allow the module to convert an RGB value into another RGB value (for B&W, all RGB values into grey, black and white values). They are used to simulate silver films or to create colorful universes. This module is the same as the older HaldCLut module.
3D lut use three types of matrix: .cube files, HaldCLut .png ones and compressed LUT.
- .cube files are text files that are widely used in video and by colorists.
- HaldCLut.png files are image files. They are smaller than.cube files.
Warning: These two file types (.cube and.png) being too large, they are not saved in the darktable database or in the .xmp files; only the directory and the file name are saved. This makes it more difficult to share the processing using 3D Lut and these files should not be lost. For another user to be able to redo the processing, it will be necessary to provide him the file (.cube or.png) with the RAW file and the .xmp without the application of 3d Lut because the link will be different. This correspondent will have to apply the module to Lut’s directory on his machine and operating system.
- Compressed LUT files are compressed.png image files with routines proposed by G’Mic. Their size allows them to be included in the database and .xmp, so they can be retrieved and transmitted more easily to another user. You can download HaldClut.png files that simulate silver films and cube files
You will also find an article in English which gives links to Lut files.
How to use 3D lut:
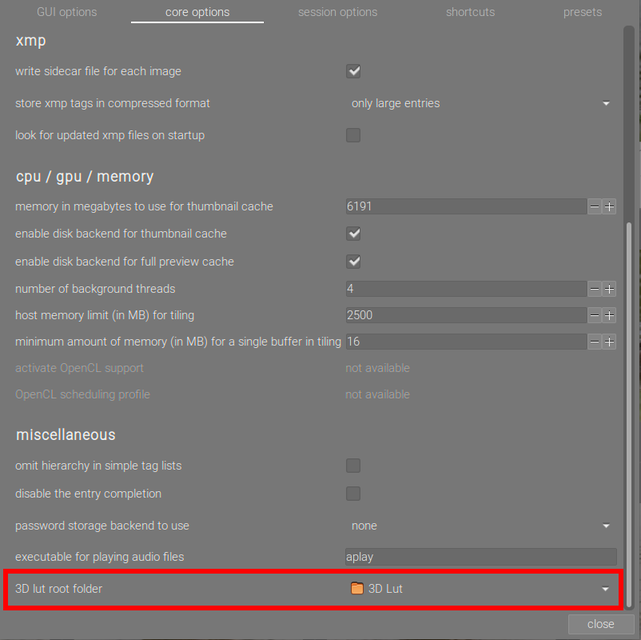
- Define a directory to use in the preferences at the end of the core options tab:
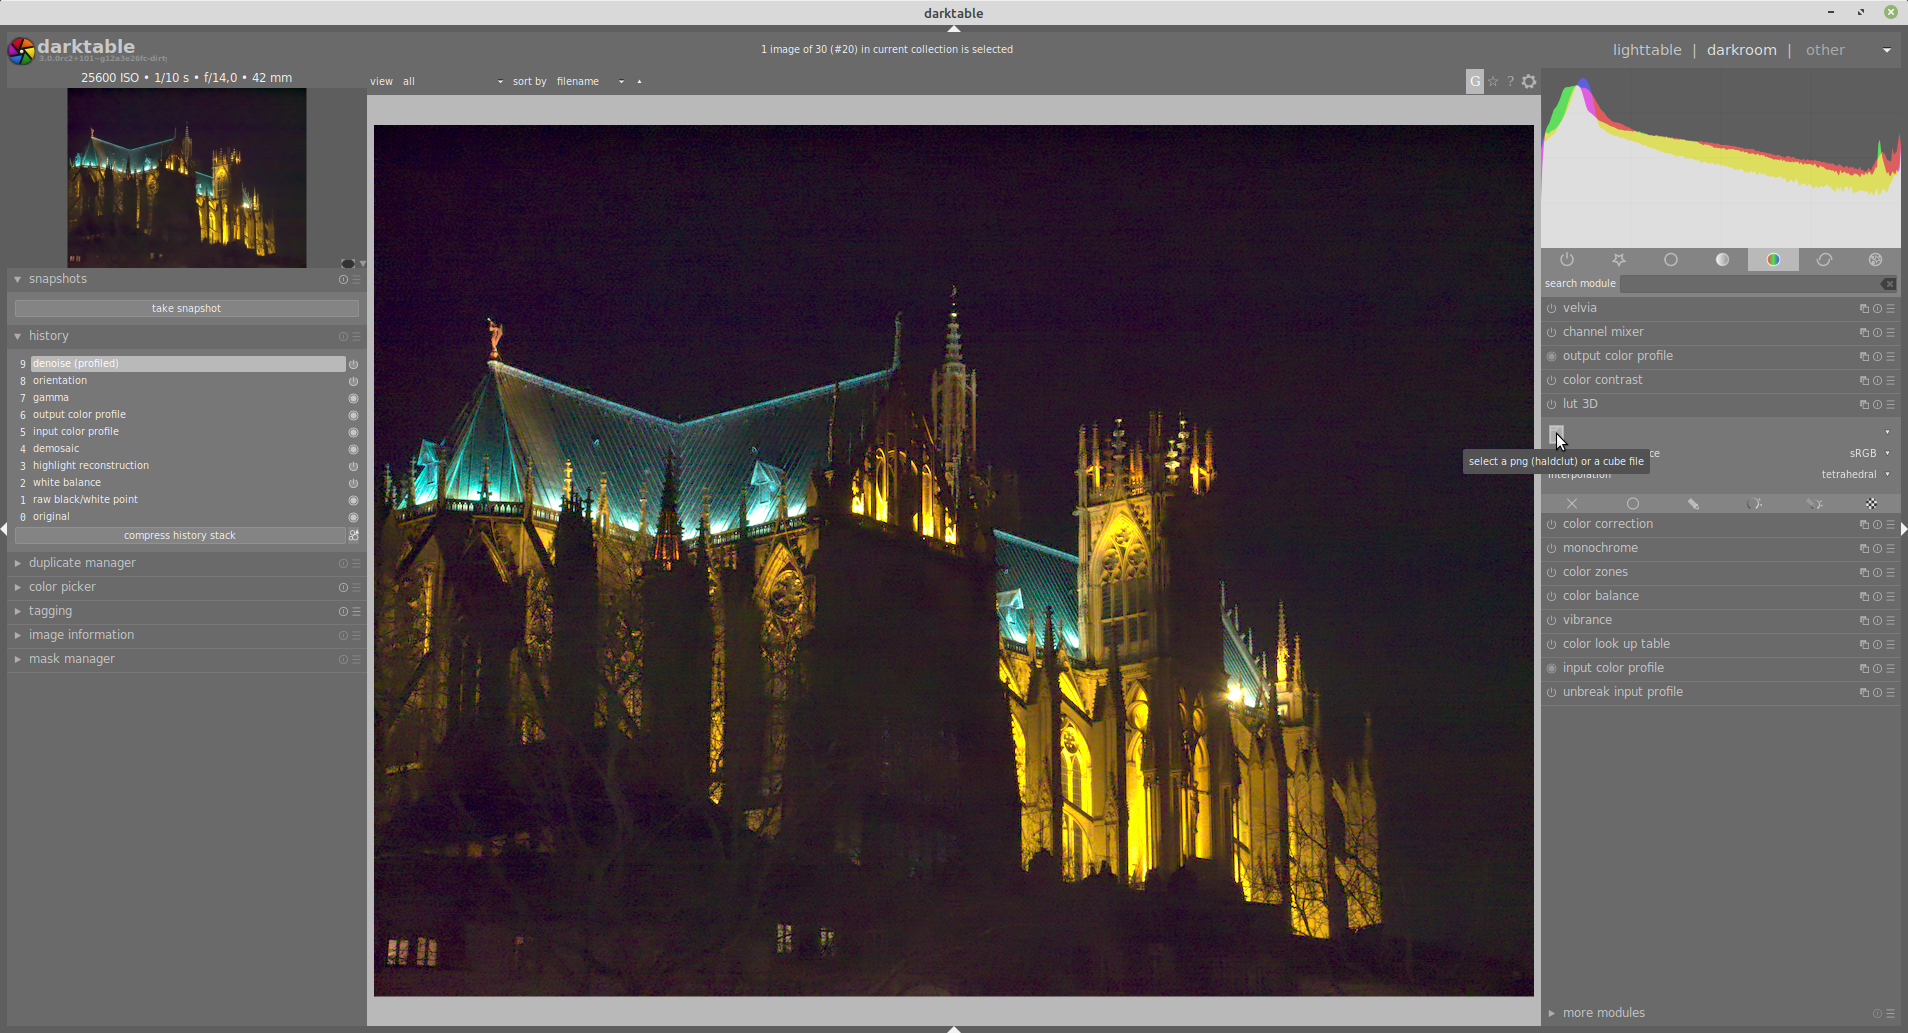
- Go in darkroom view and open 3D Lut then click on the icon inside:
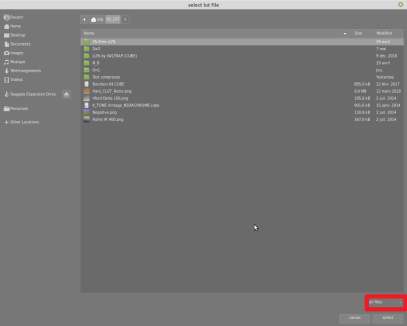
- Opening the files only shows the “png” files, so select “.cube” or “all files”:
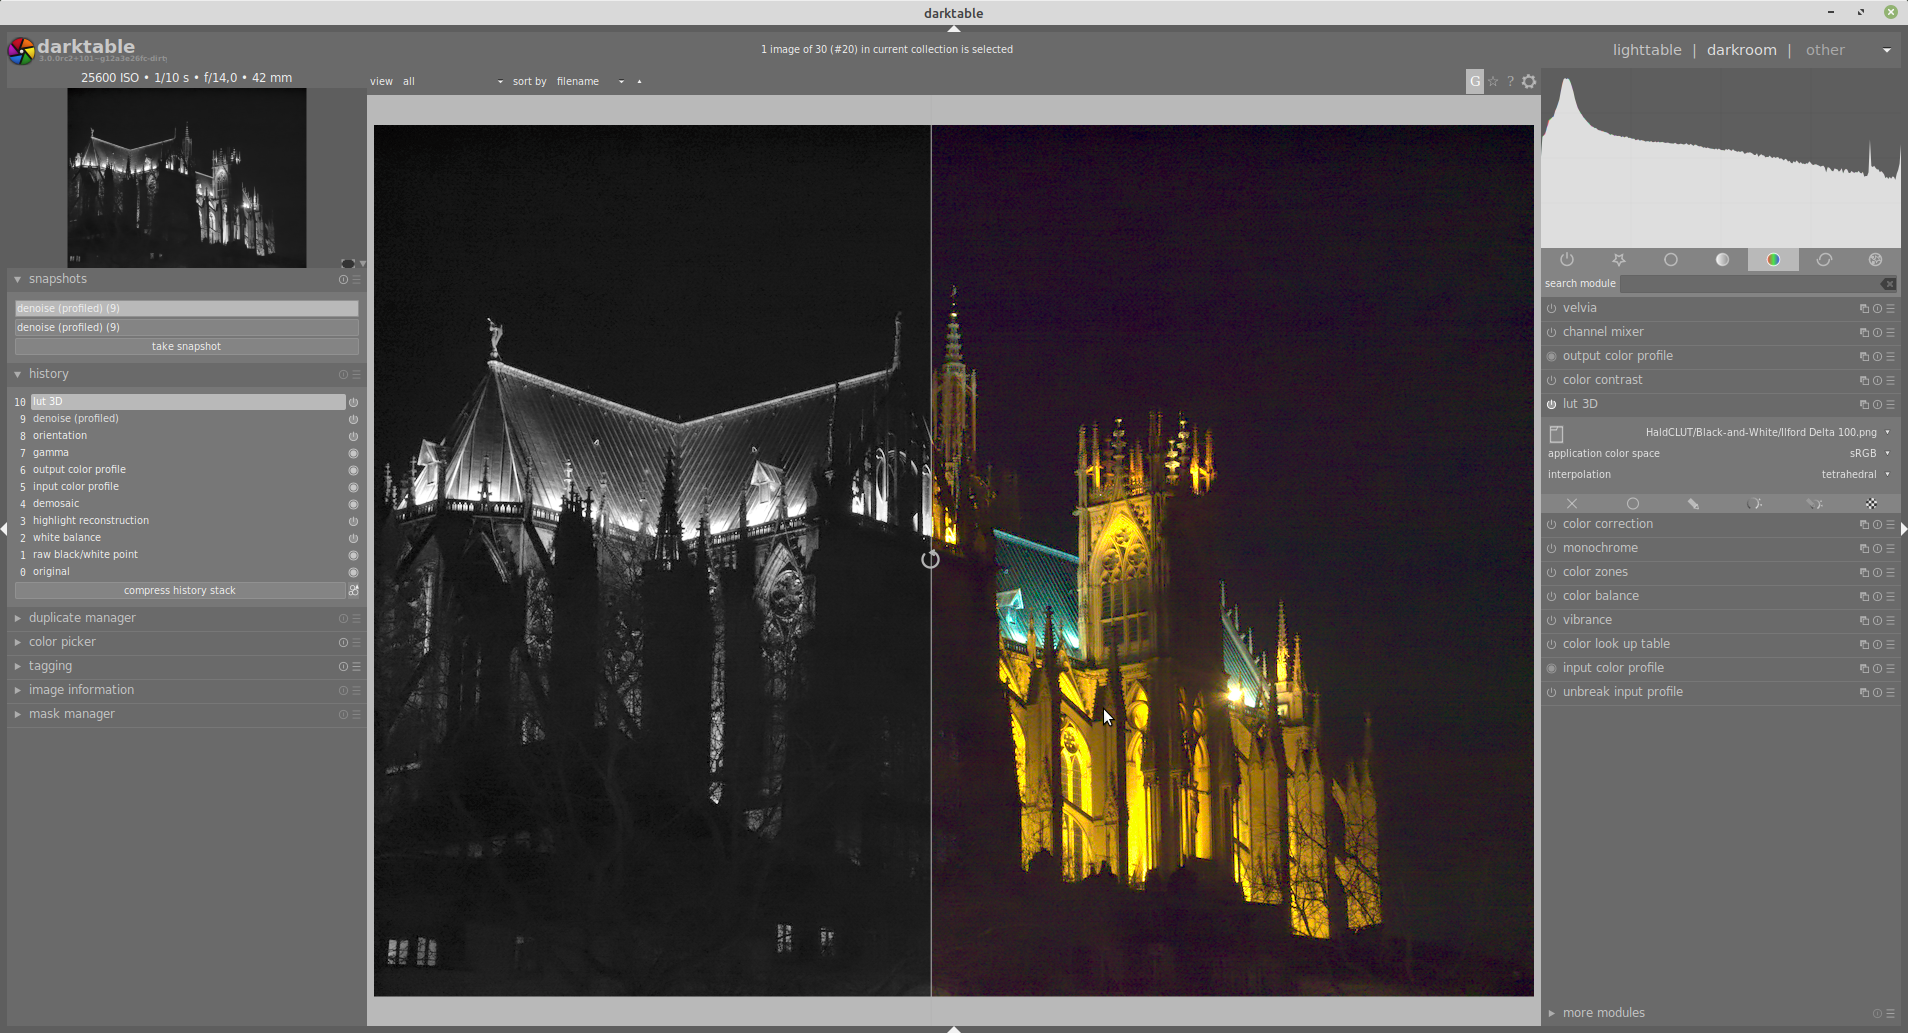
- You get this result with a B&W .png:
- And this with a color .cube:
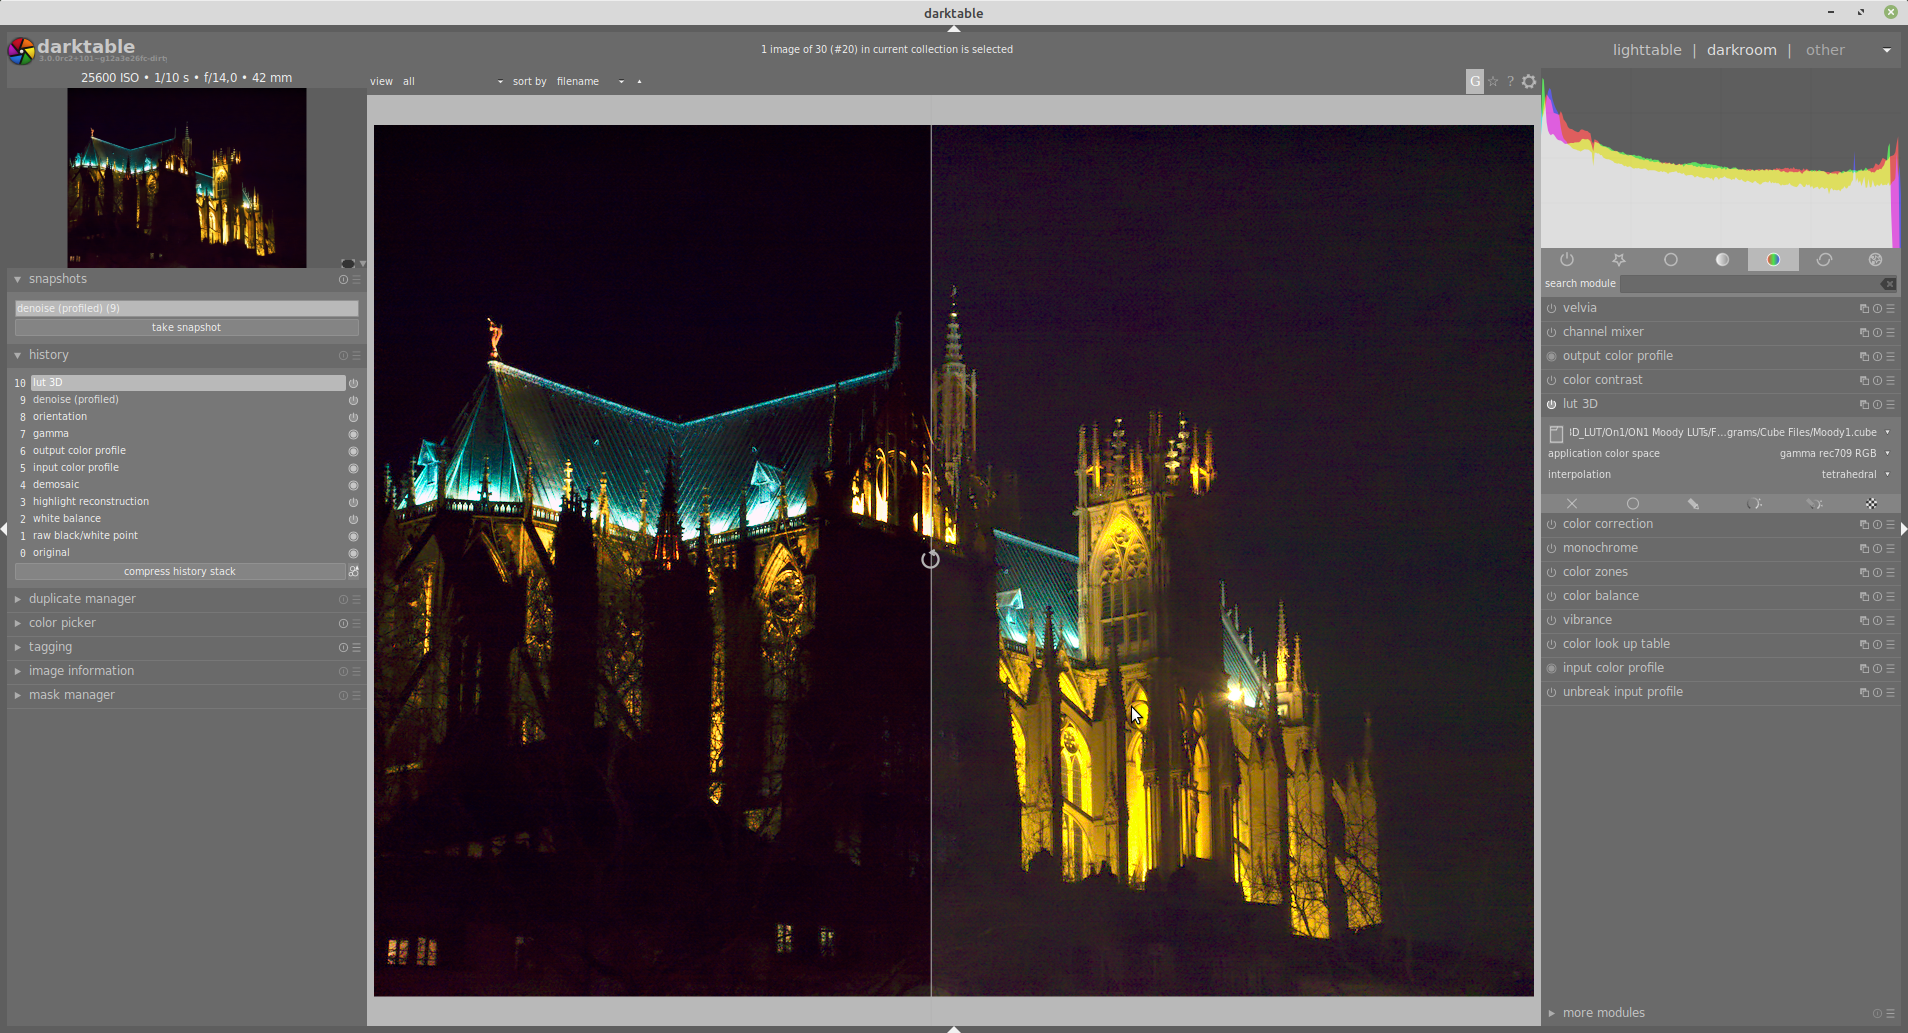
For color space, use sRBG with.png and REC.709 for.cube.
The “tetrahedral” interpolation method is suitable in the vast majority of cases and it is rare to see the difference with the other two methods (except sometimes with small conversion tables).
Complete rework of tagging module
The tagging module, present in darkroom and lighttable views, has been completely redesigned. Its use is much more intuitive than before. Many functions that previously required complicated handling are now available with one or two clicks. The general appearance has not changed fundamentally: two stack windows, the top one showing the keywords attached to the selected images, the bottom one displaying the keyword dictionary available in darktable. In between, an input field. The comparison before/now stops there due to lot of changes on the windows content and especially manipulations on them that are much more intuitive and better framed.
The top window (attached keywords) always shows the list of keywords attached to the current selection. These keywords are always presented by line according to darktable’s own notation (the hierarchy levels are separated by vertical bars,’|’ pipe in computer language). This is where the similarities with previous module ends.
To the left of each keyword is now a small icon that can have three aspects: either nothing at all, or a dash, or a check mark.
- Nothing at all: this is a hovered image, but not selected.
- A dash: the keyword is attached to at least one of the selected images.
- A check mark: the keyword is attached to all selected images.
To the right of the keywords, in brackets is displayed the number of images indexed by this keyword in the current selection.
Big new feature: a right click on a keyword displays a context menu containing one or two items.
One item:
- Detach the keyword - does exactly what he says!
Two items:
- Attach the keyword to all selected images - If you have selected a series of images containing different keywords, this item allows you to attach the keyword to all selected images; those that were already labeled remain so, and those that were not become labeled. Very practical!
- Detach the keyword - As above.
At the bottom of the window, the number of buttons has increased from two to five, In addition to the already known attach and release buttons, three more appear:
✓allows you to activate or not the display of darktable specific keywords, which considerably reduces the presentation.⥮allows you to modify the classification of keywords in the window, either in alphabetical order or according to the number of images labeled.-the latter finally displays the hierarchy of each keyword or just the terminal keyword.
The middle entry field always allows you to search for keywords or create new ones. However, for the creation, it will be advantageous to use the new dedicated window, because it allows more things (see below). Finally, a cross button on the right allows you to delete the content of the input field.
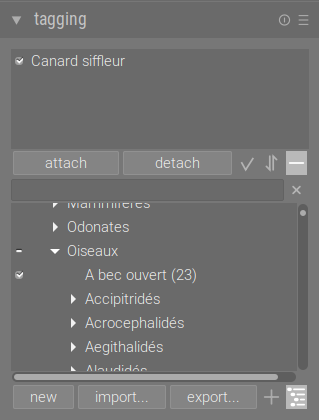
The bottom window (keyword dictionary) always shows the list of available keywords. A big improvement again, this time it concerns readability: the keyword hierarchies are presented in tree form! In the same way as keywords in the collection filter module or hierarchical styles in the styles module are. As in the attached keyword window, on the left can appear one of the same small icons. Their meaning is as follows:
- Nothing at all: this is a keyword available but not used by the currently selected photos.
- A dash: refers to a hierarchy containing at least one keyword attached to one of the selected images.
- A check mark: the keyword is attached to one of the selected images.
To the right of the keywords, in brackets, is displayed the number of images indexed by this keyword in ALL the dictionary, or nothing at all if there are no images attached to this keyword.
Another new important feature! As in the attached keyword window, a very complete contextual menu is also accessible by right-clicking:
- attach the keyword - does exactly what he says….
- detach the keyword - same as above
- delete the keyword - same with confirmation!
- delete branch - deletes a keyword and all higher-level hierarchical elements if they are no longer used by any other image.
- create a keyword - open a dialog for creating keywords. It is of course always possible to create a keyword with the input line and the new button, but creating via this option allows more things. The keyword can now be defined here as private. It will therefore not be included in the exported images. You could also affect here a keyword to a category (a category is here to help you structure your keywords). Finally, a synonym can be added to it to make it easier to enter frequently used keywords.
- edit (modify) keyword - allows the modification of the keyword and its attributes described above.
- rename a path (modify branch) - allows you to modify intermediate keywords in a hierarchy.
- copy keyword - allows you to add the keyword in the input field to make it easier to search or create.
To which is added, if the keyword is attached to at least one image:
- go to the collection linked (indexed) by the keyword - which copies the keyword into the collection filter module to activate related collection.
The buttons under the dictionary window have also been changed from four to five.
Previously the four buttons were: new, delete, import and export.
Now the buttons are:
new- works as before (for creating keywords, see the note on the item “create…. “in the description of the context menu above).import- works as before.exporter- works as before.+Enables/disables suggestions. Is only accessible if the following button is in list mode.≣Switches from list view to tree view. Returns the old display (list view) with hierarchies as a line separated by pipes (|).
As before, it is still possible to attach/detach keywords by double-clicking.
Last but not least, both windows are now resizable! Simply do a Control + wheel to enlarge or reduce each window individually. This makes it very easy to use the entire right column to comfortably manage your keywords, or to reduce each window to a minimum size to always have your keywords on hand while having another module deployed.
New basic adjustments module
basic adjustments allows, as its name suggests, basic adjustments, on essential options in a single module. For the use of this module as well as for the raster masks part who will follows, I chose a RAW proposed for processing by @holly76.
This module use the two main sliders of exposure:
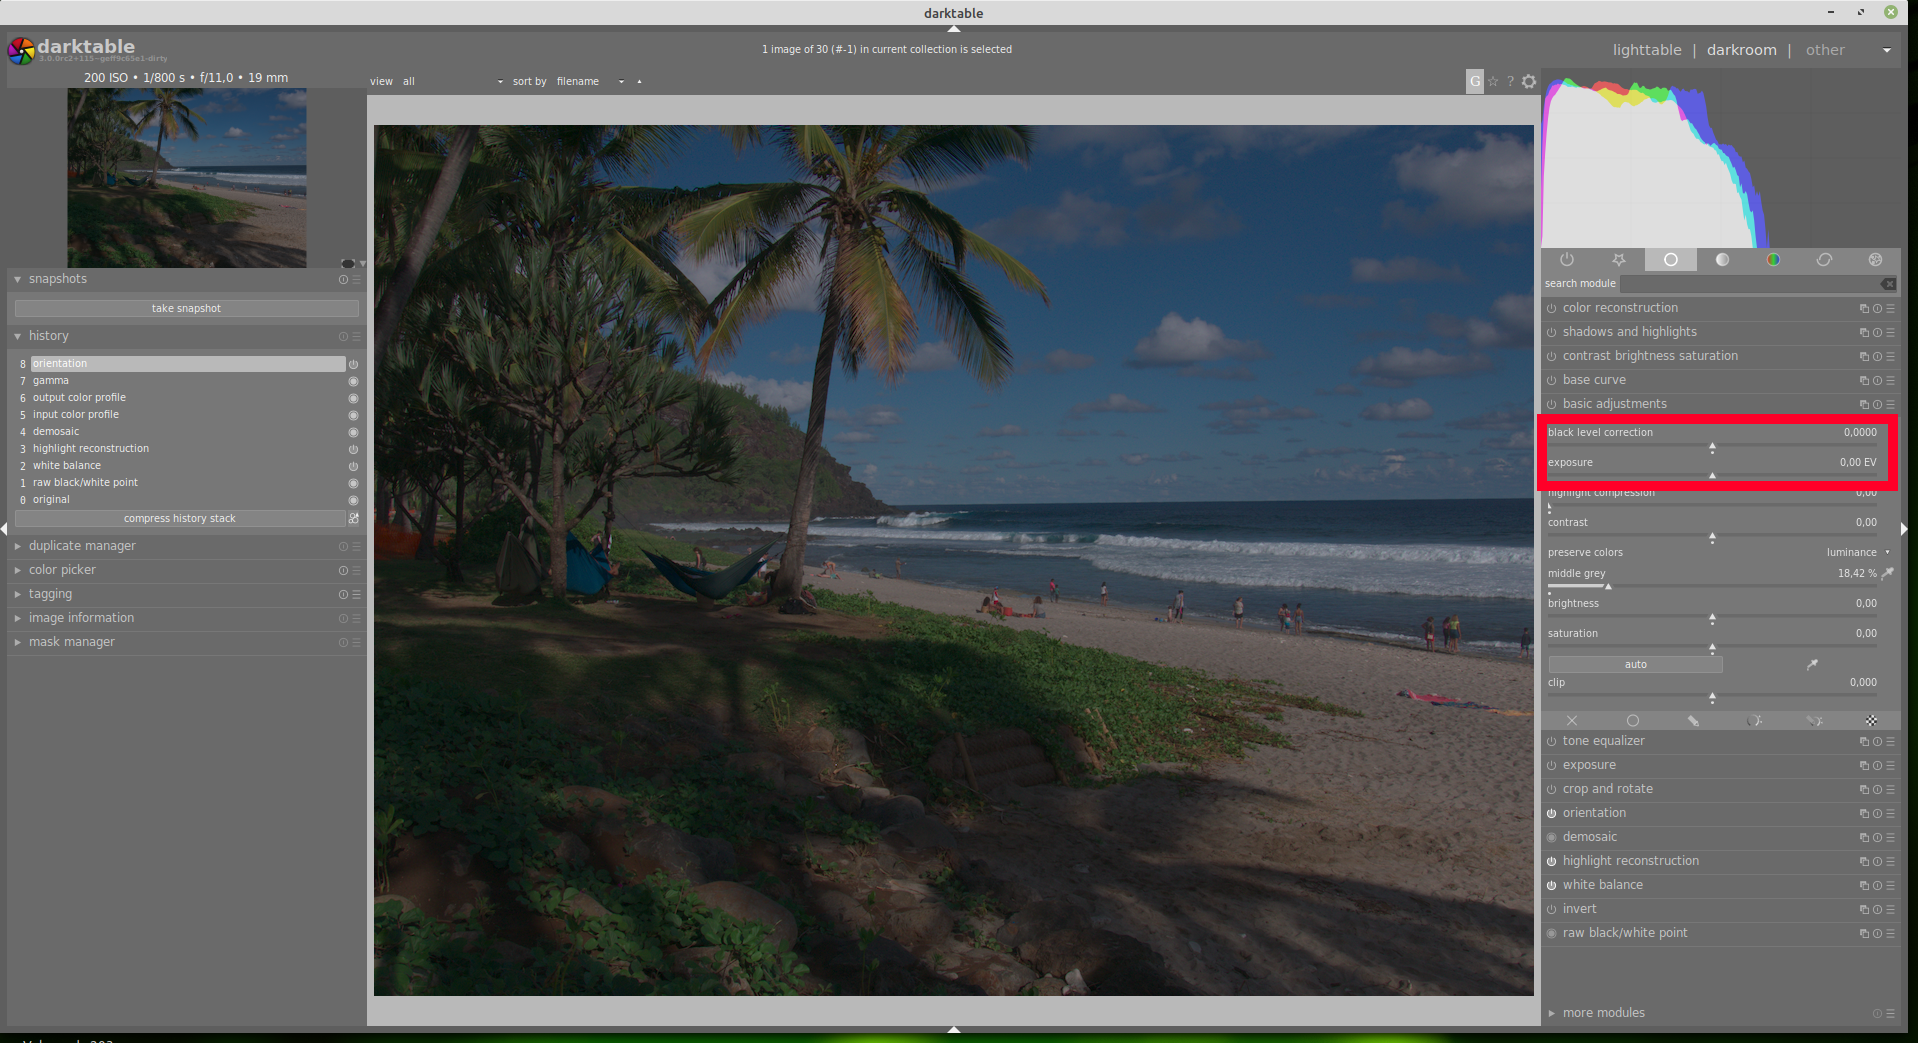
The three sliders of contrast, brightness and saturation:
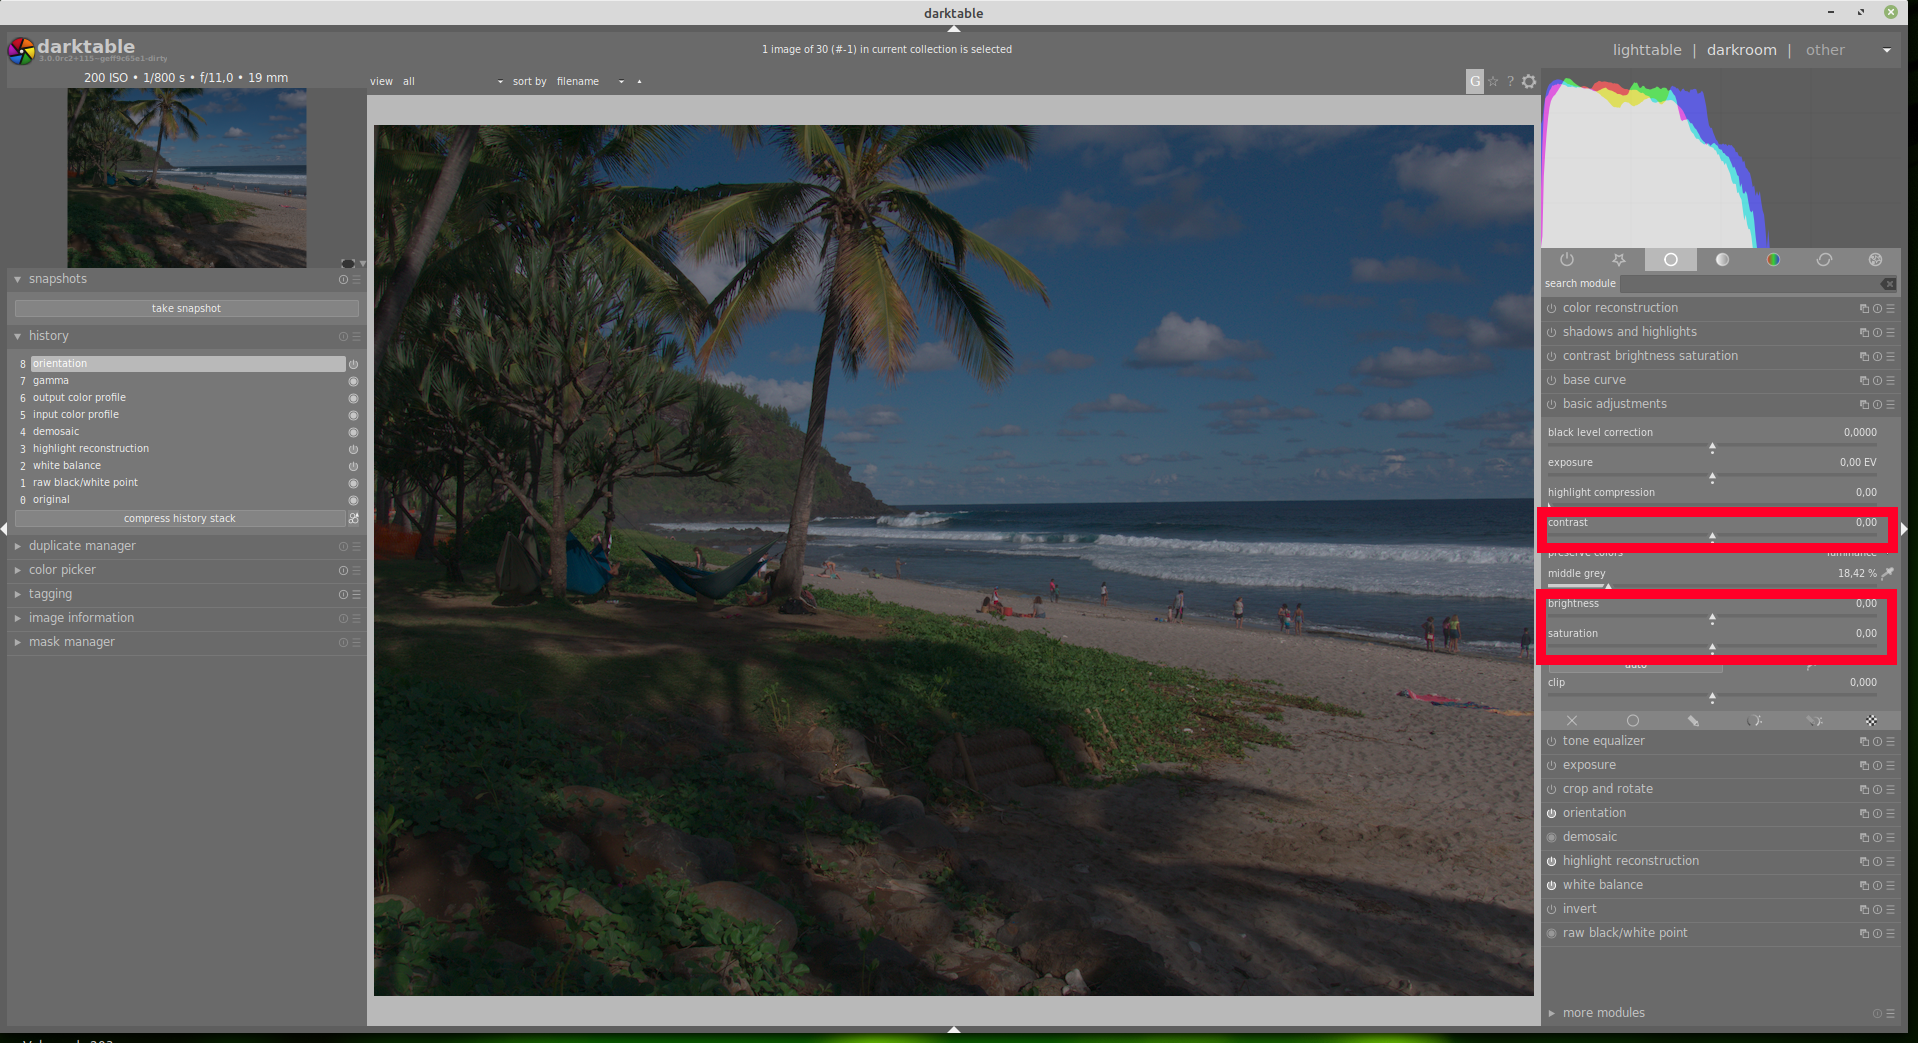
Warning: Do not use basic adjustments with the modules exposure and contrast brightness saturation. Indeed, this would be like creating a second instance of the module without a mask: preserve color uses the same values as in base curve (options also added in this module on darktable 3.0). It is therefore preferable not to use these two options at the same time and even to use these two modules at the same time.
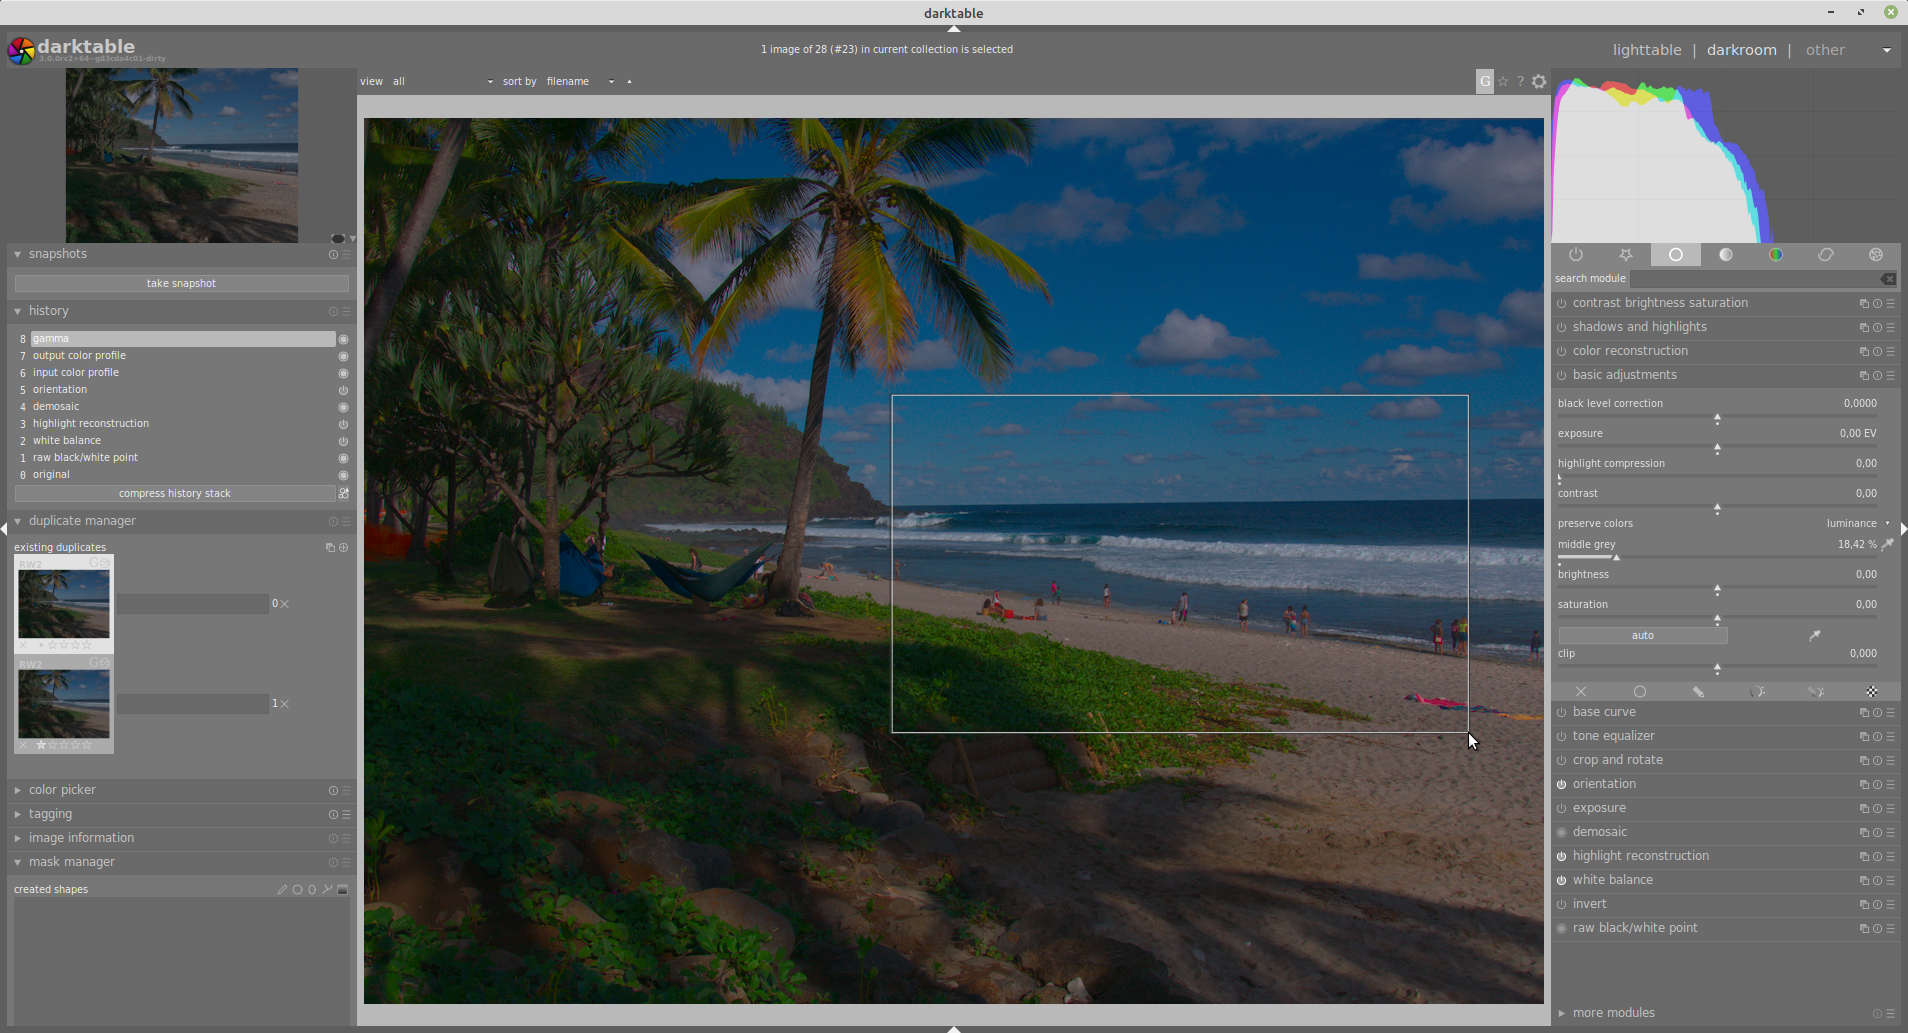
An example of processing:
I chose this largely underexposed photo. I use the picker with an area that seems to represent a correctly exposed area:
The sliders are adjusted to process this photo:
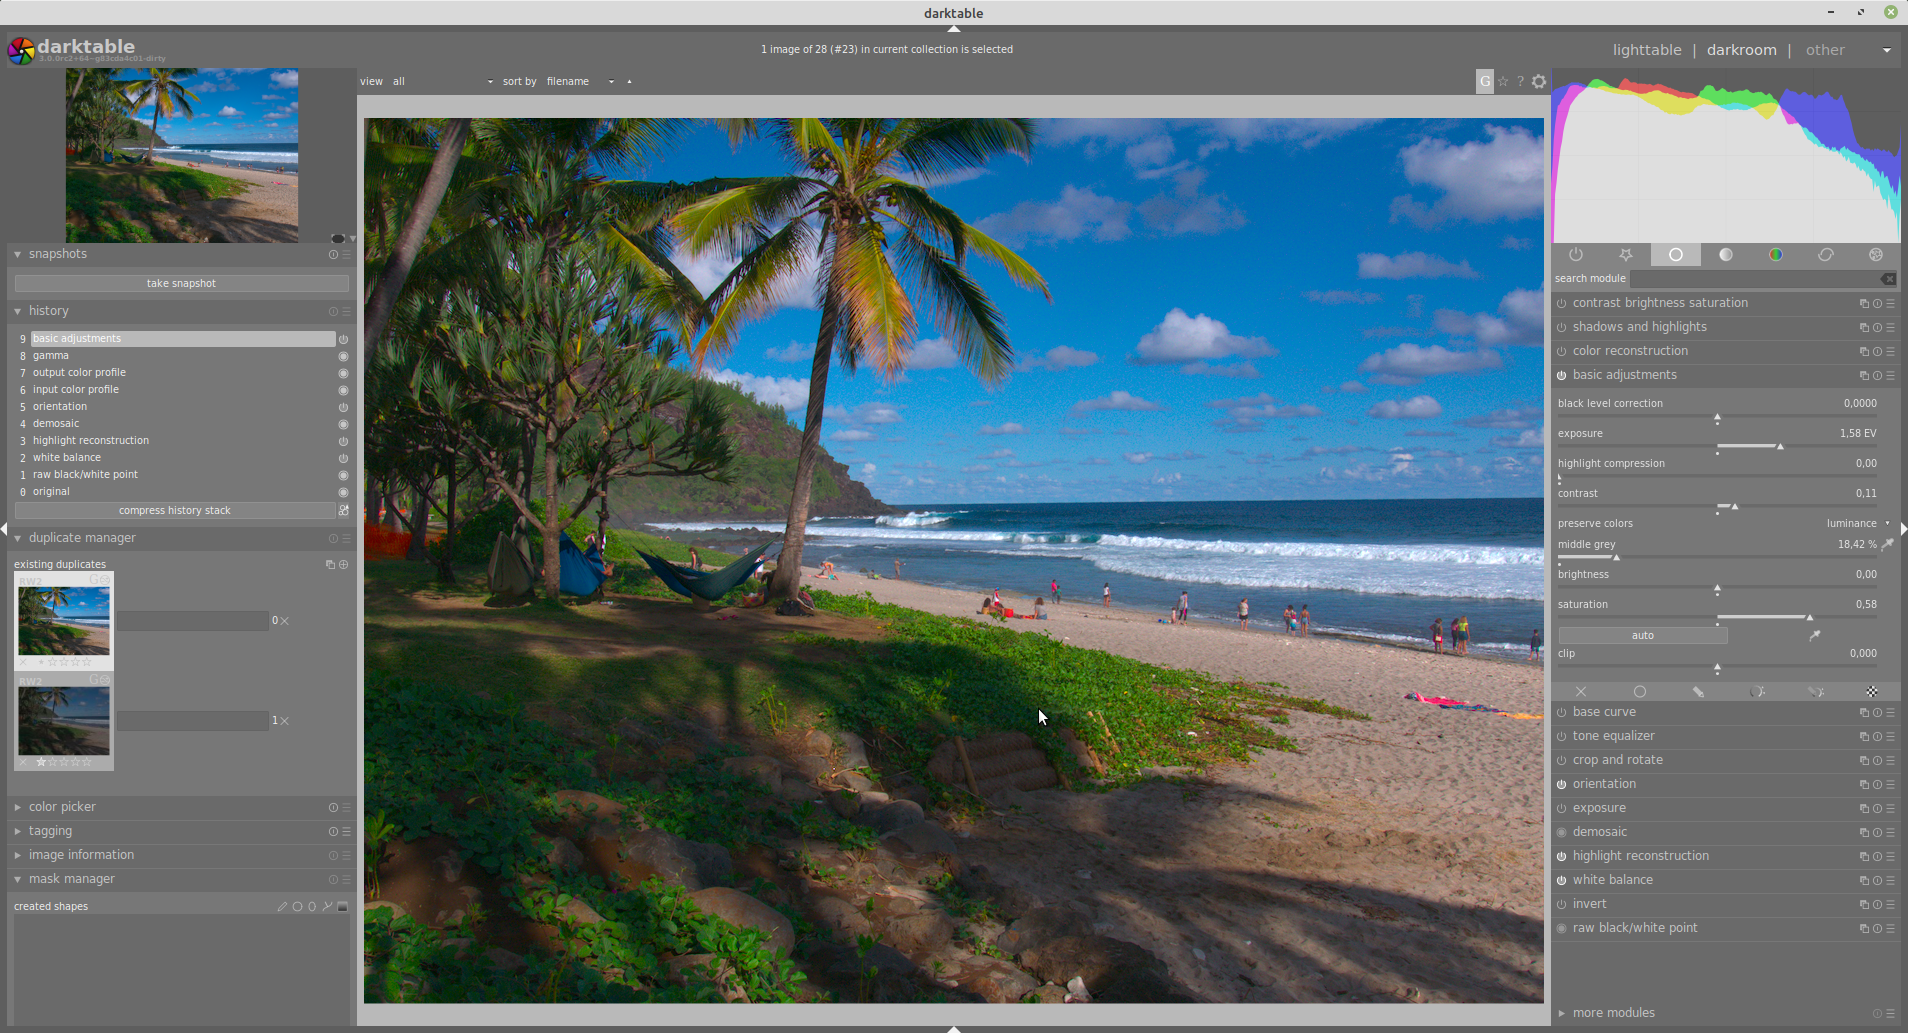
Using this module allows you to quickly correct a photo that does not require too much processing. It is therefore particularly suitable for simple and fast processing, or to begin in RAW processing (as shown in this example). The main limitation of this module is that these different parameters usually occur (via the different modules offering them outside this one) at different levels of image processing, so they do not provide quite the same rendering.
=> It must not be used with the new RGB workflow offered by the trilogy: filmic rgb, color balance and tone equalizer to which is added according to needs: rgb curve and rgb levels.
New raster mask
Raster masks add a new mode that allows you to reuse a mask from one module to another module. This is particularly interesting with parametric masks: copying the parameters from one module to another would not have been enough because the same parameters do not select the same pixels depending on where you are in the pipe. The raster mask reuses the mask directly, so it does not have this problem.
Warning: The raster mask can only take a mask from a module preceding it in the processing chain. It is also important to be careful not to move a module using a raster mask before the module of the original mask. This can currently lead to undesirable effects (in the worst case, a darktable crash).
I took the picture above for this example. I started by making a parametric mask on the shadows with the exposure module:
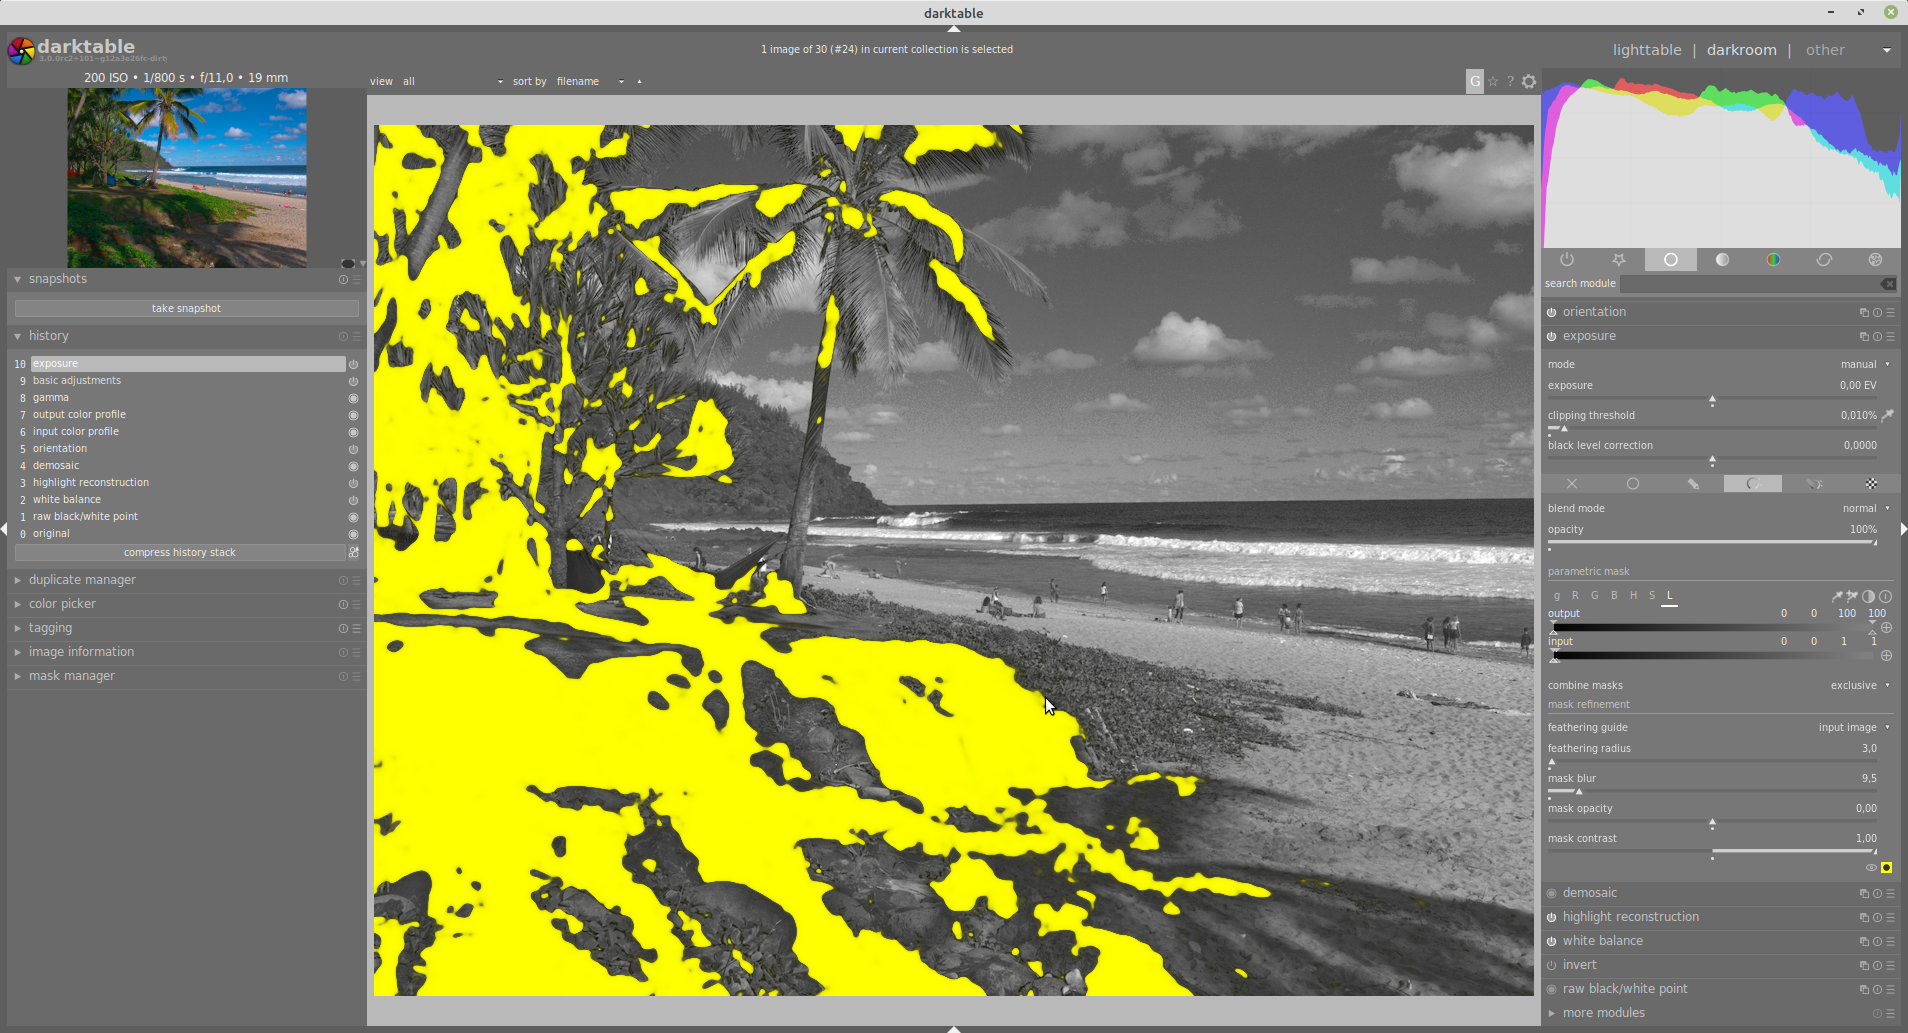
Then to lighten the shadows
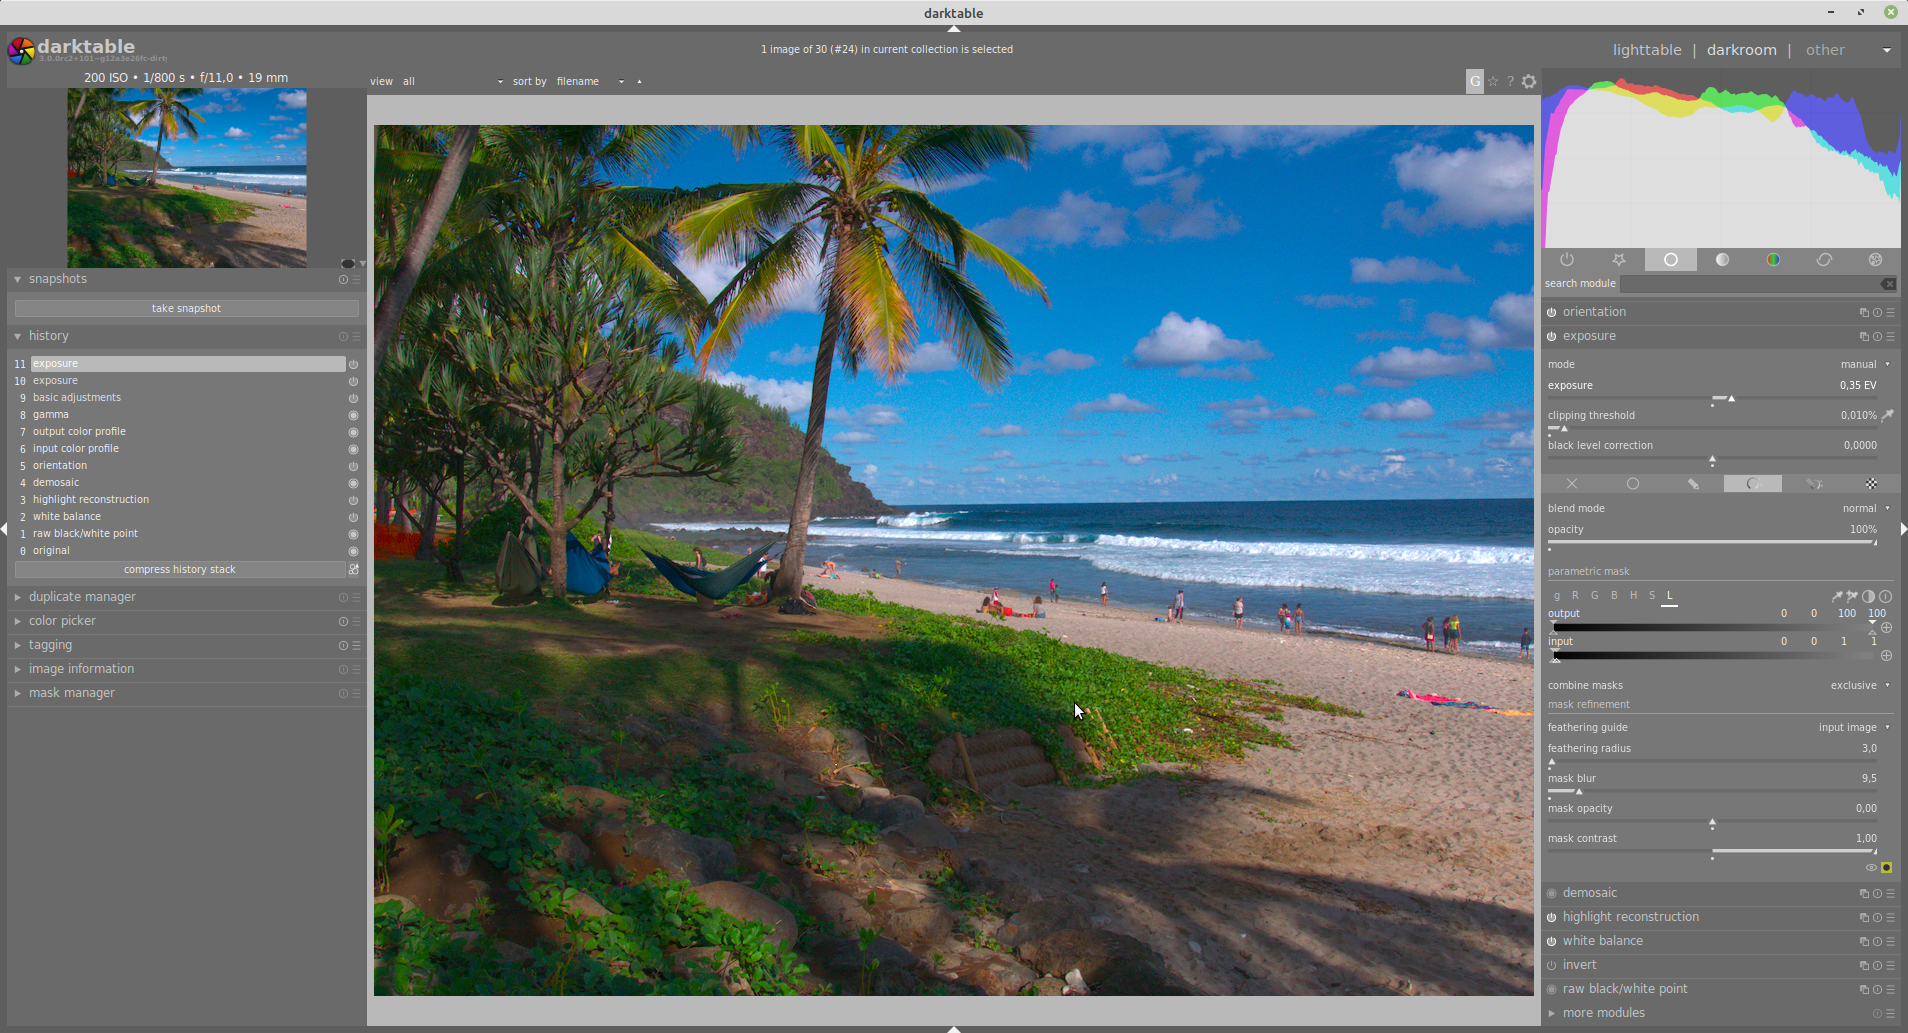
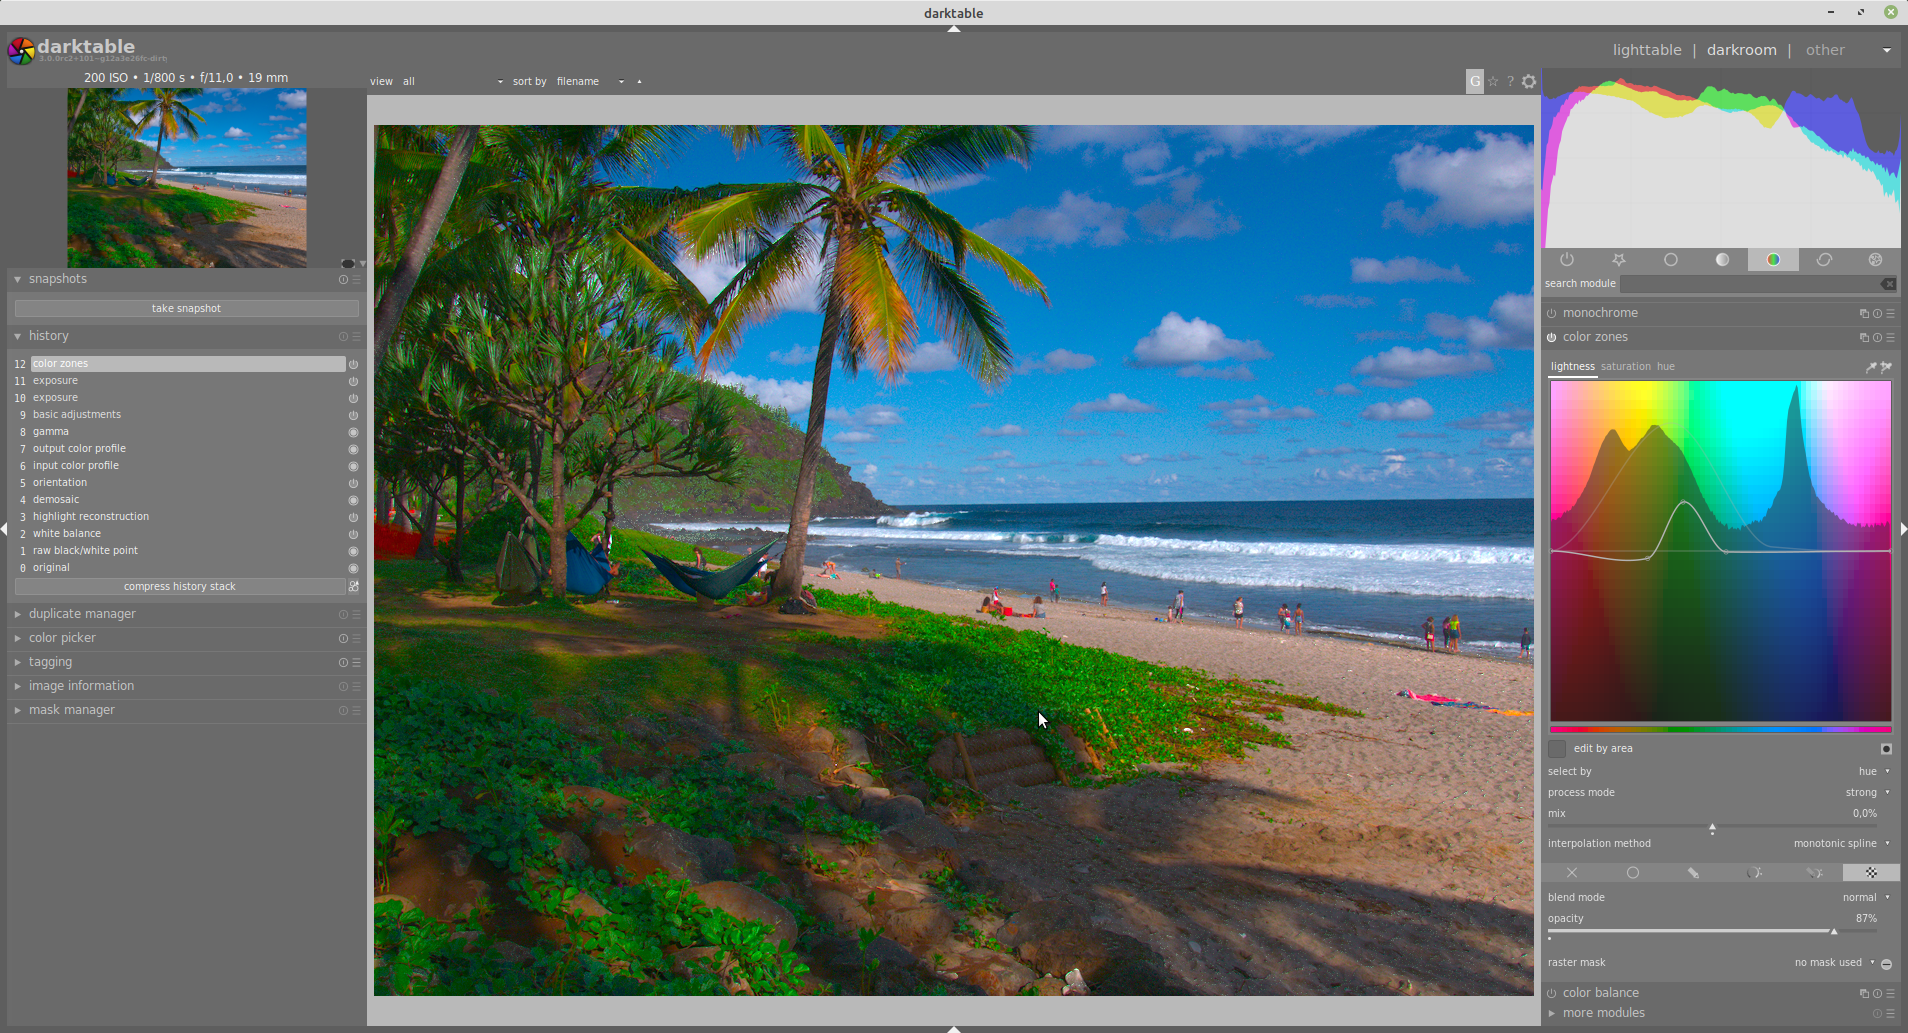
Then, to give a little pep to the shadows in the greens, I used the same mask in the color zone with raster mask. To do this, simply select the raster mask option and then choose the raster mask exposure:
Other improvements
The image processing chain (pipeline) has been thoroughly reviewed and optimized. It is now possible to re-order the modules via a Shift+Ctrl+Drag&Drop of these modules in the darkroom or via the instance menu and the up/down options.
WARNING: *It is VERY IMPORTANT TO UNDERSTAND that moving the modules changes the order in which they are processed, so it affects the rendering of the current image. The default order is safe and optimized for the majority of uses. It is recommended to move a module only if you know what you are doing and what effect it will have on your image. Under no circumstances should this change be used to “classify” these modules.
The color zones module now displays a histogram based on the “select by” option. It is now possible to add and remove nodes to the curve, but these nodes can still be moved with the old size control by checking the edit by area box. There is also a new “pronounced” processing option and a new picker that allows you to create a curve based on the selected image area.
Some performance and visual improvements are also to be highlighted on the color picker (left panel of the darkroom) and tone curve modules. More generally, many improvements have been made around the selection picker in various darktable locations.
A new preference option allows you to develop or fold a darkroom module automatically as soon as it is activated or deactivated.
The original export to Picasa has been updated to Google Photos.
darktable 3.0 also brings many bug fixes and some other minor improvements probably forgotten here due to this new version so rich in new features.
A 3.0.1 release already on its way
Due to the important changes made by version 3.0, a feature freeze was decided at the beginning of October and new text strings were frozen at the beginning of November. This allowed both time to fix as many bugs as possible and to translators the possibility to offer their translations for darktable 3.0 release on Christmas.
Thus, since then, new improvements have already been proposed or are under development. They should be published for 3.0.1, release expected in the first quarter of 2020. Here are some of the main new features expected for this future 3.0.1:
- A metadata copying functionality between images (keywords, geolocation, notation, color labels…)
- Added the possibility to search for several keywords in the collections search field, separated by a simple comma.
- Different module optimizations: tone equalizer, color zones…
- Adding a vibrance slider in basic adjustments module
- A significant improvement in the transition from displaying a darkroom image, loaded from lighttable (no more weird background display of a part of the lighttable before the full display of the darkroom image)
- A focus peaking feature (with 3 display levels at the time of writing) that can be activated in both lighttable and darkroom views. This significantly improves the display of sharpness areas of an image, compared to the “focus detection rectangles” of the currently available lighttable view (this mode will remain available).
- The possibility to resize directly and independently, with the mouse, the left and right panels. The size of each panel (left and right) will be stored for each view. It will therefore be possible to have a different size for each side panel, and for each view.
- The possible addition of a white frame around the image, in darkroom view, according to ISO 12646:2008 ICC recommendation. This allows you to visualize the rendering of an image, especially for use at the end of exposure. Be careful, this is a specific use, so the recommendation and practice requires a white frame. Any other color would render the interest of this option obsolete.
- More precise adjustment of dark tones for parametric masks (logarithmic mode)
- Re-apply the last keyword to one or more images with a simple keyboard key
- And some other improvements planned, as well as the usual bug fixes.
This list is not exhaustive and presents the main developments known to date.
About this article
This article is licensed under the terms of the Attribution 2.0 Generic (CC BY 2.0), or, at your option, the Creative Commons BY-NC-SA 3.0 License.
Article co-authored by: Nilvus, aurelienpierre, rawfiner, jpg54, jpv, Ro_G, Matthieu Moy. And thanks to the proofreaders who helped.
Bruce Williams published two videos about darktable 3.0. The first one is based on this article and illustrate it. The second one just complete the “minor” improvements not detailled here. Each videos is about 20 minutes and a good viewing thing to really learn what darktable 3.0 brings to you.

