the purpose of the basecurve is to make the otherwise scene-referred linear (linear raw rgb) color look good on your output devices. this is done independently of any color managed transforms which are also done in the pipeline, so we can establish a certain look independent of the devices. this will affect how highlights and shadows are balanced against each other, the overall contrast of the image, as well as color saturation. it basically boils down to:
Friends don’t let friends view scene-linear imagery without an “S-shaped” view transform. [0]
which is by the way a good reference to read up on, with comparison images between linear, naive gamma mapped, and images with s-curves applied to them.
in darktable we try to match approximately how vendors process their images by guessing the basecurves visually/manually. if your camera is not supported yet or you don’t like the result or just want to play with it, there is also a way to measure the basecurve from a raw and jpg pair.
measuring the basecurve
you’ll need a raw file and a corresponding jpg from your camera. from this we can try to guess the basecurve applied in the jpg. credits for the initial version of this tool go to torsten bronger.
if you think about it it’s surprising that we can get useful information from this, since there is a lot of processing done on chip on your raw data to create the jpg. for example there is white balancing, a color matrix, and then the basecurve (plus a lot more which we’re conveniently going to ignore). actually the tool we use to solve for all these things at the same time is ignorance, so for best results you should make sure your input image makes the impact of those factors minimal:
- take a blurry shot, to rule out effects of sharpening, noise, and denoising.
- try to get as much dynamic range as you can, blacks and blown highlights (you probably need to go one or two stops over what you think you need to make the raw overexpose, too).
- Shoot using the camera’s default image style (often called “standard” not “neutral”) if you have special image filters, hipster modes, dynamic light enhancement things in your camera, switch them off (such as
Nikon Active D-Light',Canon Auto Lighting Optimizer (ALO)’, `Sony Dynamic Range Optimizer (DRO)’ or Samsung Smart Range, etc). - try to make the target appear as black and white as possible (after camera white balancing).
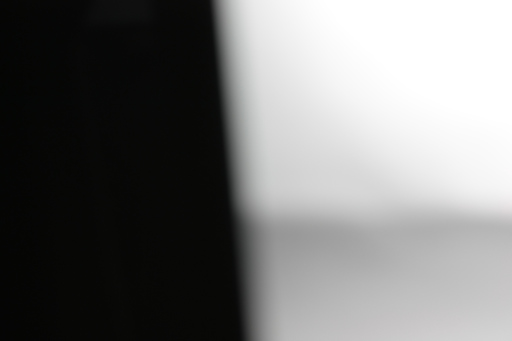
a suitable shot might look like this user contributed shot here:
you will need a git checkout of darktable and build and run the tool as follows. note that you don’t need to compile darktable itself from git, also you don’t need most build dependencies. in the directory of your local git checkout, navigate to the tools/basecurve subdirectory and execute a few commands:
cd tools/basecurve
make
dcraw -6 -W -g 1 1 -w input.raw

# now create the jpg by either /one/ of the two:
# use thumbnail
dcraw -e input.raw && mv inputraw_thumb.ppm inputjpg.ppm
# use jpg you took in raw+jpg mode
convert input.jpg inputjpg.ppm

# create basecurve
./basecurve input.ppm inputjpg.ppm
gnuplot plot
evince basecurve.pdf
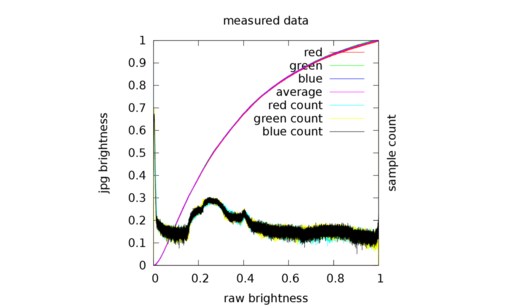
that should look something like


where the last plot compares the green channel to the fitted spline which will be exported for use in darktable. to improve the fit you can give a third parameter to the basecurve tool to set the number of nodes. 20 is the maximum.
using your measured curve in darktable
to use your newly created curve, all you need to do is to copy/paste the output of the script above into a shell. beware, you’re altering your database directly! please back it up first!
it might look something like:
echo "INSERT INTO presets VALUES('measured basecurve','','basecurve',2,X'00000000c2b8d03a2c113f3bfbf7fe3a2c11bf3cc304b33c7c36a13d21750b3e2c113f3e1577ba3ec496ba3e62e7213f7c36213ff4135c3f0000803f0000803f0000000000000000000000000000000000000000000000000000000000000000000000000000000000000000000000000000000000000000000000000000000000000000000000000000000000000000000000000000000000000000000000000000000000000000000000000000000000000000000000000000000000000000000000000000000000000000000000000000000000000000000000000000000000000000000000000000000000000000000000000000000000000000000000000000000000000000000000000000000000000000000000000000000000000000000000000000000000000000000000000000000000000000000000000000000000000000000000000000000000000000000000000000000000000000000000000000000000000000000000000000000000000000000000000000000000000000000000000000000000000000000000000000000000000000000000000000000000000000000000000000000000000000000000000000000000000000000000000000000000000000000000000000000000000000000000000000000000000000080000000000000000000000020000000000000000000000',1,X'00000000180000000000C842000000000000000000000000000000000000000000000000000000000000000000000000000000000000803F0000803F00000000000000000000803F0000803F00000000000000000000803F0000803F00000000000000000000803F0000803F00000000000000000000803F0000803F00000000000000000000803F0000803F00000000000000000000803F0000803F00000000000000000000803F0000803F00000000000000000000803F0000803F00000000000000000000803F0000803F00000000000000000000803F0000803F00000000000000000000803F0000803F00000000000000000000803F0000803F00000000000000000000803F0000803F00000000000000000000803F0000803F00000000000000000000803F0000803F',7,0,'','%','%','%',0.0,51200.0,0.0,10000000.0,0.0,100000000.0,0.0,1000.0,0,0,0,0,2);" | sqlite3 ~/.config/darktable/library.db
if you restart darktable after doing that, you should have a new preset by the name you gave above (`measured basecurve’) in the basecurve module. enjoy!
references
-
[0] Cinematic Color
From Your Monitor to the Big Screen
A VES Technology Committee White Paper
Oct 17, 2012


Go to the install page (http://www.darktable.org/install/) and follow the directions at the bottom for the "git version".
The above code inserts a locked preset into darktables database. And the apply-presets are somehow weird. How can i insert an editable preset?
i guess we'll see once we have a couple of them (probably best to send it to the developers mailinglist).
I would love to be able to run a second base curve so camera independent profiles could be created to mimic the soft clipping of film stock or to allow some HDR like processing.
so yes, curves in dt (shaper curves in color profiles, basecurve, and tonecurve) map the full hdr range [0,\infty) to [0, \infty). you're only just looking at the [0,raw range] x [0,1] range in the gui.
Thanks!
http://www.darktable.org/2012/12/profiling-sensor-and-photon-noise/
I.e. all color corrections, shadow/highlight balancing, etc., take place in a linear space, /before/ this view transform is applied.
But DT applies the basecurve at the /beginning/ of the pipe, pushing everything into a non-linear color space on which all subsequent modules operate. That's the opposite of what the quoted "Cinematic Color" paper suggests.
I pointed this out several times on the list. To really make DT a linear image processing tool, you need to disable the basecurve completely and apply it, at the end of the pipe, by other means (because there is no way to reorder the modules in DT, for the user, at this time).
Have a half open door.
Have the flash illuminate a wall behind that door.
Place yourself on the other side.
Aim so half the image is covered by the door, the other half sees the wall behind the door.
Set exposure so the door will be under-exposed.
Make the flash bright enough to over-expose the wall, half a step over should be enough.
Have manual foxus so neither the door or the wall behind it are in focus.
Shoot.
You should get it after a few tries.
that said, dt works in `perceptually linear' Lab (with some hdr/out of gamut extension), so all the linear rgb considerations only hold up to a point.
i even still have a branch that applies the basecurve as part of the output color profile module, must be years old by now.
major concerns about that are:
- can't move the basecurve because of backward compatibility
- don't want to move it after colorout since that is output display dependent
- needs to work in rgb, so the output color profile module could do Lab->rgb (standardised)->curve->output profile rgb (device dependent)
we can experiment with that again after 1.4, maybe just introducing a basecurve2 module with a different position in the pipe (would be device dependent output rgb, but good enough for a test).
the profiled curves would still be valid as we are ignoring the color matrix.
I'm curious about the above. Presumably you should shoot with the curve you want to replicate. Or am I missing something?
For most cameras the default settings are a bit cheesy with over saturated colours loss of detail in highlights etc. Having the neutral base curve would be great to build further tweaks on.
often this looks a lot more neutral and realistic, less eye-popping and oversaturated than the in-camera base curve. the small bump in the blacks i justify with sensor noise which cannot decrease dark values below 0, so it effectively biases dark areas to be a little too bright, resulting in washed out blacks. i just want to pull those down to counteract that effect.