Most modules in darktable are working on changing pixels color, lightness, etc. Few modules are moving pixels and when they do they are doing it in a very constraint way like to rotate, fix the lens’ distortions or remove spots.
The liquify module offer more ways to move pixels around by applying some free style distortions to parts of the image. There is three tools to help doing that:
- point
- line
- curve

Each tool is based on nodes. A point is given by a single node, a line or curve by a set of nodes which defines the path.
Next to the count, in order we have the following tools:
- hide/show the warps
- the point tool
- the line tool
- the curve tool
- the node edit tool
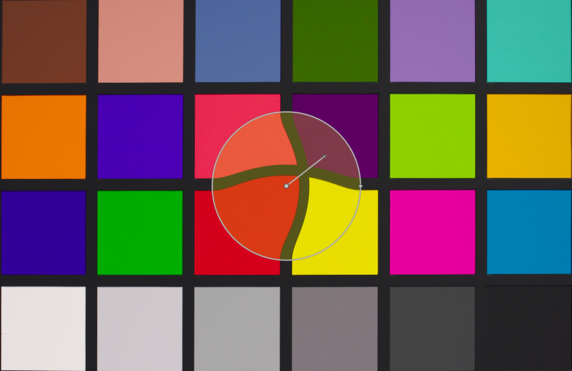
Let’s see what a node does:

- center : with the central point, it is possible to drag this point with the mouse to move it around
- radius : the radius describes the area of the applied effect, that is the distortion occurs only inside this radius. It is possible to increase the radius using the small dot on the circle.
- strength vector : the vector starting from the center describes the direction of the distortion and the strength. The strength depends on the length of the vector.
The point, line and curve tools are all based on nodes as described above. That is, a line is a set of nodes linked together for example.
Point Tool
A point is formed by a single node. In a point the strength vector has three different modes which are toggled using ctrl-click over the strength vector itself.
-
linear : the linear mode make the distortion linear inside the circle. Starting from the opposite side of the strength vector and following the strength vector direction. This is the default mode.
-
radial growing : in this mode the strength vector effect is radial, starting with a strength of 0% in the center and growing when going away from the center.
-

radial shrinking : in this mode the strength vector effect is radial, starting with a strength of 100% in the center and shrinking when going away from the center.

Furthermore it is possible to set the feathered effect by clicking on the center of the circle.

- default : linear from the center to the radius
- feathered : two control circles are displayed and can be used to feather the strength of the effect.
Line Tool

A line is a set of point. The points are linked together, the effect is interpolated by a set of strength vectors.
It is possible to add a control point on a line by ctrl-click on a segment.
A right-click on a segment will remove the shape completely.
A ctrl-alt-click on a segment will change it to a curve segment.
Curve Tool

A curve is a set of point. The points are linked together, the effect is interpolated as a bezier curve by a set of strength vectors.
It is possible to add a control point on a line by ctrl-click on a segment.
A right-click on a segment will remove the shape completely.
A ctrl-alt-click on a segment will change it to a line segment.
It is possible to change the way the points of the curve are linked together by using ctrl-click on the center. There is four modes which correspond to different way of handling the two bezier curve points:
- autosmooth : control points are always giving a smooth curve, this is the default mode in which the control points are not displayed (as automatically computed).
- cups : control points can be moved independently.
- smooth : control points are always giving a smooth curve
- symmetrical : control points are always moved together
Finally, note that at any moment it is possible to right-click on the image to show or hide the liquify controls.
We feel that such tool will be quite handy in Studio photography, but not only.


But really: awesome thanks!
right in darktable without breaking the RAW workflow.
I love any feature that reduces my need for GIMP/PS and allows me to do all my editing in RAW!
New to Darktable (version 2.0.3) and couldn't find this module. Just wondering when will it be available or if it can somehow be installed as an add-on or the program itself updated in order for it to include it. I added the unstable ppa but it made no difference.
I like the program so long, it looks convenient and to the point.
Thanks!!